The creation of an exciting flash drive ios z-pіd windows. Help from the creation of an exciting flash drive from Mac OS X from Mountain Lion to Catalina. Victory MAC OS
At the moment, the only way to get a mandatory update for a Mac is to grab an image from the Mac App Store online store. The decision of the company to switch to digital distribution of the software called out anonymous negative comments - for the obviousness of the decals of poppies of the disturbances, capture the file on the skin of their computers from the Internet. You can fix this problem by making a fancy USB stick with OS X Mavericks.
You need:
- Access to the Mac App Store with an active Apple ID to get OS X Mavericks;
- USB flash drive 8 GB.
Once everything is ready, you can start.
How to create a vanity USB stick with OS X Mavericks
Krok 1: Get a licensed copy of OS X Mavericks from the Mac App Store. Previously, Apple requested an upgrade of its OS cost-free, but it allows you to understand that platform upgrades have been given, which have become wide-ranging in the rest of the hour, and will also be available cost-free.
Krok 2: Run the utility from the Utilities folder.
Krok 3: Select the USB storage device from the left panel and go to the RHD Disk Partition tab.
Krok 4: Specify the item "Split 1" in the menu Scheme of splits, right-handed - the format is "Mac OS Extended (journal)". Name the drive Mavericks.
Krok 5: Click the Settings button at the bottom. Generate click for option GUID distribution scheme and confirm selection. Press Zastosuvati in the lower right corner of the program. Disk Utility to format the USB storage device.
Krok 6: Launch the terminal from the Utilities folder.
Krok 7: Flip it, the USB flash drive was on the space and Mavericks was the only volume with that name.
Enter the command in the Terminal to create an exciting flash drive. Enter administrator password.
sudo "/Applications/Install OS X Mavericks.app/Contents/Resources/createinstallmedia" --volume "/Volumes/Mavericks" --applicationpath "/Applications/Install OS X Mavericks.app" --nointeraction
After 10-15 minutes, the Terminal will complete the creation of the flash drive.
Krok 8: Reboot the Mac from the inserted flash drive by pressing Alt on the keyboard.
Krok 9: You can get started before you install OS X Mavericks!
Apple pursues a policy to install any company on computers that are released under its own brand, control the operating system, and make them super stable. Having bought a Macbook and regularly updating the OS, you can never get stuck with the need for re-installation. Due to the presence of the Internet, the system can be easily reset through the network. Just make sure you install macOS from a flash drive, it's necessary to do it right.
Since 2013, Apple has stopped selling the operating system to core users. If you buy a Mac, it’s a laptop, it’s a mini version, you can rent macOS and secure cost-free updates for the entire term and I’ll add it.
- We know on the Dock panel the icon for the App Store store and that’s it.
- On the main page on the right side, under the parameters of the oblique record, a message is placed, for which you can go to the site from the current OS. The current version is 10.3 High Sierra.
- Click on the "Zapantage" button. The distribution kit "important" is more than 5 GB, depending on the time of the beginning of the trial, it is stale due to the speed of the day, which is victorious.
- If the challenge ends, the installation program will automatically start.
- We don't need it now. We chose to create an autonomous, exciting nose, and we need to shut it down. Pressing on the window of the program, the elements of care appeared on the top panel. We select the item. A similar operation can be performed with the keyboard combination ⌘Q. macOS is a standard solution that allows you to close whether it is active or not.
Old OS versions
If you want to install a different, older version of the operating system, you can also find them in the App Store. El Capitan, Yosemite or Mountain Lion are listed in retail purchases for the mind that the stinks were won earlier. This is due to the license policy of the company. Shown in the screenshots of the OS are considered to be purchased, and the steps are to be rented by Apple.
Creation of an exciting flash drive
To create a disk on a MacBook, it's enough to speed it up with a terminal. macOS works miraculously with the Windows FS and does not override the installed Transmac analogs. The NTFS format is readable out of the box, while FAT32 and exFAT are completely obligatory.
Format the USB flash drive, just like on it, it's like a Linux FS, for example, ext3. Before vikoristannyam znimny disk in any case needs to be cleaned in the form of information, which is on the new one.
formatting
Formatting in macOS is dependent on the help of a disk utility. You can find out by opening the Launchpad at the “Inshi” daddy or by scrolling through the Finder. Vibermo another option, as zruchnishy. A flash drive, traditionally for modern OS, can be no less than 8 GB.
- Open the Finder and in the navigation area select "Programs". I've marked the folder on the screenshot.
- We select the specified utility.
- Shukaemo zovnіshnі disks. We choose the name of the flash drive given by the picker, we see it. At the top menu of keruvannya, the button "Erase" is activated. We press on her, to open the coming dialogue.
- The system automatically sends us the format and distribution scheme. The stench is guilty of escaping from the testimony on the screenshots. To clean up and format the USB flash drive with the selected parameters, press the button assigned.
Now, zero information is left on the old nose, and you can write a distribution kit on it.
Distribution record
Requested by us in the App Store the file is not an ISO. Full installation master with its own set of utilities. Therefore, the system places yoga in the program folder, and not in the zavantage. Call me її and write it down on your old nose.
- Turn to the "Utilities" folder and launch "Terminal".
- Enter the command to enter the name of the system administrator:
You don't need paws, but instead of Kingstone, you can tell by the name of the flash drive that wins.
- We enter the password. With this, the symbols are not displayed. We finish by pressing the Enter button.
- The system will request confirmation of the cleanup of the selected volume. Enter Y and press the enter key.
- Before that, how to copy the data, the system erases the flash drive.
- The record will end with the appearance of informational reminders about the creation of an exciting wear and transfer to the new data necessary for the installer.
The command syntax for writing is changed by the skin distribution. So, if you are choosing to work a USB flash drive to reinstall macOS, in High Sierra view, see the indicated side of Apple's tech support. When the call command is ready, you can immediately copy it to the terminal.
Installed macOS
Having connected the nose to the USB port, it will be possible to re-attach. Mac computers do not change the default BIOS, so you don't need to fix anything.
- Our task is to prevent the computer from getting addicted to the SSD and launch the menu for selecting the primary volume. To that vіdrazu, when reloading, we press the Option key. Utrimuёmo її before the appearance of the dialog shown on the screenshot. The Windows volume will be present in that case, as it is installed on the Boot Camp partition. Here it is necessary to translate the indication of the arrow symbol from Macintosh HD to the installer icon.
- We choose the language, as the menu and dialogues will be displayed.
- For a "clean" installation, we need to open the disk utility.


If you want to visit our website for information about everything related to technology, programs and services from Apple, iOS or Mac OS X, iTunes Store or App Store, write to us via .
We have come across such a request:
Good day friends.
I have a viniclo power supply for the Terminal.
In the rest of the hour, I often ask how you can create an exciting USB flash drive with Windows. Be sure to tell me what I don’t know, and what you need to google. Ale, everything turned around, for days she needed a flash drive, ale didn’t know anything worthwhile at the merezh. I know a lot of commands for capturing a flash drive, and even then I didn’t take off the result, which I was so inspired by. Tell me, please, what is the way to burn a USB flash drive with Windows for help to the Terminal or any other programs
Zazdalegid dyakuyu
Good afternoon!
No Terminal, no matter how third-party programs are needed here, because create a captivating flash drive Windows z-pіd Mac OS X you can for help vbudovanogo in the system Helper Boot Camp. Vzagali, Boot Camp Assistant - singsongly, the most mysterious utility for newbies at the OS X warehouse, like walking around a little bit. In fact, Boot Camp Assistant doesn't change anything in OS X, much less in the Mac's EFI firmware. This utility has only three words:
- prepare exciting Windows laptops
- Get Boot Camp Drivers for Windows Mac Usability
- create an add-on for Windows on a Mac's hard drive
To create a custom Windows flash drive from the image, launch the Boot Camp Assistant, press the continue button on the start screen, then check the box "Create a Windows 7 installation disk or newer":

On the next step, ask you to connect a USB flash drive to the computer and get ahead, so that all the content is shown on it. Here you will need to specify the path to the Windows image:

Then let's start churning out the image of a flash drive, like a loan close to five khvilin.
It’s worth considering that you need a key-to-key Mac for this creation, otherwise you need to install a whole virtual machine for the shortest time, so that after installing Mac OS (!) on it, you can also download the evil flash drive there 🙂
Friends, everything is much simpler, we don't need 7-zip, OS X installation image and BootDiskUtility. ALL!!!
Let's get started:
1
. Revіryaєmo rozmіr zavantazhuvalnogo rasdіlu z clover in Options —> Configuration.
Obov'yazkovo may stand a tick instructed Boot Partition Size that yoga expanded, embossed OK. Before we speak, now the zavantazhuvach has come to us from the Internet, about scho to mark the appointments with a tick on the item “Zapantazhuvati” DL
at the dzherelah for Clover Bootloader Source.
2
. In the main window of the BootDiskUtility program, select Tools, then clover Fix Dsdt mask calculator.
If you want all the checkboxes already and affixed in the back, we have sorted them out in the DSDT tables, which is even more helpful when Mac OS is installed, even if it’s necessary to add a more advanced middleware EFI Aleshchey and available to explain how to practice for your "special" possession.
3 . After which format we need a flash drive, pushing format disk mainly in the program, then OK. With such a radical approach, two divisions will be created on the flash - the first one is from the exciting Clover, and the other is still empty. Ale Windows is not a building to take such a charming picture, to at the conductor it’s better to take the first part out of the zavantazhuvachem.
4a. El Capitan [for Mac OS X 10.11] Just wanted to make some preparations for the expansion and installation of 5.hfs with the rest of the OS from Apple.
4b. Yosemite [for Mac OS X 10.10] I’m telling you to take advantage of the already prepared image of the distribution for installing the distribution of 5.hfs, which includes such necessary changes, as a copy from replacing the Packages folder on the USB flash drive in /System/Installation/ from OS X Install ESD/Packages and the location of the files in BaseSystem.dmg and Basesystem .chunklist at the root directory.
Check, at the systems Mavericks (10.9), Yosemite (10.10) and El Capitan (10.11) name the branches for updating the same - 5.hfs.
4c. Mavericks [for Mac OS X 10.9] Here it is even simpler - unpack the file from the dmg archive from OS X Mavericks 5.hfs Vіn i є our zavantazhuvalny razdіl. Abo zavantazhit only yogo and go to point 5!
4d. mountain lion [for Mac OS X 10.8.4 or 10.8.5] Let's leave the flash drive in peace and fix it with the replacement rank. In order for the installation to start anyway, it will be necessary to repack the sprat, adzhe DMG — just archives, v_dkrivaєmo yogo at the program 7zip or we can take a different route and take advantage of such a necessary distribution 3.hfs.
I draw a new file 2.hfs
Let's just do it, as we opened the first archive, we go inside the file. 2.hfs And marvel at the expansion of packed folders. Choosing the greatest of our speed, we get as far as we need InstallESD.dmg who lives at the address ... 2.hfs \ Mac OS X 10.8.4 \ Install OS X Mountain Lion.app \ Contents \ SharedSupport \ take yoga to the world
Vіdkrivaєmo our innovations InstallESD.dmg and vytyagaєmo z new ... another one InstallESD.dmg in the InstallMacOSX.pkg\ folder. Life is an unfathomable thing, but take a bite out of the way already, it’s good for that, we’ve given it. When a file is scanned, the archiver will mark the zbіg іnіmenі i zaproponuє zamenu, alemi vibero Rename automatically and our new file will be named InstallESD_1.dmg
Axis mi and distanced. From our InstallESD_1.dmg stand up 3.hfs vіn - exciting distribution of Mac OS X 10.8.4
5
. We go back at BootDiskUtility and selectable another split on flash drive, we need to renew the current distribution, we choose Restore Partition- I sweat our dear 3.hfs for OS X 10.8 or 5.hfs to install Mavericks or Yosemite/El Capitan, depending on what was selected in steps 4a-d. Copying a loan for an hour and then you can boldly collapse further!)
You need a flash drive if you want to install MacOS Mojave on a clean hard disk or SSD. It can also be costly for the installation of the system for the day-to-day connection with the Internet.
Before proceeding, please install macOS Mojave from the App Store.
If you are interested, check that the OS is in the catalog of the programs.
Madness from macOS Mojave
Your Mac must have at least 2 GB of storage and 12.5 GB of free space on disk, or up to 18.5 GB of free space when upgrading from OS X Yosemite or older versions.
macOS Mojave can be installed:
- MacBook, released on the cob 2015 later.
- MacBook Air, released mid-2012 later.
- MacBook Pro, released mid-2012 later.
- Mac mini released in the end of 2012 or later.
- iMac, released like 2012 later.
- iMac Pro (all models).
- Mac Pro, released in 2013, mid-2010 and 2012 with a video card that supports Metal technology.
Preparing the USB drive
You need a USB flash drive with a minimum capacity of 16 gigabytes. All the data you need to move from it in the next place, the oscills for the hour of the formation of the exciting accumulation, all the information that is known on the new one will be spent.
Before the creation of an opportunistic hoarder, I recommend formatting yogo.
Connect the flash drive to the computer. Open Disk Utility. Choose a flash drive from the proponed list. Press the "Delete" button on the screen, stashed at the top toolbar of the utility.

Let's come soon to recognize im'ya nakopichuvacha - a simple word, as if introduced by the Latin alphabet. You won't need it at all. In the list of available formats, you need "Mac OS Extended (Journaling)". Scheme: "GUID distribution scheme". Press the "Delete" button on the dialog box. Formatuvannya kopychuvacha trivatime deyaky hour.

Method #1. System problems
Connect the flash drive to the USB port of the computer and format it for the additional system utility for working with disks.
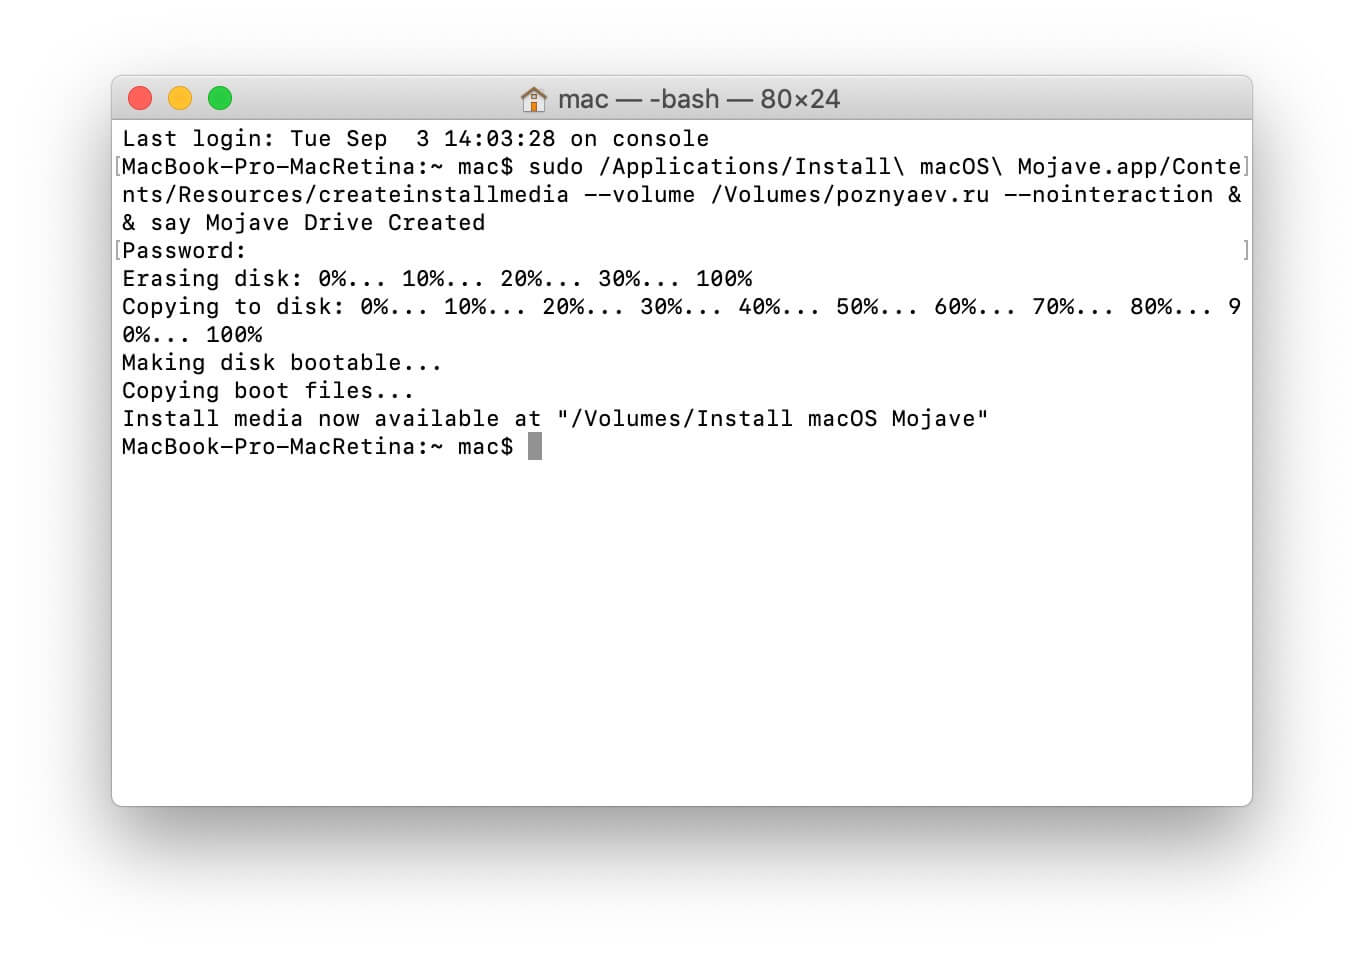
Open "Terminal" and instruct there:
sudo /Applications/Install\ macOS\ Mojave.app/Contents/Resources/createinstallmedia --volume /Volumes/[Name of Your Accumulator] --nointeraction && say Mojave Drive Created
Deputy [Name of your accumulator] enter the name of your flash drive.

At the request prompt, enter the administrator's password.

Molding of an exciting flash drive for the next hour. At the process of the work of the Terminal, it will be shown to you, on the scales of hundreds of thousands, the order has been made.
With a bag of successful completion, I will inform you:
Install media now available at "/Volumes/Install macOS Mojave"
The reviewed method is not foldable, but if you allow the graphical interface to prevail, then you can speed up one of three third-party utilities.
Method #2. For help DiskMaker X
Insert a USB flash drive.
Obtain a software tool from the retailer's website.

Open the DMG-image of the program, and then drag it to the icon of the "Programs" catalog.

To launch the program, use Lauchpad or Spotlight. To confirm the installed tool in the window, you need to click on the “Use this copy” button on the screen.

Click on the "An 8 GB USB thumb drive (ERASE ALL DISK)" button.

Choose a flash drive from the transfer, as you choose to install it, then confirm the choice by pressing the “Choose this disk” button.

At the next window, press the "Erase then create the disk" button. Tsієyu dієyu vy give your zgoda to see all the information from accumulating that yogo formatuvannya. As if important files were lost on the new one, before this time you have the opportunity to save them in another place.

Press one of the buttons: I'm more a light mood (light) or I want to come to the Dark side! (dark). In this rank, you assign the theme to the interface.
Enter the computer administrator password.

The creation of an avant-garde hoarding trivatime kіlka hvilin. On the screen will be displayed information about those, on skilki vіdsotkіv zavdannya vykonan.
Method #3. For help Install Disk Creator
Take advantage of the easy and cost-free utility on this site.

Before working on the cob with the utility, you grabbed macOS Mojave from the App Store and connected the USB flash drive to a USB port.
The whole process of robotic software tool is fully automated. You don't need to designate the field for the utility so that you can know it in the mountains, like a flash drive will become exciting. Then press the "Create Installer" button.

To show up for confirmation of formatting, click "Erase disk".

Mayuchi in your order zavantazhuvalnuyu flash drive, you can install the system. A single mindset is the sum of your computer model with macOS Mojave.
Insert the flash drive into the socket. Reseat the computer by pressing the Option (Alt) key. Select the preferred flash drive from the requested list of available storage devices. If you don't have to do it, you need to follow the instructions of the system installation master.
As a result, the computer's entanglement with these flash drives, as you have done, will appear in the installation tool of the operating system. Here you may be able to upgrade the system, install it, speed it up with "Terminal" or "Disk Utility". The upgrade or installation process takes close to a year, often a troch less. For the whole hour, the model of the computer and the productivity of the hard drive are added.


