Low format HDD WD. Low format hard drive
Flash drives are a popular accessory for storing important information or for transferring data between multiple computers, if it is not possible to transfer it in other ways. Regardless of the high reliability and ability of a large-time recording, due to the influx of various factors, chips and memory sections wear out, which can lead to various failures problems, and information is read and recorded with respect. As a result, the system may format the flash drive without opening it. You can try to check the disk for errors or update the data and continue to use it.
The last resort for updating the usefulness of a flash drive is low-level formatting.
But if everything is already bad, then no new formatting will help, only low-level formatting will help. This will help you fully improve the functionality of your flash drive, as well as avoid errors and failures. This article will look at the report on low-level formatted flash drives, as well as software that can help.
Let's start with the way the file system is organized. The entire file system is divided into tracks and sectors (the so-called clusters), which are of a large size, which, in turn, are combined into sections and directories. Depending on the file system that gets stuck, its principles of organization and expansion may change. All service information is recorded in the memory of the controller, which ensures access to the required memory location. When you transfer data to your computer, the file is split into chunks the size of the cluster and written to the next sector of the disk. When read, the controller expands to the required sector, and you are denied access to the data.
For any reason, the expansion of sectors fails, for example, when recording or reading a large volume of data and removing the flash drive from the connector, the controller cannot correctly navigate to the required sector, and parts of this partition are corrupted. Low-quality formatting allows you to remove deleted memory sectors on the disk and clear other controller information. In other words, you are removing microprograms from flash drives or memory cards and erasing the file system. In order to continue using your flash drive, you will need to format it in the original way.
Should we still carry out low-cost formatting?
- Additionally, clean up any loose files that have been lost on the flash drive, especially if they can’t be deleted normally using an additional antivirus or update.
- The latest and greatest way to remove secret and important data is to disable the ability to retrieve them using additional special software.
- Prevention of damages for the detection of bad sectors and damaged files that affect normal functioning.
- To update the private sector, this is because the flash drive is physically usable, but the system cannot deny access to the files.
In order to complete this procedure, you will need a special security program. Let's take a look at some of the most useful utilities that can help you. Because all of them support all the main models of storage devices, but some of them may have their own characteristics, in such cases you will have to share a utility tailored to work with the devices of a particular manufacturer.
A look at the most powerful utilities
A utility for low-root formatting of flash drives and other media is already in place. The program is designed to reanimate them in any hopeless way (well, except for physical defects in microcircuits and controllers that do not renew), and also completely erase any information this without the possibility of renewal. The program permanently erases the disk partition table and then marks it as a new one.
Program capabilities:
- Full support for any model of flash drive or disk from popular manufacturers.
- Consider all possible connection interfaces.
- Detailed information about Wikonan robot.
- There is the possibility of a cost-free version and the availability of a paid version.
How to properly set up a utility?
- Download the installation file from the site and run it.
- Before the first launch, click the Continue for free button.
- Find your flash drive in the list of available storage devices and click on its name.
- Select from the list of possible operations Low-Level Format - Format This Device - Yes.
- After completing the procedure, open Windows Explorer, right-click on the flash drive and select “Format”.
- After this, you can quickly use your flash drive.
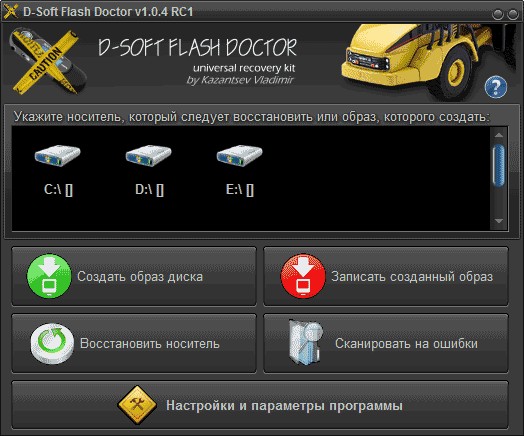
A admin utility for performing low-root formatting with a Russian interface and minimal use of computer resources. The program does not require installation, as it works in portable mode. How can they benefit from it?
- Please be sure to run the installation program file.
- In the main window, place the cursor on the disk that needs to be formatted, and click the “Renew media” button.
- When the process is complete, click the “Done” button.
- Format your phone the original way through Windows Explorer.
Utility, supported by a vicor with JetFlash, Transcend, A-Data. You may have mercy and get another flash drive. What are the features of the program?
- Fully portable.
- The minimum number of buttons is two in total – “Start” and “Exit”.
- The work is in the gloom, so the need for a computer is less.

You need to download the installation file, run it and click the “Start” button. Really simple and quick.
SP USB Flash Drive Recovery Software
A proprietary utility from the leading manufacturer of portable storage devices, Silicon Power. It’s no less important that if you put a standard identifier device on your flash drive from another device, you can safely use it quickly. Why do you need:
- Download the installation file and run it.
- Select a flash drive from the list.
- Press the button to start the update.
In just a few seconds, you can do everything you need to do.
While Kingston has a significant share of the portable media market, it also offers its customers the utility of upgrading the usability of USB flash drives. It is also not overloaded with functions, it has necessary functions and practically does not overwhelm the system. To format a flash drive using this utility, you need to:
- Capture it and save it in your folder on your hard drive.
- Open the archive, press the Unzip button on the automatic unziper to open it, and select the folder where you want to save the unzipped files.
- Go to the folder where you unpacked the utility and run the program file.
- Select a flash drive from the list of disks and folders and click Format.
- Wait until the program finishes its work to begin using your USB flash drive.

A universal add-on for formatting flash drives of various printers. It is completely costless and even effective in the fight against corrupted sections and sectors. Cream formatted, the program is equipped with the following functions:
- Support for almost all current transmitters and models.
- Works on all current versions of the Windows operating system.
- Checking and correcting pardons.
- Shvidke format.
- Deep and traceless visibility of all recorded data.
- The most recent log of work operations.

To speed up the program:
- Click on the program and launch it.
- Select a flash drive and file system format from the list.
- Come up with a name for the disc.
- Press Format disk.
- Wait for the procedure to be completed.
Visnovok
Carrying out low-level formatting, regardless of the high volume of software, must be done with care, otherwise there is a risk of irreversible damage. Tody will have to go and buy a new nose. In the comments, we ask you to write what program you used to format your USB drive.
Low-level formatting involves partitioning a hard disk or flash storage into sectors and tracks from recording data for your work. During this process, all information that was on the nose is completely erased, without the possibility of updating it.
Options
Low format flash drives or hard drives should only be used because the code needs to prevent the flow of confidential information from being passed on to other people. This process involves government services that work with publicly accessible information and private structures (to save industrial and commercial secrets). In addition, low-quality formatting of flash drives and hard drives can lead to blocking of damaged segments of the device during this process. Regardless of the fact that current hard drives can automatically skip zipped sectors (although the risk of failure is also present in them), older-generation laptops are not in the frame of this work. The fortune-telling process must be carried out in a preventive manner to ensure reliable processing of accumulated information.

How to carry out a low-cost format?
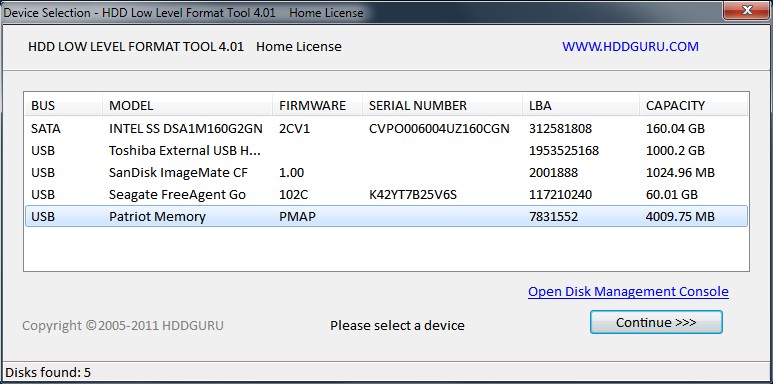
This process is carried out by the hard drive manufacturing plant with the help of specialized equipment. It is practically impossible to fully develop them in domestic minds. However, the original security program is as close as possible to low-level formatting, which is completely sufficient to protect confidential information recorded on the device. One of these programs is HDD Low Level Format. Using it, you can carry out a low-level format of a flash drive or hard drive. First of all, we need to install the software and launch it. There is a notice about the addition of a new version of the program, which, instead of the cost-free version, does not interfere with the speed of the rewriting process. Koristuvacheva has a choice: add a new version or continue to work without costs. Next you will see a list of media available for the formatting process. You need to select the required drive and press the Continue button. Next, a window will open in which information about the media, including hundreds of formattings, is displayed. Please note that all the money will be spent. As soon as the client agrees to leave the program, the process starts. After completing the program, you can close the program. However, you should know that the low-level format erased all the information on the disk, the layout of sectors and tracks, recorded service data, and did not record the file table, so it is impossible to access such a device. For this purpose it is necessary to carry out a highly advanced format. Let's take a look at what is needed.

Formatting a disk in the Windows operating system
1. Go to the “My Computer” section and select the required device from the list. Press the right button on the bear and select the “Format” option.
2. In the window with parameters, click “Start”.
3. Be aware of the loss of data. We press “Ok”.
4. The formatting process begins, which will end with the speed. When finished, close the window. That's it, the device is ready for work.
Hard disk formatting is a software process of applying marks to elements of the memory area of magnetic plates and creating a new file structure of the device. Without marks and file system structure, the hard drive is a physical device, recording information that is not possible through the physical and software features of the recording processes, saving and reading information.
Physically, when the hard drive is formatted, nothing is stored on it, but the software on the drive organizes its logical structure - a new order, necessary for recording, saving, editing and deleting data. Another logical structure of a disk is called a file system. Depending on the selected file system, the speed of access to information, the maximum number of file names, the number of files in one directory, the efficiency of storage robots, search methods, recording information, etc. will be in Get teased.
Hard disk formatting is divided into two types. The price is low and high format.
Low format formatting is a process in which special electronic marks, called servo marks, are applied to the magnetic surface of the polished plates of your HDD. They contain service information about the position of the reading heads and the positions of sectors and disk tracks, which indicate the physical format of the storage device. This procedure is completed on a special factory equipment, since until now on the nose there will be any information about the sectors and tracks of the plates (s), through the presence of any robot with the nose it is impossible. Due to the coefficient of volumetric expansion of materials (which is evident from school physics lessons) from which HDD plates were prepared in the past, the motors used to control the position of the heads, the sectors and tracks were shifted shodo zreading heads. In this way, if, in the controller’s opinion, the head was in the required sector, it could physically be on the court track. As a result, there were malfunctions in the work of the hard drive and broken (inappropriate) sectors appeared (since the controller cares that the head is in the first sector, but in reality it is positioned, for example, above the 5th, then the first sectors are inaccessible to it i). Such hard drives required repeated low-root formatting throughout the entire service term, which required a permanent and repeated reduction of all plates located on the platter/platters of the data hard drive.
In new HDDs, this problem was caused by the distortion of the sound coils in the read head mechanism, which is why the increase in temperature expansion was compensated by the recalibration of the parameters of the disk heads being operated (to put it simply - everything was controlled by the software beyond simple redirection).
Low-quality formatting is necessary for a number of problems and comes down to the following situations:
- on the productive efforts of the fermentation plant to create the physical structure of the prepared hard disk before its testing and production;
- on old hard drives to reset the file system (through the coefficient of linear expansion of materials, when the HDD head is heated during normal operation, the head is destroyed in relation to the grid of tracks and sectors, what was formed);
- completely and irrevocably erasing all information that was stored on the hard drive, for example, before selling a laptop or hard drive.
High-quality formatting of HDD is the process of forming the file structure of a hard disk, which is related to the main data record, file table, file system structure, depending on the formatting option, re-inspecting the surface of the hard drive platters for signs of defects sectors with their further replacement or deactivation. Following a high-root format, the hard drive is prepared to use the same operating system to save data.
The high-quality format is divided into two types: Swedish and external. The Swedish process updates the file table, which stores file names and paths to them, attributes, etc. After the process is completed, the operating system will classify the hard drive as clean, although all information will remain unfinished, except for the file table - all data in it will be designated as unnecessary during the process will be overwritten with new bits of information.
External formatting is a procedure for clearing the file table, as soon as a quick formatting is completed, and then subsequently overwriting the skin sector with zero bits of information. Also, with a new format, all sectors of the hard drive are checked for efficiency. If a bad sector is detected, it will be replaced with a useful one, which is in reserve, or simply turned off, which will slightly change the color of the HDD.
High format hard drives and their partitions must be converted in the following cases:
- under the hour of reinstalling the operating system to reset all data that is on them and forming a new disk structure;
- under the hour of expanding the accumulation onto logical disks;
- for a clear inspection of magnetic plates for the presence of damaged sectors on them;
- Immediately after the low-root format, the file structure of the disk is formed by a virobnik or koristuvach (obov'yazkova procedure);
- You can delete all the information that is on the hard drive.
2. Format a non-system hard drive
Any operating system of the Windows family is installed on the disk or partition, which is designated as system. This contains the main control record and Windows system files, which are responsible for the interaction between the software and the hardware. There may be a number of such partitions, but, as a rule, the client has one operating system installed, which may be considered a single system partition. All other partitions and hard drives connected to the computer are not system drives. Non-system ones include other hard drives, so the procedure for formatting them is in no way different from formatting regular USB drives.
We will look at the methods of forming the file structure of non-system hard drives with the help of features incorporated into the operating system and with the help of third-party software products developed for working with hard drives.
2.1. Format using additional BIOS
One of the ways to format a hard drive is to use a private flash drive or a CD with an installation distribution of the Windows operating system, the so-called LiveCD, or a private media with one of the programs for formatting media. formats. There are versions of programs, such as AcronisDiskDirector, that can be downloaded directly from a flash drive, which transfers it to the robot without an operating system. In other versions of Acronis there is a master of creation of innovative noses. This flash drive allows you to use the AcronisDiskDirector program from BIOS and format your hard drive.
In addition to third-party programs, formatting the hard drive from the BIOS can be disabled by downloading from the installation disk with the Windows distribution using the command line or the operating system installer. More details about all these options are available below.
2.2. Windows formatting
The Windows operating system contains all the tools necessary for formatting hard drives. In this section, we will look at all the methods for formatting a hard drive that are available for this purpose and that are provided by the Windows operating system.
2.2.1. Through the authorities
The easiest way to prepare the hard drive before work is to clear it of unnecessary information and form a new system - formatting through the context menu.
2.2.2. Through “Creating and formatting hard disk partitions”
Another way to format a hard drive using additional tools of the Windows operating system is the “Disk Storage” snap-in, which is located in the “Computer Storage” system console.
"Disk Management" is a Windows system service designed to manage flash drives, hard drives and their partitions. This program allows you to format hard drives connected to your computer in one of three file systems and create new partitions on them. All operations can be completed without reinstalling the operating system, which does not distinguish the user from the main work.
You can launch the Disk Cleaner program in one of these ways.
Via the Start menu

Via “My Computer”

Via "Control Panel"

We launched the “Keruvannya Komp’yuter” service. Then you need to go to this section under the name “Disk Management”, which is also located in the “Storage Devices” section.

During the formatting process, you will not be able to download the desired windows from the progress of the operation, next to the “Format” text in the “Stan” row (extraordinary screenshot).

Our hard drive is formatted with the selected file system and is ready for further use. You will be notified about this by a dialog box and a system signal.
2.2.3. Team row
In addition to formatting hard drives through graphical interfaces, the operating system, even from the console MS-DOS, allows you to form a new hard drive file system from deleted existing files and, with a new format, revise its surface for integrity, with the help of system commands entered from the command console, also called the Windows command interpreter.
The command line allows the user to interact with the computer directly without any intermediaries such as third-party software. It is finally possible to enter reasonable text commands into the operating system with zero parameters for direct control of the operating system or computer equipment. Naturally, in addition to the command row, you can quickly format the hard disk. For this purpose, we launch the system console, either using over-the-counter methods or in a way that works best for you.
Via Vikonati

Via the Start menu

For help with Windows Explorer
The command line is launched by clicking on the file cmd.exe, located in the System32 folder of the system directory of the Windows operating system. To launch the command line, you can go to c:\Windows\System32\cmd.exe or use the shortcut to launch the command interpreter.
Having launched the command row, there is a black screen at the end where you can enter text commands designed for the Windows operating system, starting with the first versions.

If you did not enter a label, the operating system will ask you to enter it before formatting or deleting the hard drive without a name by pressing Enter (amazing screenshot).
The process of formatting the hard drive, depending on the settings and storage procedures, can take anywhere from several seconds to several dozen minutes. The formatting is accompanied by the text: “Creation of file system structures.”

After the process is completed, the console window will display the following message: “Format completed” and the results of the operation will appear.

Now our hard drive is formatted behind another system console and ready for further use.
2.3 Format the disk using the HDD Low Level Format Tool
The HDD Low Level Format Tool, or HDDLLFT for short, is designed for low-root formatting of hard drives and digital storage media based on memory chips. It copes well with tasks in situations where the magnetic surface of the plate is severely damaged.
Carrying out the procedure for formatting a hard drive through the utility does not require any special knowledge of the user.

Please note that the cost-free version of the HDD Low Level Format Tool has a formatting speed of 50 Mb/s, so for the significant obligations of current hard drives, under the hour of full formatting by checking the storage on bit sectors, you can lka godin roboti. Another feature of the program is the ability to specify the size of the cluster.
3. Format the system hard drive
A system hard disk is, as a rule, a high-speed hard drive (the speed of the platter wrapping is equal to 10,000 rpm, although it can be a standard 7200 rpm) hard drive, on which the operating system is installed. Having said that, you won’t be able to format it using Windows methods. Formatting the system hard drive is carried out using a different method, the essence of which is the formation of a new file system of the primary hard drive. The only difference is that the utility for creating a new file system must be launched from the installation disk or flash drive.
3.1. Format using an additional flash drive or disk
3.1.1. Through the Windows operating system installer
One of the most common methods is to format a hard drive, which is considered to be a system drive, or a portable media or CD, or an installation distribution of the Windows OS.
How to create a beautiful nose is not clear to us, because of which a lot of articles have been written on the Russian Internet segment. Let's get straight to the point.
- We insert the flash drive for storage into the USB socket of your computer or laptop (or a CD into your drive).
- We restart or reconnect the computer.
- As the device to which control of the system is transferred, we select our device (our version has a 4 GB USB flash drive for accessing the UEFI connection).

- Once Windows is installed, you select the option of installing the operating system (with a different interface of the manufacturer, third-party or third-party systems, the essence of the process will remain unchanged).
- Select the language setting. It will, of course, be Russian, as well as the keyboard layout and format.
- We are pressing “Reinstallation…”.

- Type “Ok” to confirm your intentions.

Once the basic I/O system has been installed and initialization and testing has been carried out, we begin to click on the button for selecting the desired device.
This key can be “F9” or “F11” (the manual instructions for your motherboard or laptop), and these data are displayed when the BIOS is loaded.
At the hour when such a black screen with writing appears, I press a button on the keyboard.

Information will be read from the backup program, which will transfer control to the BIOS.
The next window is simply stamped “Install ->”.

Become familiar with the operation of the operating system and become thoroughly familiar with them.

Let's switch to another option so that you can use it in the hard drive setup menu.
Behind the additional keyboard and mouse manipulator you can see the necessary hard drive, since there is a cable connected to the computer, and the “Disk Setup” is stamped.

The toolbar will change slightly.
Click on the “Format” button.

It is standard that all files and programs on the disk will be deleted.
After clearing the space, the hard drive will be formatted and ready for installation of the operating system.
This method is reasonable to use in cases where the Windows operating system cannot format the hard drive, for example, through those that are not affected by any program or system partition.

3.1.2. Format the system hard drive through the command line, using the installation disk/flash drive
Another difficult option is to format the disk on which the operating system is installed - by using the command line, using the disk or flash drive with installation files for the Windows operating system.
3.2. Acronis Disk Director
- To launch the Master of Saving Savings, go to the “Backup and Update” tab on the program panel, like Wikonana in the style of the page, like Microsoft Office, starting with the 2007 edition.
- Click on the item “Create a fancy nose.”

- Depending on the version of the program, you may be prompted to select the type of wearable wear. It is recommended to select the download option based on Windows PE. Click “Next”.

You can select the type of Acronis flap nose.

- Then we confirm our intentions to write program files to a flash drive, having previously found all the files on it, and check for the completion of the recording process.
There is no doubt about the attraction from the created accumulation.
For this purpose, we renovate the computer and choose our flash drive as a favorite device. You should also try to change the priority in the list of storage devices (Boot menu item) in your BIOS or use the hotkey to select storage devices.

In most cases, during the initialization procedure that is required before installing the operating system, you must press the F11, F9 or other key to access the integration menu. Select a USB storage device and press “Enter”.

There is an obvious fascination with programs.
This procedure is a little more complicated than that of Acronis Disk Director in Windows.
- We select our hard drive and select the procedure for formatting it using any method:

- In the dialog box that appears, select the parameters for formatting the hard drive:
- file system – it is recommended to use NTFS to support files larger than 4 GB, which is not available for FAT and FAT32;
- The cluster size is set to “Auto” because you have no idea what this value is. However, to save a large number of small files, it is recommended to select a cluster size of less than 4 KB;
- A note to this is to enter the name of the hard disk or leave the field empty.
- Once you have entered the actions you have created, we check that the parameters are correct and press the “Continue” button.
We select the necessary components on the basis of which we can create a unique flash drive.
To format a hard drive, the AcronisDiskDirector program is completely sufficient. If you prefer a tool for creating backup copies of partitions, also select AcronisTrueImage.

Having set all the parameters, we turn to the toolbar located at the top of the screen. Click on the button under the title “Stop completed operations (1)”.

After recently becoming interested in the list of operations, a small window with their report description and parameters will appear.

After a few seconds of fixing the operation, the hard disk formatting procedure will start.

Be careful, the program will not show you the confirmation window before you finish the operation and will not inform you about the exhaustion of all data located on your hard drive.
Formatting will take a few seconds, as the utility uses a quick formatting algorithm. After completing the procedure, the window will close automatically, and the hard disk with a cleaned file table and a new file system will be ready for further use.

3.3. Paragon Partition Manager
Paragon Partition Manager is the most powerful software product that can be easily deployed anywhere for working with hard drives. Of course, for your help you can format either your hard drive or your partition. In addition, the utility can work with backup copies, change and create logical partitions, install multiple operating systems on the disk, etc.
- We recommend LiveCD or the installation distribution of the Windows operating system, which includes the Paragon Partition Manager program.
- We record the image on a special device and install it from it, having specified in the BIOS the highest priority for storage from a flash drive or selecting the storage device with the Paragon Partition Manager distribution as the storage device.
- We select our program using the mouse cursor or the cursor keys and the “Enter” button, from the graphical menu that is used to create a LiveCD.
- The utility menu will appear, where we select “Partition Manager” from the list, and then from the right frame.

At the next window, from the list of your hard drives, select the one you want to format.
You can find it both in the “Disk Panel” tab and in the bottom frame under the title “List of Partitions”.

- Click on the context menu of the magnetic storage device and select the “Format” command from it, which will be completed in one of the first places.

- Indicate the file system and the new hard drive label.

- Click “Additional parameters” if you want to change the number of sectors in one cluster. Also here you can specify, select format using the “format” command built into Windows, which we learned about formatting a disk from the command console, or use the powerful algorithm of the developers.

Tisnemo "Formatuvati".
The program will not ask for confirmation of this operation, and will not run the assigned command.
For this purpose, we will emboss on the “Set Change Intentions” button, which is located in the toolbar under the main menu.

To review the change settings, select the button next to the magnifying glass.
- In the dialog, you will be prompted to make changes by clicking “Yes”.

- We check for notifications about the completion of work programs.

Those who are afraid to go through the smut of the program menu.

4. Possible favors and ways of their decisions
One of the many problems that arise when formatting a hard drive is the corruption of outdated software. It is also caught through those who, for many years, do not update the work program with disks that they trust. Also, searches for the command “to get rid of acronis malware” often lead to the most popular sites, which for many months have been in the first places of search systems and replace outdated versions of software.
Make sure your hard drive versions are up to date, especially if you are using one of the other versions of Windows.
Another problem is a problem when trying to format a disk, especially system partitions. Also, any add-on can be used to format your hard drive or any other partition, don’t forget to use the reading mode if you want to format it. The way out of the situation would be to use commercial LiveCDs or media from the Windows distribution.
A problem in the process of formatting a hard drive due to a large number of bad sectors occurs when a problem occurs outside of formatting the hard drive, which is explained by bad memory. Run a HDD scan, for example, using the Victoria utility, reassigning corrupted areas or excluding them from the area that is used to save information.
It’s no secret that you can format a USB drive or hard drive using the features provided by Windows; just right-click on the hard drive and select “Format” in the context menu. What can this system utility really do and what is it good for? If a bad sector is detected on the disk, the format procedure will not show you the necessary information about it, leaving the cluster writable along with other areas.
To ensure maximum flexibility when formatting, we understand that this is an alternative program for low-root format hard drive and USB devices available on the market are the best in their class, and what functions are included in it.
Important: before using any of the specified add-ons, copy all the data from a flash drive or securely in a safe place, since after an hour of working with utilities, all information may be lost and irrevocably chena.
JetFlash Recovery Tool
A proprietary utility from Transcend. An excellent choice for USB devices from the ADATA brand and devices. Using JetFlash Recovery Tool you can also format flash drives and update data on them. If there are sectors on your flash drive that cannot be read, it will be marked by the computer for a long time, because information cannot be written to it. The utility is incredibly easy to use, and a child can master it. There are only two buttons on the start screen: to start the update procedure and to exit.
The interface is absolutely intuitive and intelligent. The disadvantages include the presence of a Russian-language interface and support for USB storage devices of other brands. Transcend recently released an alternative software product on its official website JetFlash Online Recovery operates on the basis of poor service. Feel free to try yoga.
HP Drive Key Boot Utility
There is a handy and functional program for cleaning a flash drive with bad sectors. Allows you to format flash drives for SanDisk, Transcend and Kingston. Three file systems are supported: FAT32, NTFS and FAT. Varto note that if you use the knowledge of file systems, you can clear a device with a volume of up to 32 GB, which, in essence, exceeds the FAT32 threshold. The main advantage of HP Drive Key Boot is its interface. All program options are located in one window, and all operations can be performed without any interruption.

It is possible to create portable flash drives based on the OS distribution kit with the help of additional tools. The add-on is portable, so you can use it on any PC without installation (just copy the folder with the file and libraries to be compiled). The disadvantages of the utility include the lack of support for HDD/SSD and the possibility of correcting system errors. In addition, on Vista Vista/7/8.1/10 a data formatting program is available for use only in the capacity mode. For daily operations, the retailer created an alternative product called HP USB Disk Storage Format Tool. All HP Drive Key Boot functionality has been successfully transferred here.
USB Disk Storage Format Tool
Official page USB Disk Storage Format Tool
This is a full-featured and cost-free program for formatting flash drives of any kind, as well as resuscitating them whenever there are broken clusters. Support for all current operating systems from Microsoft (Win 8/10). You can easily navigate the program manually: insert a flash drive, select it from the list of devices, indicate the required file system, and enter the disk label below. Particularly handy, the functions of correction and formatting are clearly separated. So, you can scan your USB device for bad or unreadable sectors and fix them by checking the appropriate additional options and pressing the Check Disk button. The process of clearing the USB storage device is displayed on the adjacent button, without the possibility of updating (available in Sweden and low-level formatting).

Another utility of the USB Disk Storage Format Tool is to maintain a report log of all operations, which will give you up-to-date information about the activities that are being processed. What’s especially interesting is that, with the help of the included tools, you can format any memory cards (SD, Compact Flash, SDXC, SDHC, etc.). Among the minor shortcomings may be the impossibility of creating customized disks and the lack of Russian localization, as well as the implementation of functionality, but the disadvantages are practically eliminated.
HDD Low Level Format Tool
Official page HDD Low Level Format Tool
Basic program for low-root formatting of HDD/SSD and flash drives. Velma's design is unobtrusive and simple. To start the format procedure, select what you are using: a flash drive or a hard drive. After switching between tabs, you can view the file (see additional information about storage in a particular partition and clear the MBR record) or external formatting.

There is an increase in addition to all other ones that the presented software solution has a SMART release option, and especially for screws. Before speaking, you can work with HDD, SSD and other devices connected to any other interface (FIREWIRE, IDE, SAS, SCSI, SATA). You can clear data not only on flash drives, but also on memory cards of any format from MemoryStick to MMC. Support for the remaining OS. In essence, a single application of the software product is limited by the speed of data processing (50 Mb/sec), but in essence, the benefits and functionality of the program over-covers this shortcoming.
MiniTool Partition Wizard Free – the best program for low-root HDD/SSD formatting, and more
Official page MiniTool Partition Wizard Free
Perhaps, at the cost of the greatest expansion and development of the project, both in terms of the functional part and in terms of usability. What is the number of available functions, their size and number are simply greater for all purposes. In addition to basic operations with individual HDD and flash partitions (re-partitioning disks, checking for damages, setting labels, changing the name list, converting from one file system to another), etc. and unique, powerful only to this product's potential. This means migration of the installed OS to another HDD/SSD, and copying of disks/adjacent partitions to another storage device, data update master, and without any other functions. As in most commercial paid programs, all operations can be completed either through a graphical menu or through an additional visual panel, which is located on the left side of the functionality.

It can be used both with single screws and with RAID arrays. Minitool Partition Wizard vigid to see the sidelines for the in -infurdinary formatuvannia of the Zhorstkoy disk by the ecosa Shvidkіstyu Roboti, the YakIsny design і pіddrimkoy, and the rosobnikiv, the upper tribute of the tribute without problems launched without problems. An outstanding candidate in the must-have category both for ordinary clerks and for administrators.
We have tried to find out which program for low-root formatting of a hard drive, as well as important USB storage devices, is the most relevant at the moment. All products presented are absolutely free of charge and do not require the purchase of a license. We hope that based on your preferences, you will be able to choose the best product for you as an alternative to the software available from Windows.
Most often, if there is any problem with your hard drive, you can lose all the information. The best solution for storing important data may be to use a low-level disk format.
Low-level formatting takes place at the time of production of the hard drive. The procedure described in this article can rather be called “pseudo” formatting, since the simple low-level procedure is simply impossible to implement in home minds.
Having completed this process, it is possible to fix software programs and remove virus security programs from your PC. Also, formatting is useful when selling a PC, so that the latest version of the Internet will not be able to speed up the information that was saved on the computer.
How to earn money in a low-cost format
There is a transfer of programs created with low-quality formatting. Some of them are only suitable for a specific brand of hard drive, others are universal and allow you to work with any type of drive. In this article, the programs will be considered to be absolutely cost-free and easy to follow the necessary procedure.
Method 1: HDDLLFT
This program is suitable for any hard drive, but the program will work correctly if Windows OS is installed.

Method 2: SeaTools DOS
The main advantage of this utility over its analogues is the ability to create its image on any third-party storage device. This is an important detail, since it will benefit the profiteers, the functionality of the system that works with favors.

Method 3: Windows Data Lifeguard Diagnostics
These programs can be run on low-level formatting of WD hard drives.

If you were able to convert, the low-root formatting procedure is quite simple. Perhaps all the different programs operate on a similar principle, and mastering them does not present any problems. It’s important to remember that universal programs are not necessarily superior to the utilities of a particular vendor.


