Program for Windows for acquiring Android games. Installing Android as a desktop OS
Today we'll talk about how to install android on laptop chi netbook. This topic will be relevant to all people who care about Google's lightweight operating system, which was designed specifically for compact devices. Axis and I was tsked by the food: “Why can I vikorystat free android on your old laptop, with the same success as on a smartphone?” It appears that this is entirely possible! I already wrote about another great product from Google, however, this article talks about installation in the VirtualBox environment. As has already been stated earlier, in the upcoming Android and Chrome OS, Google can combine them into a single operating system, but that is still not the plan.
I think it’s too late to talk about popularity Android smartphones and tablets on the market mobile devices. About competition with operational iOS system, installations on mobile phones iPhone attachments and the iPad of the famous Apple corporation. Such information is considered trivial nowadays, as we all know! Well, especially for those who still don’t know, I’ll give you a few statistics :-) The Kantar company has released a report that describes the behavior of the mobile industry market in various parts of the world. Based on the latest statistics (2014), the expansion of operating systems around the world, Android leads in all countries, albeit with different cellular relationships. The nutrition of android leadership is not discussed with anyone. And until 2013 there were very different statistics:
| Platform | 2007 r. | 2008 r. | 2009 r. | 2011 r. | 2012 r. | 2013 r. |
|---|---|---|---|---|---|---|
| Nokia (Symbian OS) | 62,3 % | 52,4 % | 47,2 % | 20,9 % | 2,4 % | - |
| BlackBerry (BlackBerry OS) | 10,9 % | 16,5 % | 20,8 % | 14,9 % | 5,3 % | 2 % |
| Apple(iOS) | 5,2 % | 9,6 % | 15,1 % | 15,7 % | 13,9 % | 14 % |
| Microsoft (windows mob, phone) | 11,9 % | 13,9 % | 8,8 % | 5,5 % | 2,4 % | 4 % |
| Google (Android) | - | 0,5 % | 4,7 % | 39,5 % | 72,4 % | 80 % |
| Samsung (Bada) | - | - | 0,1 % | 1,9 % | 3,0 % | - |
| Others (Linux, Palm OS) | 9,6 % | 7,2 % | 3,4 % | 3,5 % | 0,97 % | 0,3 % |
 The main feature of Android is that it is cost-free and falls into the category of open software, which means that this operating system can be easily downloaded and installed on any device. It is also absolutely legal to download and install any modification of the operating system on your device. And it is absolutely not obligatory for us to buy a smartphone in order to become familiar with Android; this system can be installed on a netbook or laptop.
Instructions for installing Android on a laptop or netbook
To install, select the required Android Live CD or Live USB image, which can be written to a disk or flash drive. Next comes the respect of the creation of the Live CD itself. With such a “live” disk, you can get excited and try the system without installing it on a computer, such as a laptop or netbook. From this disk you can create and install the system.
- We go to the Android-x86 Project website. This is one folded Android, ported to any computer with x86 processor architecture.
- On the site we need to upload an ISO file - image installation disk with the remaining version of the system on board.
- Record attractions ISO image to disk using the additional Ultra ISO program or any other program for burning images to disk.
- The recording disk is placed in the CD/DVD drive of the laptop, and if the laptop has an external drive, we set the parameters in SETUP/BIOS to enable the computer itself from our disk and start the system.
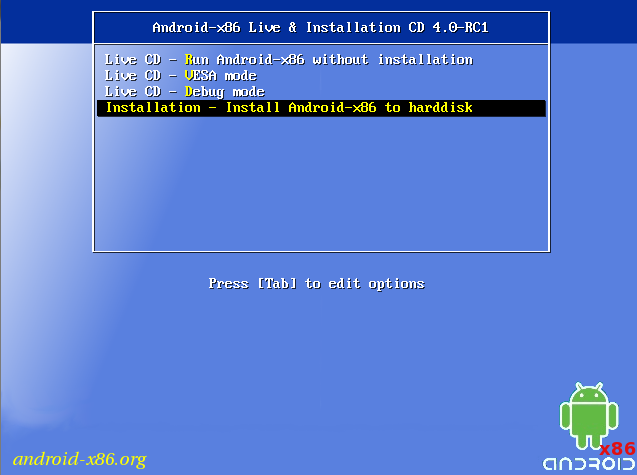
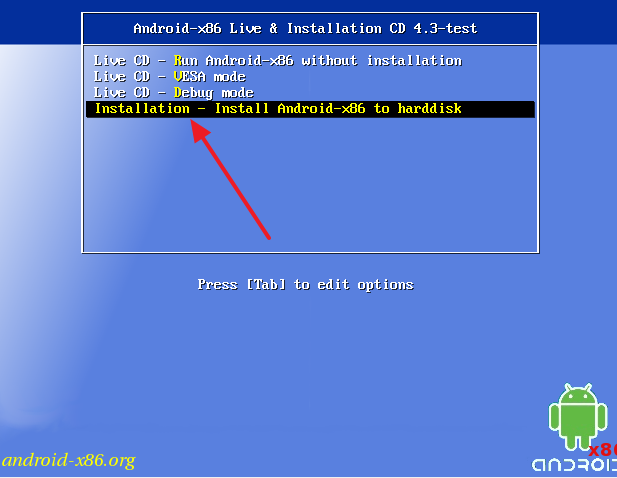
- The process of starting the system is important zavantazhuvalne menu There are many options, the first point is to run Android on your computer without installation, and the second point is to directly install the operating system hard drive laptop or netbook.
How to get excited about Android Live USB?
If you need to know that the era of CD/DVD discs has passed, it is much easier to quickly use a flash drive for installation new systems However, I would recommend a slightly different method of creating such a fancy flash drive.
- Download android-x86-4.3-20130725.iso as quickly as possible
- Please install LinuxLive USB Creator (LiLi) from this site
- In the program itself, from the very beginning, select a FAT32 formatted flash drive.
- Then we select the desired disk, or just an ISO file.
- The third point can be skipped.
- We uncheck the “Allow Linux Live USB to run on Windows” checkbox because we don’t want LiLi to download and install onto a VirtualBox flash drive.
- At the fifth point, press the button and check that the program docks to create a new USB.
- The next steps follow the analogy up to points 4-5 of the previous instructions.
Please remember, no one is covered by insurance more encouragement the equipment of your laptop or netbook model. For example, the system may not process correctly with your integration Wi-Fi device adapter. Other problems can be fixed by installing a patch, but if your configuration is not widespread and is not popular among the general public, then finding a solution on the Internet will be much more complicated.
That's all, I hope you will find my instructions useful! Subscribe to the blog, get up to date social measures, I’ll be happy to listen to the comments!
How to install Android on a laptop or netbook? was last modified: Berezen 3rd, 2016 by Admin
New in version 7.1-rc1
Release 7.1-rc1 is based on the remaining Android Nougat-MR2 release (7.1.2_r17). The key features include
- Support both 32-bit and 64-bit kernel and userspace.
- Additional information about new devices and peripherals beyond the remaining LTS kernel 4.9.31.
- Support hardware accelerated codecs on a device with Intel G45 & HD graphics family.
- Support OpenGL ES 3.x hardware acceleration for Intel/AMD/Nvidia, VMware and QEMU(virgl) by Mesa 17.1.2.
- Support OpenGL ES 3.0 for additional software support for other GPUs or GPU devices.
- Support secure booting from UEFI and installing to UEFI disk.
- Text based GUI installer.
- Support Multi-touch, Audio, Wifi, Bluetooth, Sensors, Camera and Ethernet (DHCP only).
- Auto-mount external usb drive and sdcard.
- Support foreign arches (arm / arm64) apps via the native bridge mechanism. (Settings -> Apps Compatibility)
New in version 6.0-r3
- Automatic installation of CD/DVD
- Fixed issue with VMware, introduced in 6.0-r2
- Add the qemu-android script for running Android-x86 in QEMU
- Updated to Android Marshmallow-MR2 release (6.0.1_r79)
- Updating the kernel to version 4.4.62 with new patches from AOSP
- Updating Mesa to version 17.0.4
- Updates of related projects (libdrm, ntfs-3g, exfat, bluez)
New in version 5.1-rc1
Version 5.1-rc1 is based on Android 5.1.1_r24. Added x86-specific changes to the code and fixed problems with stability and smoothness of operation.
Main functions:
- Support for 64-bit kernels and 32-bit systems;
- Support hardware acceleration OpenGL ES for Intel chipsets/ AMD (radeon / radeonsi) / Nvidia (nouveau);
- Support for installing UEFI and installing a UEFI disk;
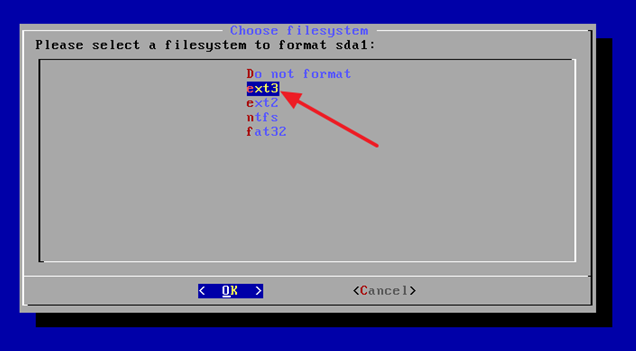
- Added the ability to install ext4/ext3/ext2/ntfs/fat32 file systems using a text installer;
- Support for multi-touch, audio, Wi-Fi, Bluetooth, sensors, camera and Ethernet (DHCP only);
- Automatic installation of external USB storage that SD card;
- Support for virtual machines, including Qemu, VirtualBox and VMware;
- Support for third-party architectures (arm/arm64) for the additional power-assisted bridge mechanism.
New in version 4.4-r5
Android-x86 4.4-r5 includes fixes for bugs found in version 4.4-r4. There are problems with hazi fonts in the graphical library Mesa 10.5.9 on graphical Intel processors 5th generation.
Android-x86(Previously known as “patch hosting for android x86 support”) is a no-cost project with open source code designed to run the Android OS on systems with x86 processor architecture.
In fact, this project is a port of the Android open source project (AOSP) to the x86 platform, implementation by Google for catless cleaning.
Android-x86 allows users to use the Android OS on laptops and desktop computers.
Zastosuvannya
Android-x86 allows you to run and use Android OS on devices based on AMD processors x86/Intel (not on ARM chips). The program is not officially sponsored by Google. Android-x86 will be a great choice for homeowners who want to install an alternative OS on a Linux-based computer.
A look at Android-x86
Installed
Android-x86 mix two files. The ISO file can be downloaded on any device by selecting the download mode in the BIOS. The EFI image can be used on current systems with UEFI firmware. Select a file that suits the type of ownership. Once clicked, a screen will open where you can select the option to start a “live” session. without the need for installation, or an option with installation of the product. Android-x86 can be installed on USB drives, which allows you to protect the main disk space. The process of installing the software is very simple. One problem arises from the lack of support for formatting partitions file system ext3.
Simplicity of robots
Android-x86 is associated with high productivity on all types of computers. When you first use the program, you need to create or log in to regional registration Google. At the same time please enter the entrance, you will be looking for a clean Android. As a result, you are unable to browse websites on the Internet using your installed Android browser. You will also need to adjust Wi-Fi network. To navigate and imitate, click on the mouse cursor in the shape of a ring. All navigation functions require using the keyboard keys. For additional help Android-x86 You can access the store Google extensions Play customize Androidі Google Chrome to personalize the new OS
The program includes two home screens and 6 background images. Off the head screens, you can hide the Google search row and the icon for voice input. The panel at the bottom of the screen contains the essential Android keys “Home”, “Back” and “Recent Programs”. A few more buttons have been added to launch YouTube quickly, standard program for SMS browsing, Google Music, browser, this button is used to launch the program panel.
Advantages
By running Android on all devices, you can quick access before additions, fine-tuning Google services. Android-x86 allows you to organize this meeting access without any special difficulties. The new version of the product has become even more intuitive and simpler to use. Vaughn is working in advance Android versions on the visible installation. Vickory the decision on various outbuildings: From netbooks to tablets - you will enjoy high productivity. Hardware acceleration technologies are now available for VMware and Nvidia chips. U new versions GPS sensor support has been added.
Nedoliky
Dealers report about problems with the vicoristic functions of the extension and renewal, which otherwise affect the exchange, associated with the vicarious deprivation standard browser Android.
In some cases, the browser may not start during a live session and a notification about the cancellation will appear. We're in a lot of troubles just re-engaging allows you to solve the problem. Sometimes users report that the program does not start at all, and in other cases there are systematic failures. To quickly resolve such problems, restart your computer. Retailers are trying to make amends for the future.
Visnovok
Android-x86 є a handy tool for seamless launch of Android OS on laptops and desktop computers based on AMD x86/Intel processors. Tim is not a mensch, the Koristuvachs are not worthy of riches possible problems stability. It is recommended to check for the new version of Android-x86.
Rich people, before buying a smartphone, feel the need to get to know Android better. In order to understand what you need, you need a smartphone with the same operating system. Luckily, this can now be done with the help of a computer. You can also install Android on your PC and explore its options.
This article will take a detailed look at the entire process of installing Android on a PC. Beginning with the fascination with the ISO image from the operating room Android system and finish installing it on your PC.
Preparation before installing Android on PC
In order to install Android on your original PC, you will first need to carry out some preparation steps. First of all, you need an ISO image from Android in preparation for working on a PC with x86 architecture. This ISO image can be downloaded from the Internet. For example, you can download ISO images from Android version 4.3. If you need a higher version of Android, you can currently download Android version 6.0 there.
Since the ISO file with the image of the operating system is stored, you need to burn it to a CD or flash drive that will be used to install Android on your PC. You can use different recording programs. This article will demonstrate how to use the UltraISO program in an application.
Run the UltraISO program on your computer and use the additional menu “File – Open” to open the previously downloaded ISO image from Android. After this, you can start recording the ISO image. If you want to burn an ISO image to a CD, press the F7 key or the UltraISO button on the toolbar.
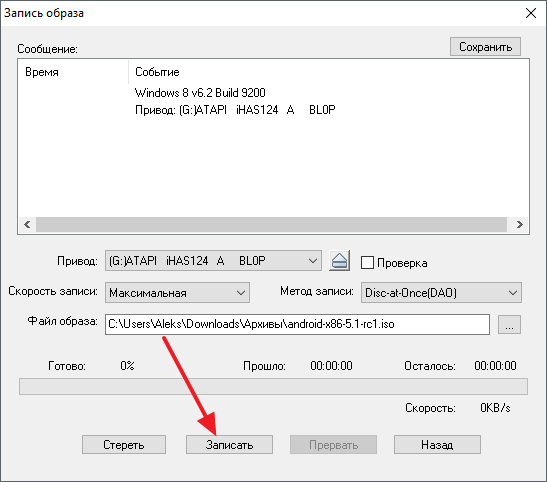
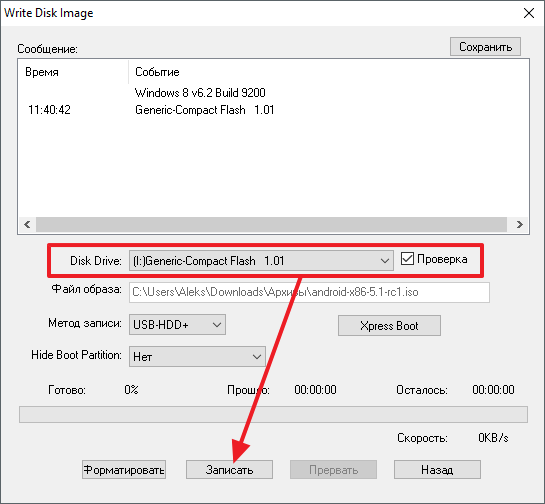
How do you want to earn money? I'll get a flash drive On Android, you can also create it in UltraISO. To do this, you need to open the ISO image in the program and select the menu “Self-imaging - Burn hard disk image.”
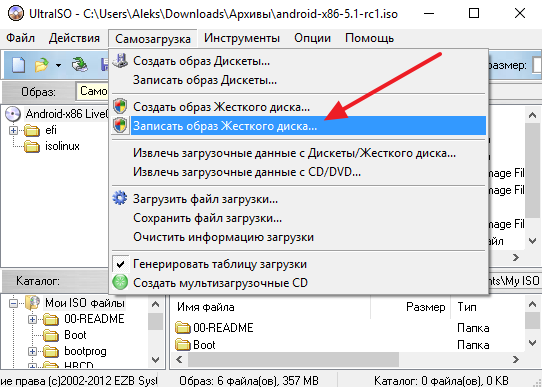
After you need to select a flash drive, because you need to log in to install Android on your PC, then click on the “Burn” button.
As a result of the actions described above, you are guilty of a corrupted CD or a corrupted flash drive. installation files Android operating system.
Install Android on PC
After completing the preparation stage, you can proceed straight away before installing Android. To restart your computer, you need to enable backup from a flash drive or disk in the BIOS, insert fancy disk Or a flash drive in the PC of your accumulator.
As a result, a menu will appear on the screen of your PC with the option to install in LiveCD mode or begin installing Android on your PC. Select an option from the settings and proceed further.
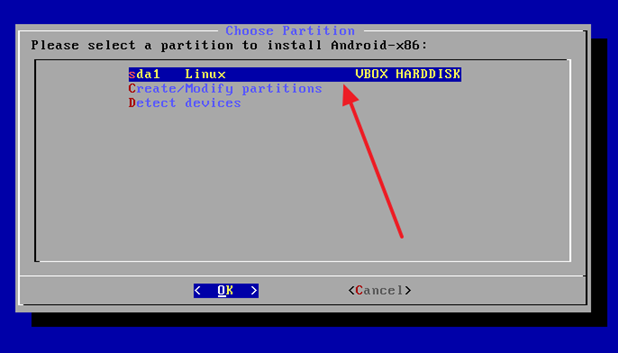
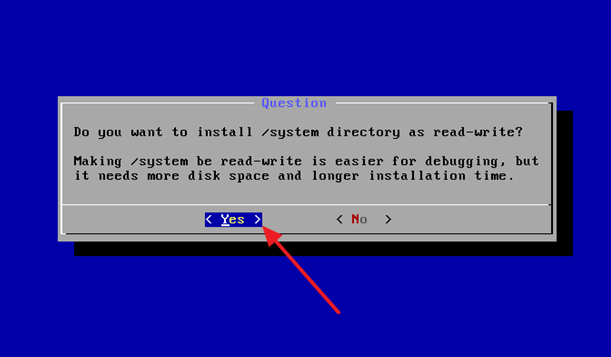
After this, the process of installing Android on the PC will start. At the first stage, you will need to select the partition on which you want to install Android. Please note that the sections you select will be formatted, so before you proceed, make sure you don’t waste your money.
After this, you can write to the system directory.
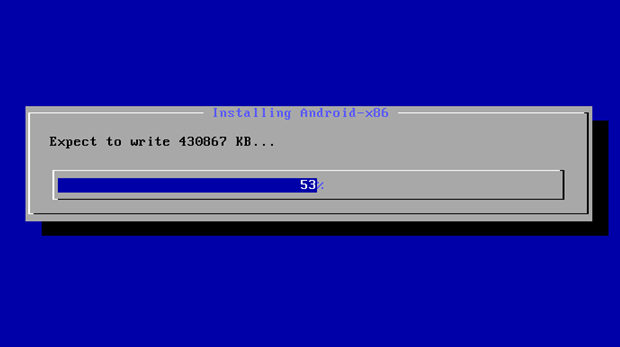
We wait until the process of installing Android on your PC is completed.
Once the installation of Android on your PC is completed, you will be prompted to immediately launch Android or restart your PC. We choose to re-enchant.

After re-protecting the PC, connect the protected flash drive or disk and protect it securely installed Android. When you first start Android on your PC, a menu will appear for cob adjustment operating system.
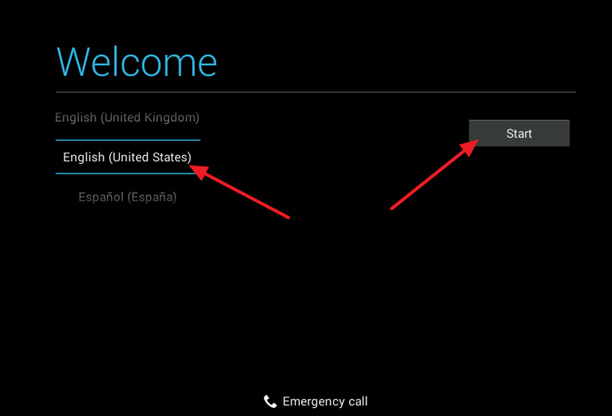
You will need to select your operating system and configure other options. After this, the Android desktop will appear on the screen of your PC.
Android works not only on tablets and phones, but also on computers and laptops. There are a number of installation options: like a different operating system, a virtual machine, or an emulator. Select your power supply when installing Android on your computer, depending on the purpose of your computer.
To create a custom installation, you will need a flash drive with a capacity of at least 1 GB, the Unetbootin utility and an Android ISO image, which you can visit from the retailer website: http://www.android-x86.org/download. If you are interested in the distribution kit, consider the capacity - 32 or 64-bit system. You can download it clean Android remains versions, and Remix OS - a special compilation for the computer. In this case, you can install the Android OS on a laptop in one way, eliminating the system interface.
For the mounting nozzle:
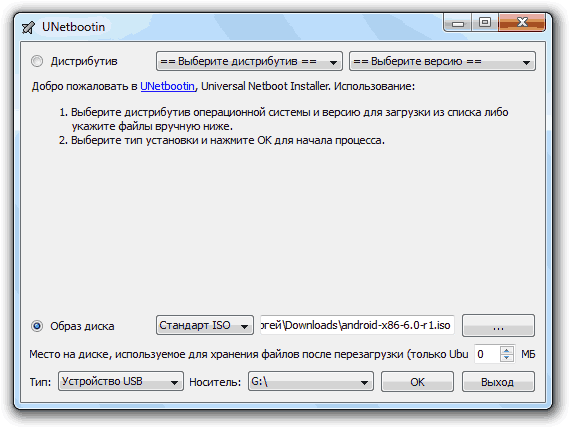
The creation of a mounted nose takes about 10 hvilins. After completing Unetbootin, you can restart your computer to start from scratch. Instead of using Unetbootin to record the installation media, you can use another utility, such as Rufus.
To start the installation media, you need to change the priority of the installation in the “Boot” tab of the BIOS or select the installation from the flash drive Boot Menu, which is pressed with the F11 key. After accessing the installation media, a menu appears where you can launch Android without first installing it. To quickly understand this proposition, select the first item. 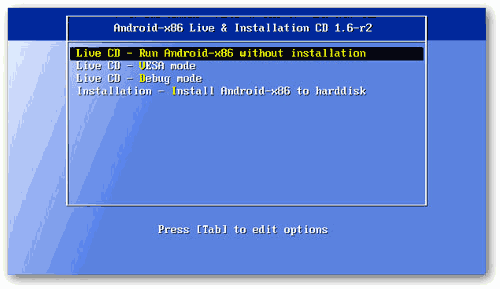 Netrivale zavantazhennya brought to the front end. Misha, the keyboard and touchpad on the laptop are already working here. You don’t have to configure anything, but after rebooting the computer, the settings will change. After adjusting in advance (or skipping this procedure), you will spend on head screen Android.
It may seem simpler, but it is not necessary to know how to install Android on your computer. It is enough to complete the installation process to launch the system on your PC and review the main features. The only thing left is that the daily changes made by the customer are not saved. Otherwise, the system works without problems, it allows access to the Internet from connecting the computer to the Wi-Fi connection.
If you are planning to install Android as a second system next to Windows, then it is better to create a separate section ahead of time.

When the volume is opened, there is no need to change the settings. As a result, you will have a personal, clean Android partition.
System installation
You can install Android on any laptop, the technical capabilities of the system are such that you can recapture the capabilities of the old machine. An alternative option would be to install Android on a netbook - the system takes up little space and uses minimal resources.
The system installation will start. After the installation is completed, the installer will create a partition in the middle of the Android account. The default is 512 MB, or better yet, increase the volume 4 times to 2000 MB. As of now, the installation has actually been completed. Click “Run Android” to start it. 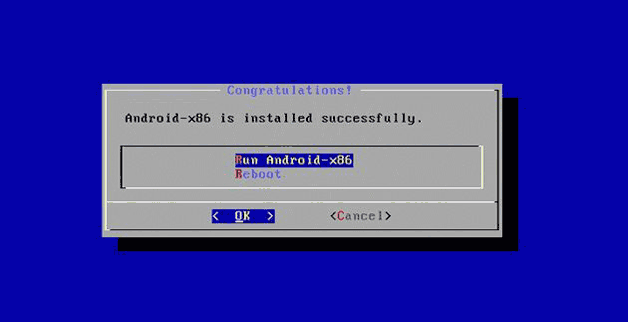 When installing Android on a laptop, you may need an external USB keyboard. Otherwise, it’s not the fault of the people to blame.
Once you have figured out how to use Android and how you can install it on your PC, then previous adjustments There are no problems, it’s more likely to be carried out the same way as on phones or tablets after purchase. The first point is to choose a movie. 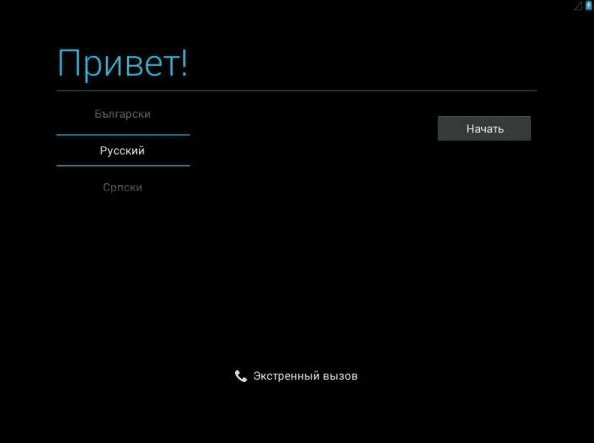 Next, the system prompts you to select a connection to access the Internet, set up geolocation, add Google account record set the hour and date. After this little setup, you can install Android Games on your computer and immediately use all the capabilities of the OS on Google. Install the tools to install any tasks that are implemented on the original Android device.
If you don’t want to install Android on a PC with another system in addition to Windows, turbo-charged to save data on your hard drive, and the option of running without installation does not control you due to the fact that it is possible to stagnate the change, then Vikorists please virtual machine. Let's wonder how to install Android on a virtual machine using Oracle VM VirtualBox.
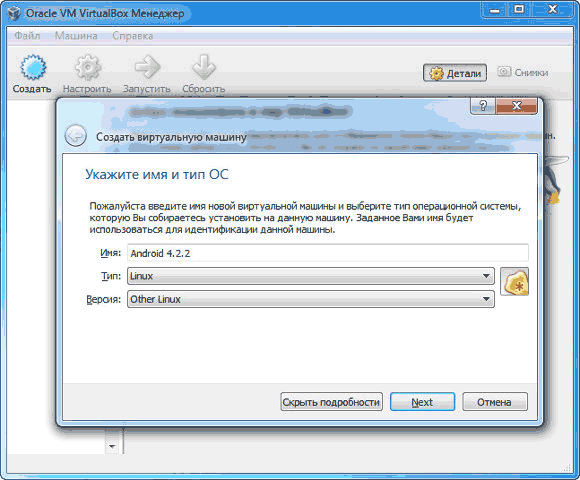
The center is insulated and can be installed in any Android device. See "Android" in the menu and click "Run". At the machine window, select the path to the ISO file with the Android distribution kit. 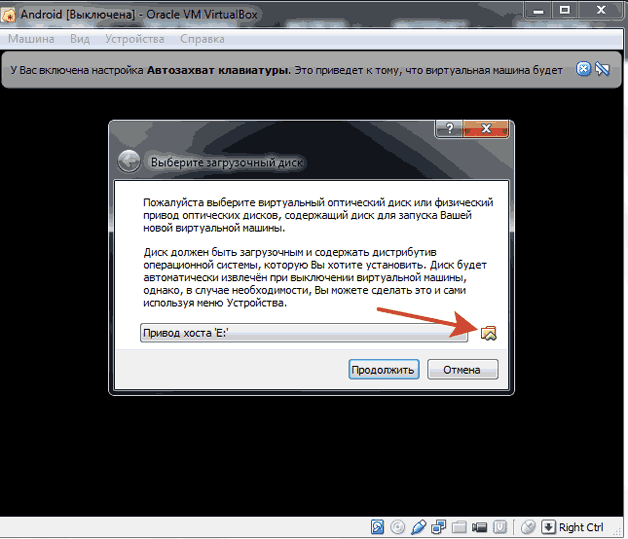 Next, you need to install Android on your PC, following the instructions below. The only difference is that we install Android not next to Windows, but in the middle of an isolated middleware created behind an additional virtual machine.
Since Android on a PC is only needed to play the program Google Play, you can get by with an emulator. Vibir rich:
- BlueStacks;
- Leapdroid;
- Koplayer;
- Genymotion;
- YouWave for Android.
The listed emulators may have different meanings. While BlueStacks and Koplayer are more aimed at launching games and other programs, Genymotion is, more likely, a tool for developers who want to open Android games on a PC with its help. 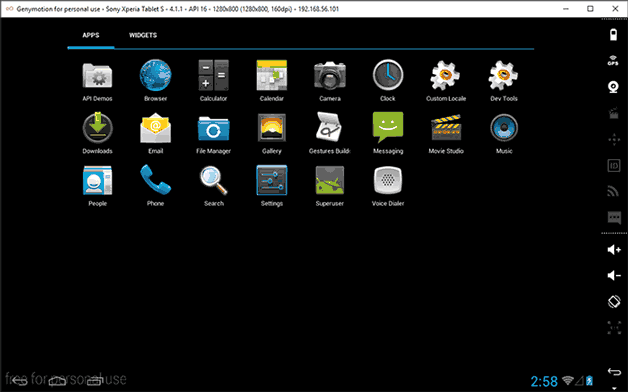 If you want to get full-fledged Android on your computer without downloading the distribution and installing the system, try the Nox App Player emulator. Vіn crazy with everything remaining versions Windows.
 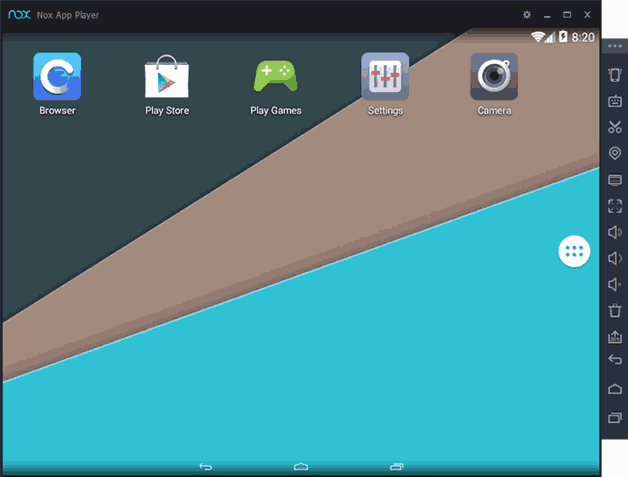 The program does not have a Russian interface, but on Android you can install the Russian language as you do on your phone. Sound and camera work without additional adjustments, just like the computer keyboard is in the middle of the emulator.
  After installation, Nox App Player is launched in a separate tablet format, and if necessary, it can be changed in settings, which can be accessed by clicking on the gear. Also placed behind the mind low productivity, which allows the emulator to work without any problems on a weak “lead”. You can also change the level of productivity through adjustments.
 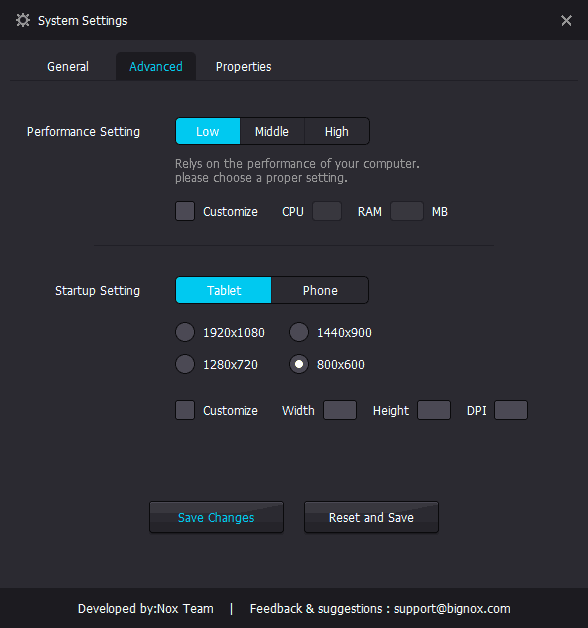 Nox App Player allows you to download on your computer the entire range of activities available on Android: installing igors Play Market, adding photos to Instagram, etc. You can try other emulators, but there is nothing radically new for simple koristuvach you can't smell the stench.
Android - tse operating system for smartphones and tablets. It is specially designed for such mobile devices, so if you want to install these programs on your computer, there is simply no support for them, you need to quickly maneuver to reach the target.
Install Android program For a computer, it is necessary that the PC be used as a smartphone, and therefore be able to simply launch programs, games or programs that do not have analogues for Windows. Zokrema, vikorist for WhatsApp, Twitter or Viber.
The neck is sleeping key ways How to install Android on your computer and thus speed up all your advantages. First of all, you need to use an emulator to create the same image, and right from Windows you will have access to the elements you need. Another option includes externally installed Android OS on a computer, converting it to a smartphone. Both options have their advantages and disadvantages, so choose the method you need. There is also a mixed option, which includes installing Android, but also virtual disk for example: via VirtualBox.
Install Android on your computer via BlueStacks 2
This option is simple for installation and operation, but is important third party supplement for your work. Also, such an emulator properly uses the OS, which does not allow you to lose maximum speed when working (the situation is similar for all types of PlayStation emulators, etc.).
If you have chosen the value of simplicity for the sake of increased productivity, then you need:
- Vanquish BlueStacks program 2 http://www.bluestacks.com/download.html?utm_campaign=homepage-dl-button-ru ;
- Start the installation process by selecting the Uninstall Programs option;

- Set the proportions of the white " App Store Access" and "App notification";
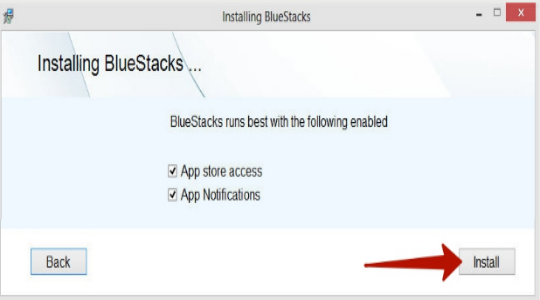
- Once completed, a window will open in front of you that will remind you of the tablet’s desktop and you can start working with Android.
3.Now the required storage capacity is about 8GB, you can create it by partitioning the hard drive and seeing required size memory, or it’s even simpler if you have another flash drive. You can partition the HDD using the supplied utility, you can find out how to:
- Find undivided spaces and create a new standard volume using RMB and a similar item;
- Win + R imsc;
4.UltraISO or Daemon Tools program.
Now it is necessary to cancel the following actions:
- Connect a flash drive with a capacity of approximately 1GB and use the additional UltraISO program to mount the image. To do this, open the image of the Android system through the program and go to the “Self-image” tab.
- Then select “Burn hard disk image”;
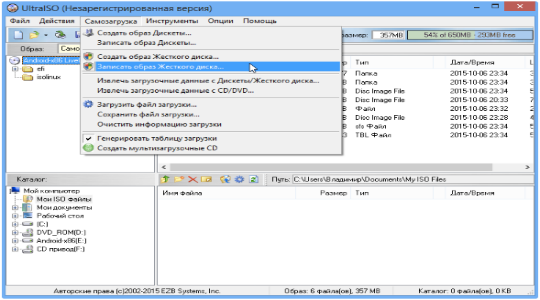
- Select the path to the storage device connected earlier, which system settings entry is available and go to the .iso or .img file;
- Click on the “Record” button and confirm in advance about deleting everything;


