Windows installer: Troubleshooting. Windows Installer: Troubleshooting The installation program starts Windows 7 services frozen
How to run a program in the Windows service view
How can I run a client program as a service? In one of them, I described ways to create a Windows service using standard OS methods. However, a console program cannot be launched as a service, and programs with a graphical interface cannot operate in a similar manner. It is still possible to launch the add-on as a service, and can you help us with a program with the original name? Non-Sucking Service Manager.
NSSM is free open-source software and supports all Microsoft operating systems, from Windows 2000 to Windows 8. NSSM does not require installation, you just need to download and unpack it. The distribution includes versions for 32- and 64-bit operating systems. You can get the program from the website nssm.cc, at the moment the stable version is 2.21.1, as I believe.
To demonstrate the capabilities of NSSM, let's try running Windows Notepad as a service on Windows 8.1.
Creation of the service
For the creation of service in our households notepad Launch the command console, go to the folder with unpacked NSSM (for 64-bit Windows) and enter the command nssm install notepad, which opens the NSSM graphical installer window. To create a service, just enter the path to the file to be connected in the Path field and click the “Install service” button. Additionally, in the Options field you can specify the keys required to start the service.
Also, at the stage of creating a new service, you can specify additional parameters.
The Shutdown tab lists the shutdown and timeout methods that are used during normal shutdown or emergency program shutdown. If NSSM rejects the command command (for example, when the robot program is completed), it is affected by the lack of control of additions by the staff. If the program does not respond, then NSSM can terminate all processes and subprocesses of the program.
In general, there are several stages of completion of the robotic program, and for the purposes of this procedure, follow in this order:
At the first stage of NSSM, you are trying to generate and submit a Ctrl+C. This method works well for console add-ons or scripts, but does not work for graphical add-ons;
NSSM then recognizes all windows created by the program and issues a WM_CLOSE notification to them, which initiates exit from the program;
In the third step, NSSM counts all the flows created by the add-on, and enforces WM_QUIT notifications on it, which will be canceled when the program decides to inform the flow;
And as a final service to NSSM, you can call the TerminateProcess() method, effectively terminating the program.
You can enable actions or restore all methods, but for different programs you can use different methods, and in order to correctly complete the work of programs, it is recommended to delete everything.

As soon as the NSSM service is terminated, it is planned to restart it. On the “Exit actions” tab, you can change the automatic action when the program terminates abnormally, and also set a delay before the program automatically restarts.

On the "Input/Output (I/O)" tab, you can set the redirection of input/output to program inputs to a file.

On the “Environment” tab, you can install new settings for the service or reassign existing ones.

You can also skip the graphical shell and immediately create a service in the console with the following command:
nssm install notepad "C:\Windows\system32\notepad.exe"
Service management
After creating the service for the additional NSSM, go to the Services snap-in and find the notepad service. As you can see, there doesn’t seem to be anything different from other services that you can start, stop, or change the startup mode. However, please note that nssm.exe is specified as the configuration file.

And if you go to the Task Manager, then we will see the following picture: the main (father) process is running NSSM, the Notepad service is running as its child process, and the Notepad add-on is running in this child process.

Vidalennya service
To delete the service, enter the command nssm remove notepad and confirm its deletion. And by entering the command nssm remove notepad confirm, you can do without confirmation.

Starting the service in interactive mode
The main utility of the customer service program lies in the fact that after starting the program, it can be used to continue additional operations on the side of the customer service - for example, press a button or enter a command. For this purpose, it is necessary to deny access to new ones, which, as it turns out, is not so easy to gain.
In order to start the service in interactive mode, you need to select the “Allow interaction with the desktop” checkbox in the Open Services tool and on the “Log in to the system” tab.

And then the miracles begin. The service, launched in interactive mode, opens in an isolated session (session 0). During this session, you can only use the additional online services detection service (UI0detect), which monitors the launch of online services on the computer and displays alerts. In Windows 7\Server 2008, this service is active, but in Windows 8\Server 2012 it is disabled and does not appear in the graphical equipment of the Service (I don’t know about it there). Moreover, if you still find this hidden service and try to run it, you will receive notifications about the cancellation.
And this means that in order for it to start, you need to allow online services to start on your computer. Therefore, open the registry editor, located in the section HKLM\System\CurrentControlSet\Control\Windows parameter type DWORD with names NoInteractiveServices and put this value in 0 .

After that, open the PowerShell console and start the service identified with the command:
Start-Service -Name ui0detect

Having restarted and found that the service is running, we restart the Notepad service, and finally remove the axis. Select the item “Watch notifications”

And it is lost in the zero session in which our program runs. Then we will do the necessary things with him and turn back.

This is the solution for launching add-ons in the Windows services view. Not the most beautiful, but entirely true to its name :)
Problems with installed add-ons from files with extensions. Users of all versions of the OS, except the earlier ones, encounter a similar problem. This problem with the installer is one of the most common reasons why the system may need to be reinstalled. Let's try to get married, as if we are unique. The reason why Windows Installer does not work could be:
- virus infection, and the virus that is removed will always cause a problem;
- Windows update was installed incorrectly;
- a problem with a sick PZ, if instead of blocking one suspected msi file, the installation service is blocked completely;
- change your computer security policies;
- corruption of system files or the registry for reasons not related to viruses (deleted installer components, unqualified editing of the registry, “crooked” software, malfunction of the hard drive, etc.).
Checking the integrity of the Windows Installer structure
Windows installer for views with the following components:- file C: Windows System32 Msiexec.exe - directly by the installer itself;
- file C:\Windows\System32\msi.dll - Windows Installer library;
- by the Msiserver service, the parameters of which are saved in the registry section.
 If the files are external, copy them from another system of the same version or from the installation disk. If you change or damage a section of the registry, you can also transfer it from the working system. To do this, run the registry editor on your computer (C:\Windows\Regedt.exe) and find the registry section.
  Right-click the context menu of the msserver folder and click “Export”. Save the file in .reg format and transfer it to the problem machine.
  Click on this file and confirm that you are ready to add data to the registry. Restore your computer.
  If the Msserver service does not start as before, check that the RPC (Remote Procedure Call) service is running, as it may be.
  You can cancel the re-registration of installer files and restart the service using an additional set of special commands in the command line. To make things easier, you can create a command file: paste the command in Notepad and save it as an extension.bat. To launch the file, click on the new one. To get started, click on the mouse on your desktop and press F5.
 We check security settings and access rights
Windows Installer may not be used through those that block it with junk software or the operating system does not have the necessary rights. First, let's get started with the software. If you have an antivirus installed, disable it immediately. There are different ways to enable the skin product, but most often it is done through the context menu of the antivirus icon in the system tray. Now let's take a look at the rights. Open the context menu of Msiexec.exe and turn on its power. Look at the list of groups of koristuvachs on the “Security” tab. Among them, the obligatory ones are the “System” and the “Trustedinstaller” service, and the remaining necessary access to the file and its owner. The system is to blame for the mother's rights to "read" and "read and read".
  The Trustedinstaller service appeared first in Windows Vista, so Windows XP must be given new access to the system. Everything written below applies to versions released later than XP. To check who is the owner of Msiexec.exe, click the “Add” button on the same tab.
  In the next window, open the “Vlasnik” tab. Sign up for the Trustedinstaller service, as stated otherwise. If the list “Change the leader to” does not have one, click the “Change” button, and then click “Other personal groups”.
  Enter Trustedinstaller in the "Enter names..." field, click "Check names" and OK. Turn to the front window. On the "Due Permissions" tab, select Trustedinstaller and system necessary rights.
  These are the same security settings that apply to the msi.dll library. Now let’s check that there is no limit for the “System” customer to have access to the emergency:
 - system disk (zazvichay tse disk);
- time folders (C:\Windows\Temp and C:\Users\Current_Koristuvach\AppData\Temp);
- folder C:\Config.Msi;
- the folder containing the msi file for which you want to install the program.
How to update Windows 7 system On the laptop, when pressed, a black screen appears, the middle part of the update does not work, I have seen everything, the original disk is missing. Having spent a lot of time, show me what to do now, because if you want to insure yourself against such situations in the future, you need to use paid data backup programs without using them. Illya.
How to update Windows 7 system
The reasons for this unacceptability, unfortunately, are sufficient, starting with incorrectly written drivers, harmful effects of the virus, file system corruption and ending with our forgiving actions when working with a computer, there is no need to be afraid of such problems, you need to learn how to deal with them effectively fight vigorously.
Let's think about it how to update windows 7 system We also insure ourselves against possible failures in the future by adding backup and update features to the operating system. We will continue to update Windows 7 without installing third-party backup programs until you select the System update options and the F-8 button will appear blank.
- Friends, if our article does not help you, then familiarize yourself with other topics, for example: in it you will learn how to update a system that does not require the use of various command line utilities, first with the Bootrec.exe command mi /FixMbr i / FixBoot or the bootsect /NT60 SYS utility, as well as Bootrec.exe with the /RebuildBcd parameter, these utilities can be launched from the Windows 7 update or from the Windows 7 update disk. h smki bootmgr . This article will show you how to update the operating system when the updated system is enabled and much more.
- If Windows 7 freezes when downloaded or re-enables itself, or sometimes displays a blue screen with a freeze, then it is possible that all these problems are due to numerical resets of the file system. How to correct the situation, if the operating system is not affected through these amends, is written in this article.
- Well, all the articles in this section will give you information about all the new features of updating Windows 7: update points, latest versions of files, system image and disk updates, and so on. So let's see.
Windows 7 may have a strong and good tool in its arsenal -> The center of renewal, which is created automatically during the installation of Windows 7 in the selected section and contains five other tools, which increases the number of malfunctions and problems.
- Once you learn how to properly update Windows 7, but it’s not difficult, you can do without additional or paid data backup programs.
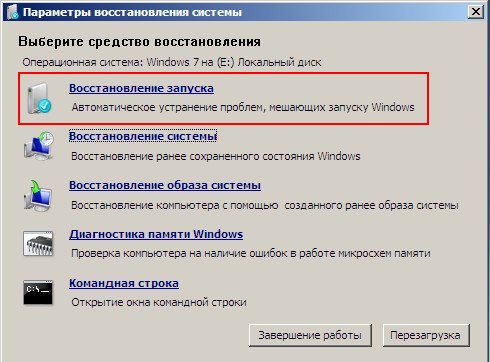
You can launch the update by pressing the F-8 button on the keyboard immediately after starting the computer. After this, you will see the menu Additional options for protection: Fixing computer problems, then Safe Mode, Safe Mode from installing third-party drivers, etc.

First, what to earn, get stuck Launch update(Automatically resolve problems that affect Windows startup)
Required access: After pressing the F-8 button while the computer is running, you may not have the item >, but only Safe Mode and so on, the fault is with the power supply.
During the installation of Windows 7, the update middle section is created automatically and is located in the root of the drive (C:) under the Recovery folder. You can also access it in the Disk Management window - the second partition of the hard drive, the volume of which is only 100 MB, is used for saving files, the backup configuration (BCD) and the backup chewer system (bootmgr file).
You can use Computer->Keruvannya->Keruvannya with disks. It is not possible to delete this section every time (most of it is visible through ignorance), otherwise you will not be able to run the middle update, then point Troubleshooting computer problems You won’t, and in more important situations, you simply won’t overpower the system.

On the bottom screen you can see another new partition with a volume of 9.02 GB, if you want a partition updated from the factory settings of your laptop, you may have a larger or smaller one. You won’t be able to remove it any better, but whenever you need it, you can always renew Windows 7 from the new one.

Why don’t you work, since in the middle of the update you don’t have enough and when you press the F-8 button, in the Advanced Options menu, the item Troubleshooting computer problems does not appear? How to update your Windows 7 system?
Here you can spin the installation disk with the Windows 7 operating system. You can start the update by downloading from the original Windows 7 installation disk by selecting the item on the very beginning System upgrade. If you don’t have an installation disk, you can purchase it (you can prepare it in a running Windows 7) for five bucks, then you can also get one from it and make the same one.


However, we still lost System Update Options, either using the additional F-8 button and the Troubleshooting item, or the Windows 7 installation disk or the Windows 7 Update Disk.
In the Select menu System update options, select first:
Launch update-> there will be an analysis of faults that are important for the normal operation of Windows 7 and further their correction for the normal operation and functioning of the operating system. The process may be ahead of us if problems have been detected with the settings, we are pressed to fix and restart.


System upgrade->for this additional function, we can, if we have it turned on, go back to the hour when our Windows 7 miraculously worked and became enchanted, everything is simple here.


-> I especially use this tool; if you carefully use it, you can replace it with paid programs from a backup copy of the data, as you can read further.

Why is he good? This will help if you do not have the original installation disk with Windows 7 and you have reset the partition to the factory settings of your laptop, but that’s not all.
Sometimes there are situations when, for various reasons or through a virus, you will not be able to invade the operating system at all How to update Windows 7 If you enter a menu with additional options, it will appear unavailable. Should I reinstall the operating system?
Therefore, immediately after installing Windows 7 on your laptop or computer, you can use this additional function -> Updating the image of the system An archived image of our Windows 7 on a hard drive, take care of it. It is absolutely necessary to create a Windows 7 update disk (read below) to help speed up the system image, since the Additional Options menu is not available.
Idemo to Start -> Control panel->Archiving computer data.

Select Creation of the image of the system

Then select the Local disk on which to save the system archives. My option is Local disk (E:), since you have a number of hard drives in the system block, then it is better to install a backup on a hard drive without an operating system installed.


Note: Please note that I have two operating systems installed on my laptop, so the backup program took two local disks.

Click on Archive to begin the process of creating an archive on our Windows 7.
They did it, as you can see.

Now, you can download the archive from Windows 7 to your computer for 20-30 hwylins for any time of need. It will be better if you copy the archives from the system onto a portable hard drive, which will ensure your safety.
It is obvious that we cannot start Windows 7 and we will create a backup and try it all at once.
Launchable Download Windows 7 update, pressing the F-8 button on the keyboard immediately after starting the computer. The Advanced Options menu opens and select Troubleshoot your computer.

Updating the image of the system


Vikoristat the remaining available system image
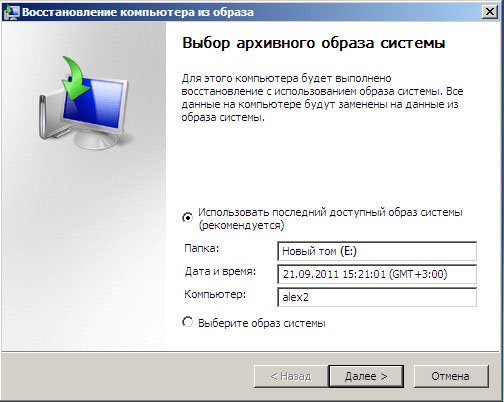

Of course, all our data is on the local disk, where the operating system is immediately updated, so you can first download any Live CD and copy what you need.
How else can you update Windows 7? Firstly, with the help of the Windows 7 Update Disk. Created Update disc, which you can use to fix your computer, there will be some updating methods that you can use to fix Windows 7 problems, as well as update the operating system from an archived copy that we created earlier Go.
Important: For the update disk, the system bitness is important, you can use a 32-bit update disk for any 32-bit Windows 7, and a 64-bit update disk for any 64-bit Windows 7.
Znovu go Archiving computer data
Create a system update disk, inserted into the DVD drive, pressed

Create a disk

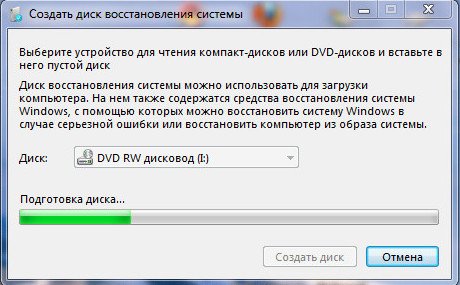
Once your Windows 7 update disc is ready, pick it up from a safe place.
To update Windows 7 from the update disc, you do not need any operating system running. You will only need to change the disk drive priority in the BIOS of your computer, insert the update into the new disk and update your Windows 7 to the additional archive. Who can draw an analogy here with data backup programs and that's right, blame the stink for the same In principle, only their functionality is much simpler.
- If you don’t know how to change the priority priority in the BIOS, read our articles and
Updating Windows 7 from an update disc. I’ll show you how to earn money. It is possible that we have some inconveniences, we cannot launch Windows 7; when you press F-8 on the keyboard immediately after starting the computer, nothing is displayed. The menu with additional options cannot be consumed and there is a notification about the meal. In this case, the system archives on the hard drive are not accessible to us. Our reader Illeya became so hostile to us, and he wrote a sheet of letters to help us.
In this situation, many people will install Windows 7 from scratch, but not with you, or even with us System update disk.
When it is inserted into the drive and re-installed, it is installed in the BIOS to re-install the disk from the drive, so to speak, re-install the disk, and the System Update Settings program is launched.
Press Enter until the option to download from the disk disappears.


