How to increase the size of the system disk How to increase the size of drive C? There are three simple and easy ways to cleanse them
The problem of lack of a free place in the systemic division has always been a common problem among private sector workers. Through ignorance, many people simply installed the system or saw some programs that were installed on them. To avoid reinstalling Windows, you will be given the option of expanding the C drive to accommodate another partition. For which different methods are used: the use of standard tools and third-party programs.
United respect– the system partition and the partition that will take up a lot of space must be located on one physical HDD or SSD storage.
How to enlarge the C drive using the additional “Disk storage”
To expand the section, you can use standard Windows features. The utility is called “” and you can access it like this:
At the window that has opened, the evil one turns into a podrozdil "".
We conclude the offensive series of actions:

At this point, the disk expansion process is completed. This way you can increase any partition without wasting your money.
Respect! The mother's trace is respected, so that those from whom take the song of the vastness of space need to see, but this is still a serious shortcoming of the method.
Vikoristovamo Aomei Partition Assistant
This is a third-party program for working with accumulated information. To expand your HDD or SSD disk, you need to use an official or other device. Є support for Windows 7, 8 and 10.
It is necessary to reconnect so that the operator can work everything correctly, as well as problems in the electrical supply. You can only start the procedure, otherwise you will waste most of the files on your device.
After installing the program, change the interface to Russian settings. We look at the skin section with respect and it is known to be systemic. To change the size of section C, please do the following:

Whenever you happen to check out, everything is stored in the liquidity of the robot and accumulated in the collected volume. There will be one or two re-installations of the system.
EaseUS Partition Master to increase disk size
After installing the utility, run it. The interface will be similar to Aomei Partition Assistant, which is no problem for many wealthy people.

After re-invitation The volume of the device will be increased, and the files located there will be lost in their places.
Enlarge your C drive for help MiniTool Partition Wizard Free
Another option for increasing the system partition is using the MiniTool Partition Wizard Free program. After installation, we move on to specific actions:

Four methods have been considered to allow you to expand the system volume. Carry out the following procedure very carefully, as it may result in the loss of important data.
Editing partitions and volumes occurs when the disk allocation is thoughtlessly at the beginning of Windows installation. Shortcomings, allowed under the hour of installation, can be easily corrected.
It is now necessary to change the hard disk partitions
After a large number of programs that occupy almost the entire free space, Windows begins to behave, and defragmentation of partition C ends with damages.
The main reason for changing hard disk partitions is the lack of space on the system partition C.
Partition D currently has up to hundreds of gigabytes empty, and unless you transfer certain files to partition D, you will need to reconfigure a lot of third-party programs. This way it’s easier to expand drive C to drive D.
How to expand drive C
Disk expansion is possible using both Windows and third-party programs.
Expanding drive C without the middle in Windows 7
If you want to expand the disk using standard Windows options, do the following:
- By pressing the Win + R buttons, select the “Viconati” window. Enter “diskmgmt.msc” and click “OK”. The command “diskmgmt.msc” is used as a utility “Disk Manager”
- Select partition D and click “Delete volume” in the volume’s context menu. Do not rush to edit the received disks without a name, so that the dedicated partition will save all the valuable files that are saved on the new one. The necessary information can then be copied to another disk or storage device. Visibility of drive C, on which the system itself is installed, is not possible. After the D drive is depleted, you will lose the undivided space.
 Select volume and delete it
 - Select drive C and in the context menu give the command Expand volume.
- Indicate the number of megabytes that will be allocated to drive C. Change the maximum value to achieve the minimum physical boundaries. Press "Distance".
 The size of the previously unmarked area will change by this amount
 - Drive C will be enlarged. The size of disk D will change by megabytes, given to disk C. Click on the largest part of the disk and give the command “Create a simple volume”. When volume D is created, this partition will be automatically formatted (it will be formatted using Windows methods).
 Click on the unmarked area that is missing, and click on “Create a simple volume” in the context menu
Now in C there is a place for normal Windows work and your programs.
For this purpose, you can quickly use third-party programs, such as Acronis Disk Director or Partition Manager. Just to remember, in the hands of poorly-informed procurers, alternative programs often become not a magic wand, but a special waste of the procurer’s files, and only in a computer service center you can renew your money. and data.
Video: Extending volumes for help in Windows 7
Disk expansion C under the hour of installation of Windows 7
Once Windows is installed, you will not go through the next stage of changing disk partitions. During the reinstallation process, the program powers up which partition to install the system and assigns partition to the hard disk space.
There are two types of Windows installation: upgrade and external installation. The update runs on top of the original system, saving all programs and resetting system parameters. Full installation - installation with a formatted system partition, or installation on another partition of the hard drive. If you want to change the hard drive partitions, you must select a different installation type.
If there is really a need for a “clean” installation of Windows, do the following:
- Insert the installation DVD or flash drive and restart the PC.
- To open the BIOS window, before the system starts, press the Del key, F2 or Esc (the key selection is located in the computer's startup box). In the window, use the arrow keys to select “Boot”.
 In the window, use the arrow keys to select “Boot”
 - Next, use the following arrows to open the Boot Device Priority tab and in the list see the important device for which you need to protect the system. Close the BIOS and save changes.
 In the list you can see the most important device you need to use to unlock the system.
 - Check until the installation program is downloaded into the PC's RAM.
- Select Windows installation type.
 Select new installation of Windows 7
 - For the butt, one disk and one partition were taken. Select the disk and click “Adjust disk”. All files may be copied back to other disks.
 Select the disk and click “Adjust disk”
 - To receive additional messages – press the “Vidality” message. When prompted about transferring the data, click “OK” and delete the section. Proceed similarly with the vessel sections (D, E, etc.), as there is a stench.
 Click “OK” if your special files were copied to other devices
 - After deleting the existing partitions, you will see an unpartitioned (unformatted) area of the disk, which is the larger size of the hard drive. To create new sections, click on the “Create” option.
 The Windows 7 installation program will help you create new logical drives
 - Enter the size of section C and create section D. Go to section C and format it. The format of the disk is set (cleaning up the disk space).
 The installation program will format partition C
After formatting, Windows will be reinstalled. Section C has been successfully changed.
Video: changing the size of partitions during installation of Windows 7
Why can't you expand the volume in Windows 7?
The situation, if the "Expand Volume" option is inactive, is possible. For example, we took the extension of drive C.
 The situation, if the "Expand Volume" option is inactive, is possible
 - Once a storage volume has been created, which includes, for example, disks D and E. Transfer files from these sections to other media. View this storage volume;
- You forgot to delete all the previous volumes, including disk D. Expanding the front volume only works when you delete the old one.
Yak vidality volume
You can add to the disk any unpartitioned partitions that appear after deleting one or another volume.
What volumes are visible in Windows 7?
For a volume view:

You will be deprived of a free space the size of which can now be added to another section.
Why can't you delete a section or volume?
In such cases, the situation can be simplified.
The reasons are:

How to get the swap file
To see the volume is available, do the following to delete the Windows swap file:
- Through the "Start" menu, go to the "Control Panel".
 Through the "Start" menu, go to "Control Panel"
 - Go to the "System" section.
 Go to the “System” section
 - Go to “Additional system parameters”.
 Click “Additional system parameters”
 - In the “System Power” window, go to the “Add-ons” tab and click on the “Options” button in the settings of the settings.
 Press this button
 - In the window of parameters of the speed code, select the section “Add-ons” and click “Change”.
 Select the “Addatkovo” section and click on “Change”
 - In the virtual memory configuration window, uncheck the option to auto-select the size of the paging file and check the box next to “Without paging file.” Press the “Set” button.
 Uncheck the option to auto-select the size of the paging file and check the box opposite “Without paging file”
 - Press “So” to clear the swap file.
 Give positive feedback on clearing the swap file
 - Close all windows by clicking the “OK” button and restart your computer.
Go to “Disk Management” and try to delete the volume. Be sure not to link this volume with the next volume in this section.
Yak squeeze volume
You can expand the disk for a small amount of compression. As a result of the compression, more space will be removed that can be used to create a new section of the volume.
Features of volume compression in Windows 7 are due to the following:
- The compression only works for main and secondary partitions, as well as for the NTFS file system. If the partition or volume is formatted in FAT32, transfer the data and reformat (or convert) it to NTFS. To do this, select the context menu of the disk and click “Format”;
- Since this section has a lot of bad sectors, it will not be possible to squeeze it;
- The swap file, files in deep sleep mode, and the update point present additional difficulties for compacting partitions and volumes. In other areas of the free space, there is no shortage of pressure.
Pressed volume for additional “Keruvannya with disks”
If you want to compress the volume using standard Windows features, then:

Squeezing Tom behind the help of the command row
If the function of shrinking a volume in the Disk Management program has become unavailable, use the Windows Command Row. You may experience inactivity in activities that are hidden behind the Windows graphical shell. The instructions are universal for Windows 7/8.x/10.
- Find the “Command Row” program through a search in “Start” and run it with administrator rights. For tasks such as running various application programs, Windows often requires a new administrator.
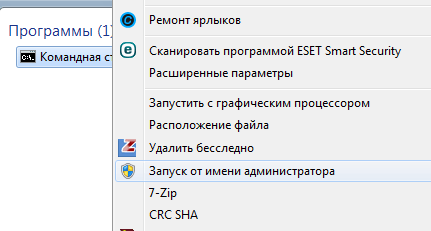 Launch the “Command Row” program with administrator rights This command displays the list of disks, partitions and volumes. The command line informs about the maximum available space of the volume for compaction
 - Enter "shrink desired=(number in megabytes)" if you want to compress. The “shrink” command is entered with the parameters, and all available space will be compressed.
 The "desired" attribute is a variable that represents the value in megabytes
Once the compression is completed, the command line will display a message about the success of shrinking the volume on the specified megabytes. Look, there is a free area where you can create a new volume using the Disk Management program.
Video: squeezing Tom behind the help of the command row
Expanding, condensing, deleting, adding new sections and volumes using standard Windows utilities is not important on the right. Golovna - do not waste the valuable tributes that you have collected and created more than one river.
It may be that there is a need to increase the capacity of the C drive. Such a need may arise, for example, if the computer becomes malfunctioning due to a lack of memory on a large disk, then. on drive C. The reasons may vary. Before you wash your face right away, you need to increase the size of the C drive to save more memory on the D drive (or a drive with another memory) so that they are located on one physical hard drive (HDD) or solid-state drive (SSD) ).
The instructions are written for the operating systems Windows 7, Windows 8 (8.1) and Windows 10. There is no interface provided for such a transfer, so in the statistics you will find two free programs: MiniTool Partition Wizard і Aomei Partition Assistant .
Also, before starting the procedures, it is important to say that accidental disconnection of life during the memory transfer or incorrect actions during the execution of the procedures can lead to the loss of some data on your disks, so before transferring it is recommended to save important data on other disks.
Increase the volume of the C drive with the additional program Aomei Partition Assistant.
The program can be downloaded from the official website by following instructions: www.disk-partition.com/free-partition-manager.html
This program supports the Russian language (which must be selected at the installation stage) and does not install any unnecessary software in addition, so we give it its own advantage.
After installing the program, you will see this.
1. To start, click on disk D in the program with the right mouse button and select the item "Change section size" .
2. In the window that opens, you can change the size of the disk. You can change it by simply pulling the dots with your right hand or left, or by entering data in a special field for that particular field. Disk D has unused space and has boot space BEFORE him (div. Fig. Below).

3. Same as with drive D, open the window to change the size of drive C, otherwise you will need to enlarge the drive for enough space to make it right-handed. Don't forget to press OK.

4. Now everything is no longer stagnant. Why press the button? "Zastosuvati" At the main program window, check for the transfer to complete.

Increase the volume of the C drive using the additional program MiniTool Partition Wizard.
This is also a very good, simple and cost-free program for transferring and increasing the volume of disks. It’s true that this program does not support Russian language.
After installing this program, you will see this window.

In principle, the program is practically identical and as simple as the previous one.
To change the size of disks, you need to select the same data: right-click on disk D, select item in the menu "Move/Resize Partition" , Next, change the disk size using the same scheme as the first program. so that the space is left-handed. The same is true for drive C, but it is not changeable, but there is more space in place, so that you can use the right hand. Click OK and set up settings in the main window of the program.
Sometimes there is a need to increase the volume of drive C to accommodate another partition. You need more money for everything, because there is no place in the new space, but it needs to be expanded. In this article I will discuss two programs that will help you complete this short instruction.
We will talk about the increase in drive C at the expense of another partition, for example, drive D, and the culprits are located on one hard drive or SSD. If you have Windows 7, 8 or 10, then these instructions will work for you.
How to increase the volume of the C drive using Aomei Partition Assistant
A wonderful program that allows you to expand the partition C of your hard drive or solid state drive is called Aomei Partition Assistant. This program does not establish at once the different things that these programs are famous for. It’s also a Russian program with a very sensible interface. Works on all operating systems starting with Windows 7.
The most important thing to remember is that incorrect work with sections can lead to the loss of data. Since the smells are important, I recommend saving them in a safe place.
If you download and install the program, I don’t think there will be any problems. After launching, you will get the receiving interface, for whomever you want. All your disks and partitions are displayed there.
In our case, as I have already said, we have greatly divided section C for the part of section D. Now we will separate it.
Click on disk D with the right mouse button and select "Change section size".
A window will appear where you can either step or change the size or enter it manually. It is necessary to do this so that there is no unoccupied space for the section after choosing the size of the letters in front of it, as shown in the screenshot. Then we press OK.

Now, section C is changing itself, only now the size of the right hand is larger. We are very grateful for the price of that free place we took on disk D. Once again we press OK.

After the installation of the robot, in the mountains of programs, evil, there is a button "Zastosuvati" press її.

Now you need to restart your computer, so you need to create two. As a result, the size of the C drive will be increased.
This is not the only function of the program. We can help her. You can also create a customized flash drive in the program and change the size of the sections there.
How to enlarge the C drive using MiniTool Partition Wizard Free
Well, there is another good program called MiniTool Partition Wizard Free. It’s cost-free, it doesn’t install third-party software, but the downside is that it’s not Russian, it might be difficult, but then you’ll understand this statistic.
The program interface is similar to the previous one. In principle, there are no more advantages than the first option. We'll do the same thing by expanding the system disk.

To start, press disk D, and then press "Move/Resize Partition" beast. Now take the required size of disk D, see what is wrong and press OK.


That's all, after completing the operation in Explorer, you can now increase the size of the system partition. Now you know how to work.
You can download the program by clicking here.
How to increase the volume of the system disk as standard
By default this means additional to standard Windows features. You can do it the same way as Windows 7, Windows 8 and Windows 10 have this function. However, there is a drawback to this method: the data located on drive D will be erased, so you will need to transfer it somewhere first. Perhaps you wanted to quickly get started in this way, then start pressing the combination Win+R, a window will open where you need to enter the command:
| diskmgmt.msc |
In this manner, the instrument is opened "Keruvannaya with disks". There you will see all connected disks and partitions. Since there are additional sections, which are also called admissions, I do not recommend them.
Now, right-click section D and select "Vidality Volume". After this, the data on the disk will be deleted, and the right-hand side of disk C will be free of space.

To increase the volume of the system disk, click on it with the right mouse button and select "Rosewidth Volume". Next, the Expansion Master will appear where we need to indicate which disk we are expanding to. There are plenty of options to choose if you need section D.

We have enlarged the system disk, now we need to use up the space that we have lost. For which we press on something that is not distributed with the right mouse button and press "Create a simple volume". The disk will be assigned to the letter you selected, and will also be formatted. That's all.

Now you can turn all important data back to drive D.
Most computers have two partitions on one hard drive, called the drive called C and D. When installing, change the disk size in Windows 10 і Windows or after) and third-party cost-free programs.
Speed up the Disk Management utility
- Open the utility by right-clicking on the “Start” menu and selecting “Disk Management”.
- Next to the Start menu, select “Control Panel” and open it.

Vibrate the item “System and safety”.
In the window that has opened, in the “Administration” section, click on the “Create and format the hard drive” sub-item.

Shrinking the volume, a new place to create a new partition in Windows 10
To create a new volume in the utility, you first need to find a suitable place for it so that you can remove the compressed space on the existing volume. In the Windows operating system, one physical HDD can have no more than 4 partitions, including system ones (for example, the update partition). Name two local drives Z and D.

To create the third volume, you need to right-click on the section in whichever place is most suitable, in our selection, drive D. The Explorer window will appear, click on the item “Squeeze volume” to select the most convenient place, change Its threads are undivided.

Section D is for creating a new volume.
After which the message appears: “The training is being completed to determine the available space for compression. Check..." The process can take anywhere from several seconds to several dozen minutes.
When the system finishes accumulating the volume, you will be prompted to see the “Size of what is being squeezed” column to indicate how much space needs to be added to the donor disk to create as much space as possible. To see more space for the new section, it is clear that it will not be possible. The app in the screenshot has 78880 MB, a little more than 77 GB.

You can specify another number less than the specified volume, for example, by setting the value to 51200 MB, you will see exactly 50 gigabytes for the new volume. After selecting the “Squeeze” option for any hour, the result will not be exactly as expected. To verify that the compression process is in progress, you need to hover the cursor over the utility window, a blue circle will appear that will turn around. If at the bottom part a black space with undivided space finally appears, then we will talk about those who have become cramped.

Thus, the place has become available to create a new volume on the HDD in Windows 10. Now the unallocated space must be converted into a full-fledged partition of the hard drive.
— Creation of a hard drive partition from unallocated space
You need to press the right mouse button on the area with the inscription “Not distributed”, select the item “Create a simple volume”.

Open “Simple Volume Creation Master”, click “Next”, and at the next window you will need to specify the size of the new volume. You don’t have to change the value if you want to create two sections or enter a smaller value. Press "Dali".

After that, select the Latin letter that represents the disk, for example, F. Select the letter and press “Next”.

Then it will be possible to format a new section for your needs.

Continue the pressure of “Done.”

After a few seconds, the entire partition will be formatted and a new partition of the Windows 10 hard drive will be created. When choosing the amount of memory you want to see new, you must take into account that the amount of space cramped in Windows for system needs is small.
So, when choosing 50 GB of memory, the size was 49.9 GB.

Creation of sections during installation of Windows 10
Before installing Windows 10 on your computer, you can divide disks into volumes from a flash drive or disk. For those who are reinstalling the operating system, you will need to get a service that will remove data from the system partition.
Before installing Windows, after entering (or skipping entry) the activation key, select the “Select installation” item, after which you can select a partition for installation, available tools for setting up partitions.

In our case, drive C is partition 4.
To create two partitions from one HDD, you need to click on the “Delete” button for the partition, as a result it will change to “Unoccupied disk space” (point 4).
Then select an unoccupied location, press the “Create” button, and set the size of the new “Disk C”. After your creation, you will lose a lot of unoccupied space that will need to be transferred to another partition of the disk in this way.

After creating another partition, it is recommended to see it, click “Format” (otherwise, it may not appear in Explorer after installing Windows 10 and you have to format it and assign a letter through “Disk Transfer”). Then select the volume that you created first, click the “Next” button to continue installing the operating system on drive C.
Programs for dividing disks into sections
In addition to the included Windows tools, there is a non-invasive program for working with partitions on disks. Some of the most cost-free programs are Aomei Partition Assistant Free and Minitool Partition Wizard Free.
To get started, you need to download the Aomei Partition Assistant program from the official website, install it on your PC and run it. In addition, in Russian language, select the system drive, in the “E” section.
Click on the right mouse button, click “Change section size”.


To show up, the selections have been used for memory, ours has 15 GB.
Right-click on the system local drive C and select “Change partition size” from the context menu.

Again, drag the bar to the right to the required size, or enter the required space for expansion in the “Unoccupied space after” field. To decide first how to update your Windows 10 system or use a third-party backup, click “Ok.” To save changes, press “Zastosuvati” at the top left corner.

To be notified that there will be some re-installation, when the disk will run out of space with unoccupied space, select “Go”. Be informed that the program will run in PreOs mode by pressing “So”.
Windows 10 seems to be re-loved.
At the first hour of downloading, AOMEI Partition Assistant PreOS Mode will start.
The process of Vikonannya Zavodannya will begin to emerge.


