The custom recovery cannot be installed. How to install ClockWorkMod Recovery on an Android device: report instructions. Visibility under TWRP
Today we are encouraged to talk about this tsikava and immediately folded river (recovery for Android). Most consumers who have switched to smartphones running the Android operating system will not realize how richly functional it is. An essential part of the value of the OS is the recovery.
In a sing-song tone, you started joking about what’s going on after all the filth that has been messing with your smartphone (doesn’t respond to the pressure of buttons, the black screen hangs, etc.). Am I right? You've come to the right place! Our materials provide maximum information about what is needed and why.
Recovery for Android (Stock) - what is it?
This, so to speak, thing is present in every Android smartphone called Mode. It is switched to “Update mode”, presented in the adjacent menu, which includes the selection of software. In this regime you can:
- update your device after any malfunction or infection with viruses;
- update (flashing) the system;
- install new patches;
- reset the device to factory settings;
- create a backup copy;
- create and montuvati divided;
- otrimati ROOT-rights (superkoristuvach rights).
You know, there’s no shortage of possibilities. Virologists are trying to incorporate more functions into this mode so that users can independently perform various activities with their smartphone without any special skills.
You won’t find the Recovery menu on your desktop or on your smartphone. The recovery is “secured” deeper in the system, and access to it can be denied by pressing the same combination of buttons when the device is turned on (your smartphone may be damaged).
The stock menu can be folded for mastering the koristuvach through those presented in English. In addition, the cervical bath in the update mode operates using physical buttons - the touch cervical bath does not work.
Stock recovery – what is it?
For those who are interested in dealing with this, it is immediately clear that there are two types of update mode:
- Stock (Stilny, rіdny rekaveri) – is used for the harvesting of the virobniks;
- Custom (custom, custom recovery) – a version modified by the developers, which includes more functions and capabilities (aboutCustom a little lower).
Also, recovery is an update mode that is installed by the driver of your smartphone or tablet. It is fully functional, allowing you to work with all those who have spoiled the little bits of it, but without any precautions.
Stock does not transfer the installation of third-party firmware to the control system - only the official version of the manufacturer.
Some of the official firmware is installed (as a rule, owners of popular smartphones, which without a fresh update are not deprived for a long time), for others (owners of models from small Chinese companies, who forget about their child after one update) – the story doesn’t even come up yet.
There are thousands of firmwares available for custom covers, which are developed by the developers themselves. So, on a smartphone that has long been forgotten by the vendors, using Custom, you can install the latest, even non-official, firmware. Let's talk a little bit about customization.
For completeness, watch the video that talks about the cover mode on Android:

How to go to the menu on Android?

It’s much simpler to become familiar with what and why it’s so much simpler, but not to be absorbed in something new. On the right, most smartphones have a different set of physical buttons: one smartphone has three, another has even more. As a result, combinations are differentiated.
As a rule, the life button and the adjustment dial are activated. It is necessary to wait until the menu appears.
Below are the simplest ways to enter update mode for the most popular Android smartphones.
How to get to Recovery Mode on Samsung

- We connect the smartphone via additional USB to the PC;
- launch the program (via “Run with administrator rights”);
- Look, you're going to get attracted;

- A list of possible actions and presentations in English will appear before us;
We need the item "Reboot Devices", which is represented by the number "4";
enter "4" from the keyboard and stamp "Enter";
appears soon;

Now we select “Reboot” (reset to update mode), the item is listed under the number “5”, then we type it on the keyboard, stamp “Enter”;
Your smartphone will now be restored to Recovery Mode.
Method 2 - command "adb reboot recovery"
If for some reason the first method did not work (although it is unlikely), there is one more. Let's start the Adb Run program again, where:
- enter the number “7” (go to the “Manual Command and Unlock Bootloader” window) and confirm with “Enter”;
- In the next window, enter the number “1” to deny access to the Adb command line;

Here we enter the command “adb reboot” and confirm by pressing “Enter”;

Wait for a few seconds to re-engage your smartphone.
Method 3 – commands for singing models
It’s rare that things get messed up in such a way that two over-the-top methods don’t help (most often with LG smartphones). For this type, it is recommended to vikorize other teams. What is timid:
- We also go to the Adb Run command line (read more);
- enter one of the commands: adb shell, reboot recovery or adb reboot -bnr_recovery;
- In just a few seconds, the smartphone will be re-engaged.
Custom recovery – what is it, what is it?

Custom, as indicated, is an update mode for third-party vendors. Its main advantage over Stock is the ability to install different firmware, and not just official ones.
Modified recovery (Custom) is the simplest and most manual way to install third-party firmware.
The most extensive are the two types of custom recovery:
- TeamWin R ecovery (TWRP);
- ClockworkMod Recovery (CWM) .
TWRP
TeamWin R ecovery - unofficial modified recovery, this version is practical for all devices running the Android operating system. You can boast of significantly greater capabilities, lower Recovery. TWRP is often installed on phones after installation, and can also be installed in parallel.
In the current TWRP update menu, there is not only expanded functionality with the ability to install any firmware, but also the presence of touch sensors. You can also download data, create backup copies, and share installations. You can customize TeamWin R ecovery without any costs, with only a few details about installing custom covers.
CWM
ClockworkMod is a popular analogue of TeamWin, which also offers expanded functionality and capabilities. You can find a version for your smartphone, just like the older models.
There are a lot of modern devices to tune CWM for washing.
Like the analogue, the main task is to assist the customer in installing third-party firmware on the device. In addition, CWM is ready to help you revoke ROOT rights in order to become rich for everyone. The controls in this recovery can be varied, however, most of the time the buttons increase/change the volume and the life key are used. Also, in the vastness of Merezha, it is not important to know the version of CWM touch, which allows you to select the required functions on an additional screen.
Installation of custom recovery TWRP and CWM
You can install Custom in a number of ways, which significantly differ from one type to another, and may also be suitable for one device, but not suitable for another.
Installing recovery via fastboot
F astboot is a section of the update menu, so this method is often called the first one.
In order to install Custom in this way on your device, you will need to undergo a rigorous recovery, which will result in one of the methods that we talked about above. Also, you will need files for installation.
Cover files must be downloaded for a specific model! If you try to download and install covers that are not for your smartphone model or TV set-top box, you are guaranteed to miss the target!
In addition, to install recovery via fastboot, you must first unlock Bootloader.
Unlocking is used in order to get the device “without repairing it” if you decide to install a custom recovery or remove ROOT rights. There are enough ways to unlock the Bootloader, but for skin problems it is important to vikorist the song. Read the report on unlocking in topics specific to your smartphone.
Instructions
Also, the instructions for installing Custom via fastboot look like this:
- check to see what recovery is on your smartphone;
- unblock your device (look for information on thematic forums on your device);
- download the Android SDK package, which includes a set of various programs and files;
- We are searching for a new version of the Recovery.img file specifically for your device (we are back on thematic forums);
- download file is renamed to "recovery.img";
- Move the file to the “platform-tools” folder;
- We connect the device to a PC that has set the FastBoot mode in Android SDK Tools;
- launches the command row on the PC (“Viconati” – cmd);
- here we write: “cd (space)” the next path to the platform-tools folder”;
now enter the command : "fastboot flash recovery recovery.img";
Check while the installation is in progress.
Installing recovery via RomManager

This method, although one of the simplest, is not recommended, as it carries few nuances.
- First of all, it is necessary to have ROOT rights;
- Otherwise, you need to check that your device is crazy with an add-on (otherwise there is a great risk of removing the “whole” (an unnecessary device, which can only be confirmed (not again) in the service center).
So, if you wanted to install recovery in this way, then:
- ROOT rights are revoked;
- download the RomManager program (on the Play Market or other devices);
- we launch yogo, granting the rights to the superkoristuvach;
- embossed on the “Install” item;
- check for completion;
- To get to the recovery menu, select “restart to recovery”.
Other ways to install custom recoveries

We have told you about the two most popular methods, and we recommend that you follow them first. True, in some situations this may not be enough, so the developers have found many ways to install Custom. Those smartphone manufacturers are not particularly up to speed with their expansion.
The current option, if the first two methods were not used, is to flash the device’s firmware using special software. For example, the Odin software is specially developed for Samsung devices, and the SP Flash Tool is specially designed for smartphones on SoC MediaTek, and for Motorola smartphones – RSD Lite.
We recommend that you choose the right method for a specific device model, so that problems do not arise due to confusion. Find information on thematic resources on topics dedicated to your device. For greater reliability, do not hesitate to ask questions of other traders on the forums.
How to flash an Android device through recovery?
As a rule, users search for information about when there is a need to flash the device, and through the update menu this process can be made as quick and simple as possible.
If you are planning to install the official version of the firmware, you must install a custom recovery, otherwise you will end up with a problem.
You can try to find the official firmware for your smartphone on the manufacturer’s website; however, it is not guaranteed to have access to it in order to protect the code from being handed over to hackers. Also, a copy of the official firmware is often shared by users of similar devices on various forums. Make jokes.
However, the firmware process actually takes a lot of effort, as there are a lot of peculiarities to consider:
- download the firmware file (you know it for your smartphone model);
- As a third-party firmware, a custom recovery can be installed (see instructions below);
- After downloading, the file is moved to an external memory card;
- Install your smartphone in update mode (see instructions below);
- Look for the item “Apply update from external storage” and indicate the path to the firmware file;
- we confirm this;
- we check for the completion of the renovation of the building;
- We won’t tell you to clear the traces of the previous software (see the Wipe data/factory reset item);
- To complete the firmware of the new device, you will see the “Reboot system now” stamp.
Ready! Your smartphone can successfully become addicted, presenting itself in a new look.
Of course, the Android firmware will not be successfully completed through recovery. Smartphones are often asked to be flashed using a white recovery, often to flash the required additional information, as well as connect to a PC. However, the official firmware of the big one installs without problems.
Pouch
Well, today we told you everything about Recovery as clearly as possible. We tried to convey the material as clearly as possible, so that our readers do not write without a video.
At one point, you can effectively restore your device by discarding settings or creating a backup copy, and custom recovery will help you install the firmware that you need, with updates. We hope that you will now be able to figure out the update menu without the help of a clerk.
Installation of modified firmware is completed through custom recovery - an installer program on the phone. One of these programs is clockworkmod or shortened to CWM. What are the capabilities and features of the stitcher, you will find out from this article.
What is CWM recovery?
CWM is a different type of modified update mode with expanded capabilities, consistent with the official version, which is used by electronics manufacturers. The installation license has been removed, which allows users to install third-party firmware and other modifications - kernels, patches or programs.
Due to the fact that CWM recovery is obvious, it is more important for homeowners to select the installed firmware and additionally. Fragments of incorrect actions can lead to software damage to the device, or without the possibility of recovery in the home or at the service center.
What does CWM recovery include?
- Install images of firmware, kernels, add-ons, patches and programs.
- Resolve the system’s “slips” or save unnecessary parts.
- Reveal the image or the singing section before saving.
- Install the song section, mark the memory card to create additional areas.
- Clear your account data and remove information from the singing section.
Navigation with CWM recovery
The external appearance of CWM is close to the standard update mode. Visual significance is revealed by the color scheme. The controls are also standard: the volume buttons allow you to move up and down, the life button allows you to select an item. This is the original version of CWM touch, where input is entered via the touch panel.
Sections CWM recovery

- Reboot system – restart the system.
- apply update.zip from sdcard – install archives with the image/updates that are on the memory card.
- wipe data/factory reset – deleted customer information.
- wipe cache partition – clearing the cache of the internal memory partition.
- install zip from sdcard – installing the archive from the memory card.
- backup and restore – saving the image of the system as a whole or even just one section. Renewal of the previously created image and division.
- mounts and storage – place system installation points, storage and other sections. More tools from cleaning and formatting.
- Advanced – additional tools. I divided the items to clear the Dalvik cache, reinstall recovery, etc.
Sections of CWM recovery versions of Touch

install zip – section with options for choosing to install a system image, update or install from external memory.

wipe data/factory reset – this section allows you to erase your personal data. It is often necessary to install a new mod or reset the system and re-adjust the system.
wipe cache partition – wipe the cache partition.

backup and restore – in the partition there are items for saving images of the system/partition, as well as for reversing the backup in case of recent manipulations with the system or when downloading from one firmware to another.

mounts and storage – move installations from installation and clean sections.

advanced – includes the functions of going to recovery or bootloader, turning on the device, clearing the cache, etc.

Destroy CWM recovery
The utility is available from the software warehouse. A similar CWM package is often added to the instructions for the singing model of the device, for example on the XDA resource. CWM acquisition from the official website is no longer available.
Methods for installing CWM recovery
Obviously, installing CWM is possible using the additional program Rom Manager or other analogues, which allows you to install a custom update mode. However, this method is extremely unnecessary, as it often leads to the device getting stuck during the installation process or other problems. The reason is the complexity of programs with a specific device. Therefore, it is better not to use this method of installation, since there is no exact evidence of the usefulness of the method.
Anyone who is new to the familiar procedure for flashing Android devices will immediately fall in love with the most advanced method of doing this process – flashing it through recovery. Android Recovery is the centerpiece of the update, access to any truth is practically available for all Android device owners, regardless of the type and model of the rest. Therefore, the method of flashing firmware through recovery can be seen as the easiest way to update, change, update or completely replace the device’s security software.
It is practically a skin device that works under the Android OS, equipped with a special renewal medium, which provides various means, including for the most severe patients, the possibility of manipulation from the inside Your device’s memory, or more precisely, its sections.
It should be noted that the transfer of operations, which are carried out through “real” recovery, is installed in the device by the manufacturer, even the surroundings. Since the firmware is missing, it is not possible to install or update official firmware.

In some cases, through the factory recovery, you can install a modified middleware (custom recovery), which in turn expands the capabilities of work with firmware.
In this case, the main steps for updating the efficiency and updating the software can be completed through factory recovery. To install official firmware or updates that are common in the format *.zip, we are concluding such terms.


How to flash a device through a modified recovery
With a wide range of capabilities, robots with Android devices offer modified (custom) midstream updates. One of the first, and today even expanded solutions, is the recovery from the ClockworkMod command - CWM Recovery.
Installing CWM Recovery
CWM recovery fragments and unofficial solutions will require installing a custom update middleware on the devices before using them.


- For Samsung devices, most devices use the Odin program.
- For devices installed on the MTK hardware platform, the SP Flash Tool program will be installed.
- The most universal method, which is also the most insecure and most complex, is flashing the recovery via Fastboot. Details of the actions that are carried out to install recovery in this way are described as follows:
Firmware via CWM
In addition to the modified middleware, you can flash not only official updates, but also custom firmware, as well as various system components, represented by Russifiers, add-ons, upgrades, kernels, radios, etc.
It is clear that there are a large number of versions of CWM Recovery, so after logging in on different devices, you can change the interface that changes - background, design, maybe touch control, etc. In addition, there may be visible or daily actions menu items.

The butts below are equipped with a standard version of the modified CWM recovery.
In this case, in other modifications of the middle, during the firmware, items are selected that have the same names as in the instructions below, then. In case of registration, there is no need to complain to the koristuvach.
In addition to the design, the control of CWM processes in various devices is being expanded. Most devices have the following scheme:

- Hardware key "Guchnist+"- Move one point uphill;
- Hardware key "Guchnist-"- Move one point down;
- Hardware key "Zhivlennya" either "Home"- Confirmation of choice.
Hey, firmware.


Firmware via TWRP Recovery
In addition to the solution from the ClockworkMod version, there will be other modifications to the middle of the update. One of the most functional solutions of this kind is TeamWin Recovery (TWRP). About how to flash devices using TWRP, the statistics says:
This is how the firmware of Android devices is carried out through the update process. It is important to select a recovery device and the method of its installation, as well as to flash unnecessary packages to the device, taken from the reliable cores. In this case, the process proceeds smoothly and does not cause any problems throughout the year.
One of the most popular alternative versions of recovery is ClockWorkMod (CWD), which significantly expands the functionality of the custom version and provides a wealth of benefits for those who like to experiment with their device and for service engineers.
What is ClockWorkMod Recovery?
A special change has been made to the system recovery menu for Android, which supports a wide range of devices and can significantly expand functionality, with the main functions:
Installation of various, including unofficial, firmware;
Installation of additional updates, patches and graphic changes to current firmware;
Create backup copies;
Renew from previously created backups;
Outside, we'll drop it off to the factory's adjustments.
How to install ClockWorkMod Recovery
We have three main methods, which you can use in addition, let's take a look at each of them.
Firmware from CWR
Find out the required firmware version for your model with ClockWorkMod Recovery already installed. Vikorist's method, you will sing. The device will be efficient and will have an up-to-date version of CWR without any glitches. The only downside to this method is that it is not suitable for any skin model.
Software methods
Officially, CWR is available, divided into a single command, and there is an official Rom Manager add-on, you just need to install it. Select the first setup item, give the model of your device and that’s it.

Important! If you have a Samsung smartphone or tablet with Android system recover 3e, the procedure will not work.
Also remember that in one out of ten ways you can change the accessory to a “target”.
Another program, it’s more simple with Vikoristan, but often you just don’t install ClockWorkMod Recovery on your Android.
Installing recovery via fastboot
This is the most reliable and reliable method, but many traders have a problem with it. The problem is that each model requires its own files in the img format, it is necessary to unblock the owners and open the recovery section.
The recovery itself is easy to do, just launch ADB (Android Debug Bridge) in the command line and enter the command
fastboot flash recovery imya-recovery-obraza.img

For this reason:
Fastboot - final exe file, flash recovery - firmware command for the recovery section imya-recovery-obraza.img - image for your gadget
ClockWorkMod Recovery Options
Let's take a look at the main functions of ClockWorkMod Recovery 5 and 6 versions, they are practically similar, select the up and down keys, and confirm the live key.

Wipe data/factory reset - deletes all settings and data of the gadget, and during this procedure, all data from the internal memory sections data and cache are deleted;
Wipe cache partition – deleted information of the /cache partition;
Install zip from sdcard – select installation from a zip file on the memory card;
- chooze zip - Select archives for installation;
- toggle signature veritification - enable or disable verification of the archive signature;
- toggle script assert - toggle or toggle the assert script
Backup and restore - create or update a backup copy
- Backup - create a new copy;
— Advanced Backup – create a copy from designated sections;
- Restore - update from the necessary copy;
— Advanced Restore – restore the previous section from a copy.
Mounts and storage – a robot with hoarders
- Connecting the system folder;
- Vim the data folder
- Vim the cache folder;
- Upgrading the memory card
- if there is a Linux partition on the card, then you can connect;
- Format of the vantage sector;
- Format the system folder;
- Format the data folder;
- Format the cache folder;
- delete all information on the memory card;
- if there is a Linux partition, there will be no cleanups;
- Connect to the computer, like a hoarder.
Advanced – expanded settings
Go Back+++ - Turn to the front menu.
Pouch
ClockWorkMod Recovery for Android is a very useful utility that will help you create a backup copy, update the device in case of failure, and also install other updates. It will be useful to the service workers and the accredited service providers.
For those who do not like the standard recovery menu on Android, there is a wonderful alternative in the form of TWRP Recovery, but there is a problem with the power supply due to this, how to install TWRP Recovery.
This recovery option is particularly surprising in that it removes all functions from the touch surface.
Then you will not need to select the volume buttons and phone menu to select these and other items from Recovery.
Most often it is extremely inauthentic and evokes more than unacceptable emotions. That's why you want to install TWRP Recovery.
In addition to sensory selection, there are no other advantages. We won’t look at them now, but then we’ll talk about installing custom recovery.
Zmist:Option #1. GooManager
The infection program has been renamed to TWRP Manager. This is one of the simplest, and therefore easiest, to set the menu we need.
All events end up in that same window. The retail workers did their best.
The installation process looks like this:
- From the very beginning you need to attract the manager to . For whom is this special message?
- Next, the program will be installed and launched. After this, go to the program menu. Swap to the left.
- This menu will no longer have the “Install TWRP” vibrate.
- In the next window, you just need to click on the “Install Recovery” item.
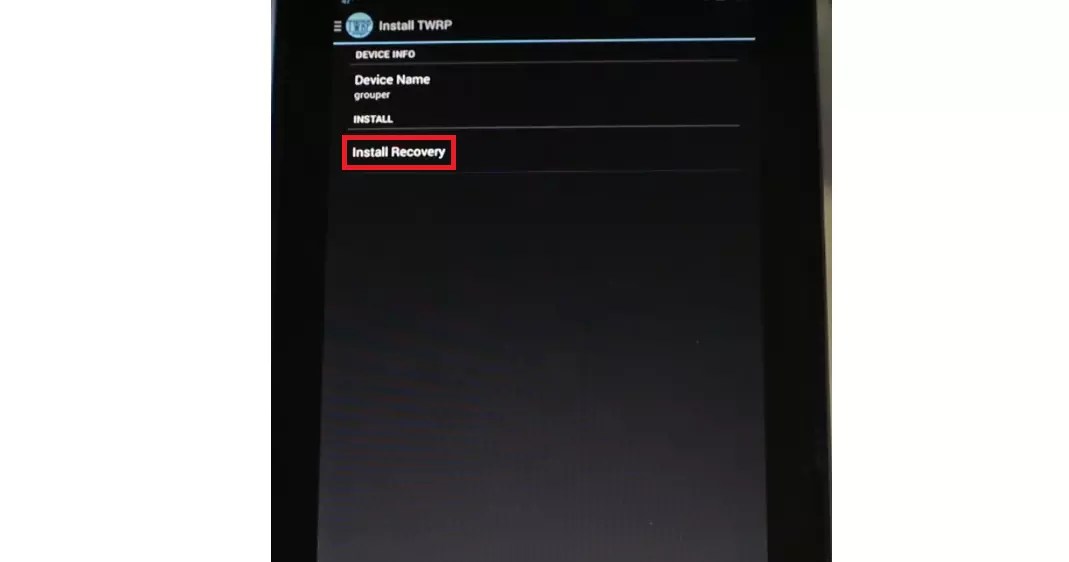
Small 2. "Install Recovery" in the manager
- You will be directed to the installation file. In his name it is possible to figure out the structure. For example, if you have a Samsung Galaxy S3, then the acquisition file will be called “openrecovery-twrp-1.1.1.1-i9300.img”, and “i9300” here, of course, means S3 (this is the code of your phone).
- So, since the name of the downloaded file does not contain the name of your device, it is not possible to install it. The quickest way is to use other methods, described below. And if you don’t, you can’t just press “Yes” on the message that showed up after downloading.

That's all, the process is complete, and you can safely explore the new menu.
But it's not that simple.
Respect! To use this program you need root rights.
One of the easiest ways to date a device of this name is with the popular Root Checker program.
Everything you need to do after downloading and installing it, just go to the Verify root tab and click on the same entry a few minutes below.

Small 4. Root Checker for assigning root rights
In principle, this is relevant and practical for all the methods described in this review. Therefore, before the Vikonannym, give your device root rights.
This, before speaking, is important in many other situations, if you need to add any non-essential functions to your phone or tablet.
And now let’s go back to installing the recovery.
Option #2. Official TWRP App
Of course, the creators of this beautiful and manual menu have created a powerful program for installing recovery.
But the problem is that often the operating system itself blocks your accessory.
That's why you have to guess the manager and other programs that we talk about further.
In this case, it is not possible to understand why this is happening. You won't get anything. There is also no need to be afraid of unofficial programs for installing TWRP.
All smells are absolutely safe, identical to those described in this article.
So, to quickly access the Official App, get the following:
- Everything begins, obviously, with downloading. Axis for downloading Google Play.
- After installation, open the program. In the first window, press the “TWRP FLASH” button at the bottom.

Small 5. “TWRP FLASH” button on the first page of the Official App
- At the next window, select your device. To do this, click on the menu that drops down, where it says “Select Device”.
- Next, click the “Download TWRP” button to download the installation file. Here the principle is the same as in the first option - since the name does not contain the name of your device, it means that it is not so. And it’s even easier to re-verify. You need to go to the “Download” folder or the place where you want to save all your favorite files, and check the file that is missing recovery. Once everything is installed, the program can independently determine what needs to be installed. If this is not the case, then in the field under the device there will still be the inscription “Select a file to flash”. Then click on it and select the downloaded installation file.
- In the end, just click on the “FLASH TO RECOVERY” button.
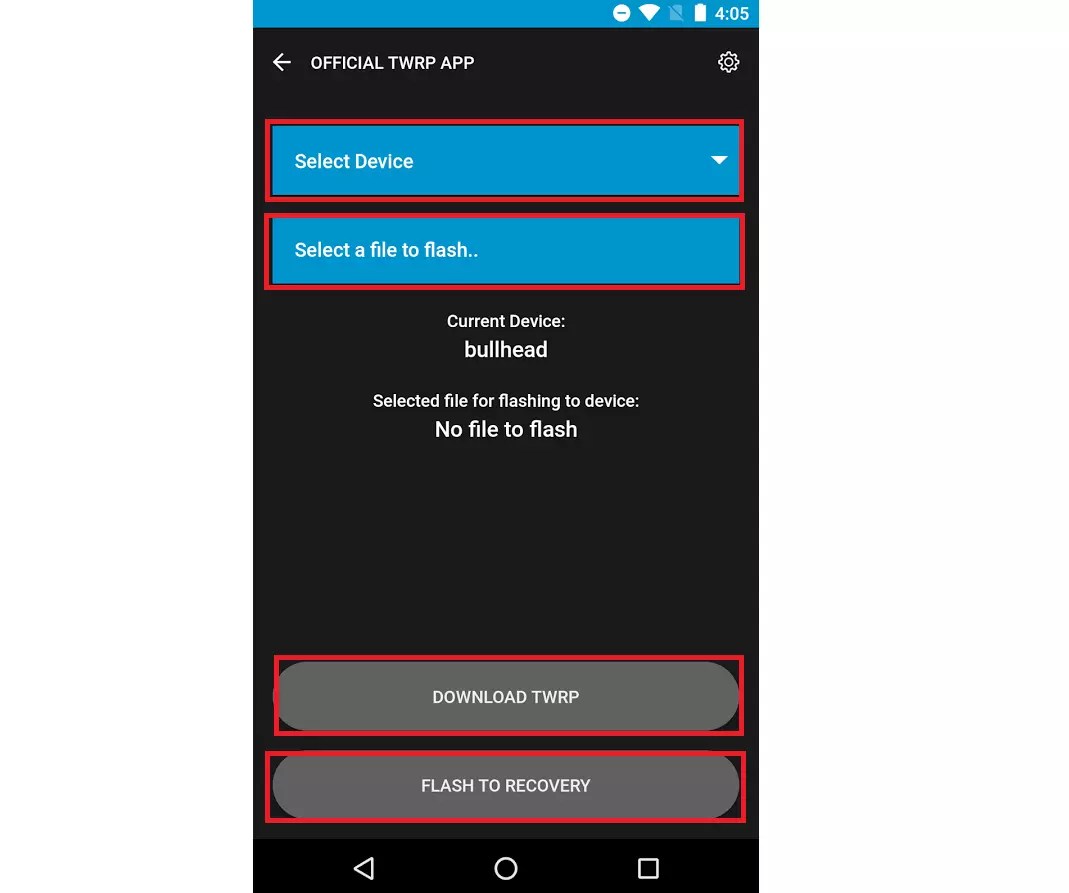
Small 6. Main menu for installing TWRP via the Official App
Like a bachimo, you can easily finish everything. We recommend that you try Vikoristati Official App for the first time. It won't be long before it's time to go out.
Then you need to take one of the managers assigned to this status.
And since neither the Official App nor the GooManager want to cope with the tasks that we consider, then the ROM Manager.
Hint: Also in case of seizures, if you can’t cope, write about it in the comments. We will definitely help you troubleshoot the problem and install TWRP.
Roll around!
Option No. 3. ROM Manager
This manager's role is simpler than that of the front two. This process is immediate:
- From the very beginning, the program has been attracted to Google Play. The axle is strong. Then it is installed on your smartphone/tablet. It turns out to be the same as if it were a problem with some other supplement.
- After launch, you will see a detailed description of the ROM Manager function. Click “OK” to continue.
- Next, click on the three vertical dots at the top right corner and select download the recovery file first. The installation itself will be carried out.
- Then, under the “Recovery Mode” section, select “Recovery Setup”.
- At the next window you will need to click on the item corresponding to TWRM (you will need to use “ClockworkMod Recovery” in the section "Install or Update Recovery").
- Once you have found it, you must click on “Install” in the remaining window to ensure that the downloading of the required file and installation is complete. During this process, the koristuvach can no longer be careful, lest he take his fate from someone else.

Small 7. Vikoristannya ROM Manager
As you can see, if you need to go ahead, manually download the .img file, so that you need to install the recovery.
You can earn money on the official website of this custom extension, twrp.me. The download process looks like this:
- Right now you need to go to the me/Devices page and look for your device there in the next row.
- Among the listed options that appear in search, select the required one. For one device there can be several .img - differences vary depending on the processor model and other features.
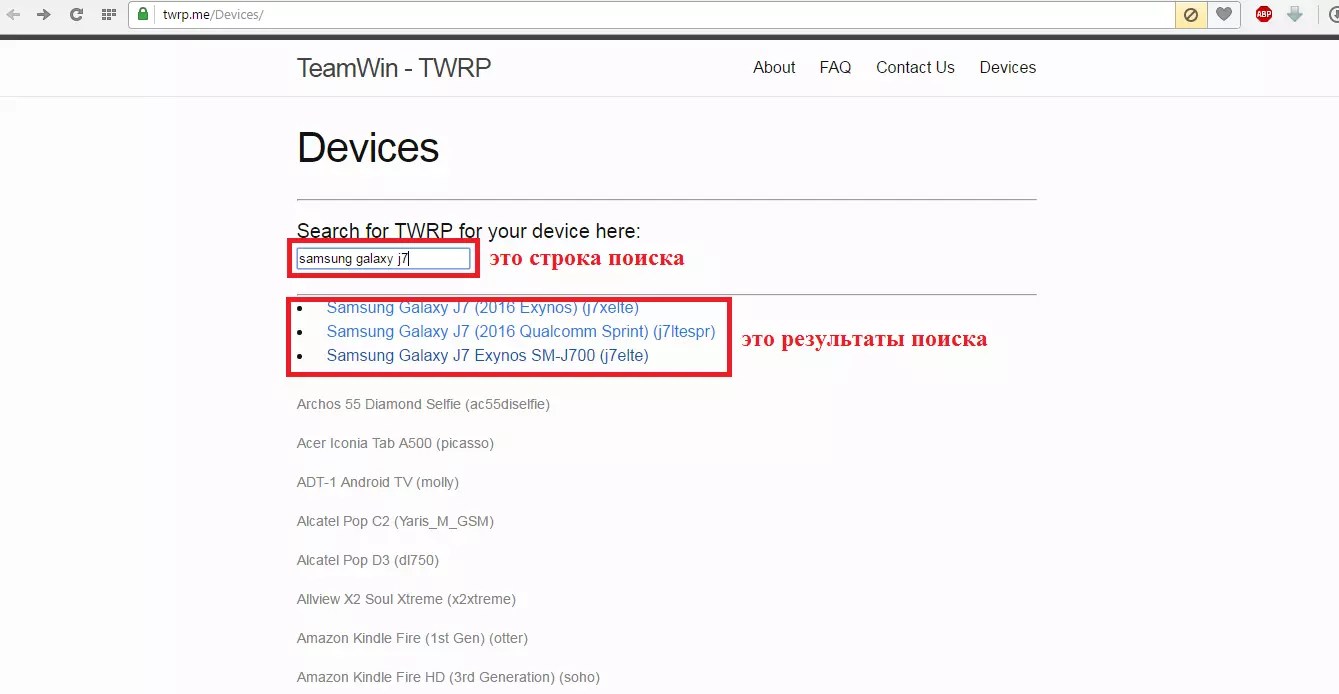
Small 8. Select the installation file on twrp.me
- Next, scroll down to the “Download Links” section. If you are in America, click on the message “Primary (Americas)”, and if you are in other countries, then your option is “Primary (Europe)”.
 "Choose a file" and indicate where the previous file is located.

Small 10. Flashify wiki for installing TWRP recovery
Vlasna, this is where the installation will end. You can safely use the new Recovery.
Option No. 5. Rashr
This is actually the simplest option in our current opinion.
Everything you need to get is to download the program on Google Play, click on “TWRP Recovery” in the main menu


