Virtualbox installation of Windows XP. Installing a virtual machine (on Windows XP) on a hard virtual disk created Windows XP Virtual
If you have at your fingertips a number of operating systems with plenty of workspace and additional features, you don’t need to buy another (third, fourth, or even) computer. Because everything can fit on your single PC. Yak? All about virtual machines (VMs) - special programs that create (emulate) virtual computers in the middle of the main operating system.
Virtual PC may as well be helpful. This includes a powerful processor, memory, hard drive, edge adapter, and everything else. Of course, these are not physical devices, but rather they are structured so that operating systems respect them as such - useful.
One physical computer can simultaneously run a number of virtual ones. How much is left in hardware resources: the larger the processor, the larger the RAM, the larger the storage space, the more. The average home PC of average productivity based on Windows 10 can cope with the one-hour work of three to five light operating systems (for example, Windows XP, Android and Lubuntu + the main system). Or two or three very large ones (for example, basic Windows 10 + virtual Windows 7 and Mac OS X). As you already understand, virtual computer programmers allow you to install and run various operating systems on them.
Virtual machines of general purpose (in the category of specialized ones - such as, for example, VM Java), vikorista:
- To run programs that are not supported by the main system.
- To protect the system from the potential harm of unverified programs.
- How to additionally remove viruses from dubious web resources.
- For the creation of the isolated center, the activity of the free PZ is obtained.
- Like a testing ground for the development of energy development.
- To master the technology, take measures.
- For additional authorization on various game portals and much more.
Well, of course, virtual machines are used everywhere as part of the working resources of servers.
Today we are not talking about the commercial stagnation of VMs, but we will look at only those that can be useful to Windows home users.
Oracle Virtualbox
Let's take a look at the process of creating a new virtual machine and installing Windows 10 in it.
- Click the “Create” button in the top panel.

- The first time you create a VM, you must have the OS name (as shown in the list of guest systems), type (Windows, Linux, etc.) and version. Our application has Windows 10 32 bit (you can install 64 bit, otherwise it will require more resources). To move to the next step, press the Next button.

- The size of the RAM of the VM is also significant. For Windows 10 x86 upgrades, 1 GB is provided, but you can increase this amount by using the right-handed button. If your PC does not have much RAM, do not give the VM more than 2-3 GB, otherwise the main system will suffer due to memory defects.

- Next, we create a virtual hard disk. If you put the system first, select the “Create new” option.

- The type of virtual disk depends on the definition.
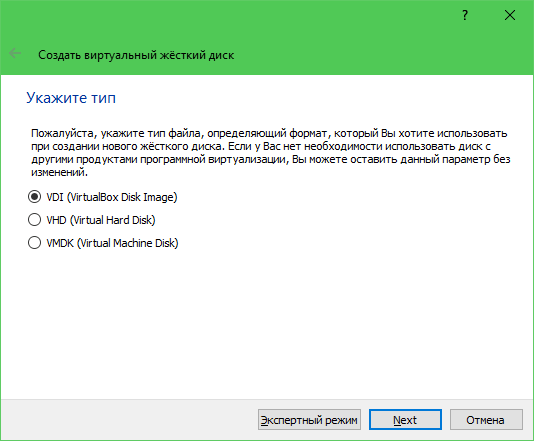
- The data storage format is the area on the physical storage of the computer that is allocated to the VM. There can be a constant or dynamic expansion of obligations at the boundaries, as you will know further. To save space, choose dynamic format.

- Here you can enter the name of the volume (virtual drive C) and its size. For installation – 32 GB.

- After clicking the “Create” button in the remaining window, a new virtual machine will appear in the list. The right-handed frame shows the same parameters.
- To proceed to install Windows, click the “Run” button in the top panel.

- In the window that opens after this, the “Select a backup disk” window will appear. Click on the folder icon and indicate the route to the system distribution. This can be an image in the .iso or physical format (DVD, flash drive). Having selected the distribution, click “Continue”.

- The subsequent installation of the OS in a virtual machine does not differ from installation on a physical computer.

Steps for setting up the VM and guest system
Clicking on the virtual machine window will cause the mouse cursor to disappear (so it will collapse between the virtual screen). To rotate the cursor to the OS, press the Ctrl+Alt combination.
To access the full set of OS functions, you need to install special add-ons. Go to the "Appliances" menu, click "Connect a disk image of an additional guest OS" and follow the instructions below.

To connect a folder for exchanging files with the main one to the guest system, click on the "Additions" menu item "Multiple folders". Click on the “folder+” icon near the window and through the “directions to folder” field, indicate it to the explorer (in this display the directories of the main system).
If you want the setup to work smoothly, select “Auto-connection” and “Create private folder”. The hidden folder will be accessible from the virtual machine explorer as a backup.


To change the order of installation of virtual devices (for example, to download a virtual machine from a DVD), shut down the guest OS, open settings (at the main window of Virtualbox) and go to the first tab in the “System” section. In the "Order of acquisition" list, select the required nose and, pressing the buttons with the arrows, push it up.

VMware Workstation Pro
Options for Hyper-V virtual machines
To take a snapshot of the running guest OS, open the top menu of the “Action” window and click “Checkpoint”. Or press Ctrl+N.
Access to setting up a particular virtual machine is available from the context menu in the list of the main window of the dispatcher and located next to the “Parameters” button.
Other features of the programs are also quite simple and can be mastered without much effort.

Croc No. 3: Create a new hard disk Select the item “Create a new virtual hard disk” and click “Create”.

Croc No. 4: For a new window, you can specify the file type that will be selected when the VDI (VirtualBox Disk Image) disk is created. Press "Next".

Croc #7: We go to “Adjustment” at the top left corner and click on the “Zagalni” tab. Click on “Dodatkovo”. We adjust the working mode of the clipboard between your computer and the virtual machine. Select “Bidirectional” from the list “Background clipboard”. We check the box opposite “Victory in full-screen modes” and “Remember changes during VM operation”.

Croc #8: Go to the "System" tab. Installation is available from CD/DVD-ROM.

Go to “Processor” and check the box “Enable PAE/NX”.

Croc #9: Click on the “Display” tab, check the boxes: “Increase 3D-accelerated video” and “Increase 2D-accelerated video.”

Croc #10: Go to the “Noses” tab. Add a new device “Add optical drive” and select the system image to be installed.

The machine is ready to start by clicking “Start”.

Croc #11: The Windows XP installer starts and presses “Enter”. It goes into the master partition of the disk, if we have a disk larger than 10 GB, it will be stamped “C”.

Check while the disk is being formatted.

Croc #12: The beginning of installing Windows XP.

Croc #13: After the installation is complete, the disk image from which you completed the installation is created. Click on the “Devices” tab, go to “Optical drives” and select “Remove disk from drive”.

New addition of jokes
Having marveled at this video, the hour of life will increase on the river
First, before installing the system, you need to create a virtual machine for it - Windows is treated like a full-fledged computer. For this purpose the program VirtualBox is assigned.
Once the virtual HDD has been created, this stage will end and you can proceed to setting up the VM.
Setting up a virtual machine for Windows XP
Before installing Window, you can configure a few more settings to improve productivity. This is an unnecessary procedure, so you can skip it.

After setting up the VM, you can proceed to installing the OS.
Installing Windows XP on VirtualBox
- On the left side of the VirtualBox Manager, see the created virtual machine and click on the button "Run".

- You will be prompted to vibrate the disk to start. Click the button next to the folder and select the location where the uninstall file from the operating system is located.

- The Windows XP installation utility will launch. It finishes its first activities automatically, and you will need to check a few things.

- The installation program welcomes you and prompts you to proceed with installation by pressing the key "Introduction". Here and below, under this key, there is a key Enter.

- The license area will open, and if you use it, press the key F8 accept this mind.

- The installer will ask you to select the disk where the system will be installed. VirtualBox has already created a virtual hard disk with the volume you selected at the 7th hour of creating the virtual machine. Tom press Enter.

- This area is not yet marked, so the installer asks you to format it. Choose one of the four available options. It is recommended to select the option "Format partition on NTFS system".

- Wait, the dock will be formatted.

- The installation program automatically copies certain files.

- The Windows installation window will open, and the installation of devices will begin immediately, please check.

- Verify that the installer has selected the correct settings for your computer system and keyboard layout.

- Enter the name of the employee, the name of the organization does not need to be entered.

- Enter the activation key if you have entered it. You can activate Windows later.

- If you want to activate the activation, then in the confirmation window select "Ni".

- Enter the name of the computer. You can set a password for your account "Administrator". There is no need to skip entering the password.

- Reverse the date and hour, if necessary, change the information. Indicate your time zone by selecting a location from the list. Residents of Russia can uncheck the box "Automatic transition to daylight saving hour and back".

- Continue with automatic installation of the OS.

- The installation program prompts you to configure the monitoring parameters. For immediate access to the Internet, select "Significant parameters".

- You can skip the link for the configured work group or domain.

- Wait until the system finishes automatically installing.

- The virtual machine will be re-enabled.
- After re-engaging, you need to do some more tweaking.

- The window will open in which to press "Dali".

- The installer prompts you to turn it on or turn it on automatically for updates. Select the parameter according to special similarities.

- Please wait until your Internet connection is checked.

- Select whether your computer will be directly connected to the Internet.

- You will be asked to activate the system if you have not yet been activated. If you do not activate Windows at once, you can earn 30 dB.

- Come up with a name for the cloud record. It is not necessary to guess 5 names, just send one.

- At this stage the adjustment will be completed.

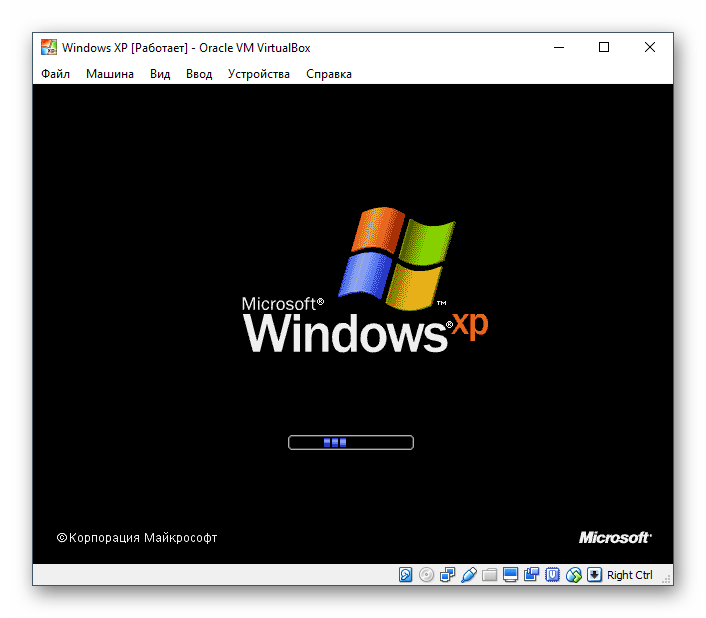
- I'm starting to become obsessed with Windows XP.

Once you are interested, you will go to your desktop and you will be able to start using the operating system.

Installing Windows XP on VirtualBox is very simple and doesn’t take too much time. In this case, it is not necessary to install drivers associated with PC components, as would be necessary during the initial installation of Windows XP.
Description of how to install and launch the full version Windows XP s-pid Windows Vista or else Windows 7 for additional help Oracle VirtualBox. This version of Windows XP is installed on a virtual machine and runs as a complement to Windows Vista, Windows 7 or any other operating system, including various Linux distributions. In this way, you can solve problems due to the combination of different driver programs with Windows Vista, Windows 7 or another operating system.
Not much introduction
Of course, many of you, my dear readers, have already managed to install and try Windows Vista and Windows 7. After all, all systems are good, but some programs and old games do not run in the new operating system, and drivers are up to date the extensions are not installed. What is there to be shy about? Do you think you belong to a new version of Windows?
In fact, there are many ways to solve this problem. The most obvious is installing Windows XP on another system with the ability to choose when you want to turn it on. This method of descriptions in statistics: . Alas, this is due to incompetence. For any programs you need to restart the laptop, turn on Windows XP, run the program, restart the laptop and turn on Windows 7 for example. It's not easy, isn't it? What should it do if the USB modem only works normally in Windows XP? Restart the system and turn on Windows XP in order to surf the Internet?
Fortunately, the decision has been made. Windows XP You can install it on a virtual machine and run it under any operating system as a program. I follow this principle Microsoft Windows 7 XP Mode. It's a good technology, but it requires the laptop to support virtualization, which works best in Windows 7 Professional, Windows 7 Ultimate and Windows 7 Enterprise. What's the cost of running Windows Vista on a laptop?
And here the miracle program comes to help VirtualBox view Sun. It is completely cost-free and allows you to create virtual machines on a laptop on which you can install bare-bones operating systems. The advantage of this utility is equal to Microsoft Windows 7 XP Mode- trivial graphics support for virtual machines, no work required hardware virtualization, as well as those that can be run on any version of Windows, Linux, etc. The downside is that a Windows XP license is formally required to keep our realities in order... :)
This article will look at the process of installing Windows XP on a virtual machine. The whole process can be divided into the following stages:
If you have problems with food or work with the Virtual Box virtual machine, then you should contact us for help on this forum topic: .
1. Creation of a virtual machine
First of all, you need to install the utility VirtualBox(/). Before installation, it is important to check the following options:

System devices will also be installed. Everyday entries must be enabled for installation.
Once the installation is complete, launch the utility and click on the button Creativity:

Blame it to start:


Let's move on now. Since we can’t handle the virtual hard disk, we need to create a new one:


Select the type of virtual hard disk. I recommend :


That's all. The virtual machine has been created. Now you can move on to adjustments.
2. Setting up the virtual machine
Before setting up, prepare a disk from Windows XP or an ISO image from it, and then select the created virtual machine from the VirtualBox window and click on the button Powerful:

Let's talk about the tabs Main. Behind the scenes you can expand the menu of the virtual machine. It’s so much easier:

Go to the tab System:

Here you can change the amount of RAM that is seen by the virtual machine, change the order in which virtual devices are installed, turn off or turn on the IO-APIC option (required if you plan to use it for the virtual machine) a number of processor cores), as well as the EFI plug-in or plug-in (required for OS, for example MacOS). Let's go to the tab Processor:

Here you can specify how many processor cores the virtual machine can support, and also enable or enable PAE/NX (all operating systems support PAE. This mode allows a 32-bit virtual system in and up to 64 GB of RAM). Let's go to the tab Priskorennya:

This tab can be enabled or disabled using hardware virtualization. If you are going to install a 64-bit operating system, you must enable it and support virtualization on the side of the laptop. If the laptop does not support this function, then it does not matter. For running 32-bit operating systems on a virtual machine Hardware virtualization is not required.

VirtualBox supports 2D and 3D acceleration (OpenGL/DirectX8/DirectX9). Yogo varto vimknuti. Let's go to the tab Merezha:

When VirtualBox was installed, the system had another edge card that was virtually connected to the edge of our virtual machine. You can customize the virtual hemline adapter as shown in the little picture and go to the tab USB:

The first article said that additional virtualization may eliminate the problem of driver incompatibility for USB devices with new operating systems. So axis VirtualBox allows you to redirect work so that any USB device that connects to a computer or laptop, connecting not to the main operating system, but to the system that runs on the virtual machine. Then, on Windows XP, install the drivers on the new USB device in the virtual machine, and it works fully under Windows XP. The main system is the device will not be used. The system has a lot of fragments of USB devices, so that when the virtual machine is turned on, they do not connect to the virtual one, so a filter system was invented. Filters indicate which USB devices are responsible for connecting to the main operating system and connecting to Windows XP on a virtual one when it is turned on.
To add a new filter, click on the icon with a plus sign and select the required USB device from the list. Whose name appears on the list. Let's go to the tab:

If there are fragments of Windows XP on a virtual machine, it is impossible to work with files on the main one; you need to organize back-up access to the old folders on the hard drive. To do this, click on the icon with a plus sign and select a folder on the hard drive of your computer or laptop where you will run Windows XP on a virtual machine:

Enter your name and press OK. Axis appeared on the list:

Now the remaining very small touch has been lost. It is necessary to install Windows XP :) Go to the tab Nosii:

We have two options: install Windows XP from the ISO image or from the primary disk. In the first drop-down, click on the icon with the arrow and click on the button Add:

Indicate where the Windows XP image is located and add it to the list:

Click on the image from Windows XP and press the button Vibrati.
If you just have a disk with Windows XP, then put it in the drive and select the drive from the list:

Click OK. Now you can proceed to installation Windows XP.
3. Installation and configuration of Windows

The initial installation of Windows XP must start:


I won’t describe it in detail. The installation is described in detail in this material: . This version does not require drivers. Everything must now be done in Windows XP.
After installation, you can remove the running Windows XP from the virtual machine. Now you need to install Additional guest OS. For which we select the last menu item Extensions:

Respectfully: If you have fragments of a keyboard and a bear in a laptop or in a computer, there is usually only one, then the main operating system is the operating system that is running in the virtual machine, which changes everything. And this is why the mechanism of burial is discussed. In other words, since there is a virtual machine in the foreground, everything that is entered from the keyboard will be addressed to it. You can manually change the mixer. Why bother with vikoryism? right Ctrl. When the virtual machine is working with the keyboard and mouse, the green arrow at the bottom right corner of the window with the virtual machine will light up.
It is to blame for installing additional software for the guest OS:

Possible meals: If the installation has not started for you, then manually add the image VBoxGuestAdditions.iso For my dad with VirtualBox, the virtual drive worked when Windows XP was installed, and then launch the disk in the virtual machine.


Put a tick in the box Direct3D Support:

When installing the frame, the following advances appear:

Onslaught Still live. Once installed, restart the virtual machine:

To open the virtual machine window, go to the menu Auto select the item:

The axis of the frame climbed up and it became much easier to handle:

Now I can no longer get rid of the hidden folders. U Windows XP launching Team row:

We connect the previously created folder as a border disk. For this we enter the command net use x:\vboxsvr\Documents(Documents here is the name of the folder):

U My computer the disc appeared x:\, which we have so kindly connected:

The location of this disk is similar to the folder that we created before.
That's all.
If you have problems powering your work with the VirtualBox utility, then we post them in this forum thread: . Please contribute all information related to the installation of Windows XP to this forum topic:
Detailed manual with installation Windows XP from flash drives or memory cards to any laptop, netbook or computer.
A detailed description of how to solve the problem with the blue screen of death or BSOD for newbies.
How to find out and remove all viruses and other harmful programs from your laptop or computer.
A full and detailed description of the many installation methods Windows Vista or else Windows 7 from flash drives or memory cards to any laptop, netbook or computer.
A detailed tutorial on how to install Windows Vista on a laptop or computer.
This article will look at the installation of Windows XP Service Pack 3 on the Oracle VM VirtualBox virtual machine. The above steps are also suitable for the “real installation” of the system, but the need to indicate in the motherboard BIOS, priority for downloading from CD/DVD, which is not indicated. There is a need to adjust the priority of information to be stored in the version of the BIOS and the driver. If you want to ask about food at the moment, you can ask them in the comments.
Let's go!
I am installing the system from a DVD image, so I mount it on a virtual drive using the additional DEAMON Tools program. If you are installing an optical disc, then insert the disc into the CD/DVD-Rom. Don't forget to enter the correct CD drive. How to work was described in the section “ Nosii».
We launch our virtual machine manager “Start->All Programs->Oracle VM VirtualBox->Oracle VM VirtualBox”. From the list, select the virtual machine we created earlier. WinXP SP3“and embossed” Launch».
If the drive has been entered correctly, the installer will begin downloading from the CD/DVD.
In the first window we indicate the following keys:
- Installation of Windows XP
- System update for additional console
- Vikhid.
To insert an embossed key Enter.

At the window that appears, we will be prompted to select the disk partition on which we want to install our system. Because We have created just one virtual hard disk with a capacity of 10 GB, then you will be entitled to submit it to us. Please note that the disk is displayed as an unallocated area - this is due to the fact that you have not yet set the format for it (NTFS, FAT32 or others). Embossed “Introduction (Enter)”.

We were thrown at the next menu, which was assigned to the format of our section. The following items are available:
- Format the partition using the NTFS system (Swedish)
- Format the partition using the FAT system (Swedish)
- Format the partition on the NTFS system
- Format the partition using the FAT system

I’ll briefly explain the importance.
NTFS (schwiedke) – this option overwrites the table with the address of the section. The data is physically deprived of recording, but the system will not be able to capture anything. Apparently, when new data is written to a section, the old data is gradually overwritten. So, with this option, the slaughter sectors will be lost. This formatting option is flexible and more suitable for new disks, however old.
Format the system partition FAT (schwiedke) – similar to the first option, only the method of organizing data recording has been changed (if the partition was previously formatted in NTFS, FAT will not be displayed).
Format the system partition NTFS - this option changes the format of the entire section (the address table and all sectors), in which bad sectors will be removed from the address table. This option is suitable if you are reinstalling the system, which requires multiple rewrites.
Format the system partition FAT – similar to point 3, except the file system does not support files larger than 4GB. This type of system is not relevant.
Our version would be completely satisfied with the first option. Format the system partition NTFS (Swedish) " Select it and press Enter. We check for completion of formatting and then copying of system files.

Once the copy is completed, the machine will be re-arranged. After re-downloading, we will again be faced with launching from a CD/DVD, which you need to select, or if a menu appears to select the option to download, select “download from drive C”. How did you get excited about the CD?! It is necessary to configure the virtual machine, in the section " System"Put it first" Hard disk"or uncheck the box" CD/DVD Rom"

Continued installation of Windows.
In the window “Mova and regional standards”, you can adjust the standards, such as penny unit, date display format, etc. Also, the language is introduced and the language behind the rules. These parameters can be withdrawn for payment. Tisnemo " Dali»

Now we are prompted to enter the name and name of the organization. If you enter any information, this information is linked to files, for example doc. Tisnemo " Dali»

At the next window we will be asked to enter a 25-character CD key, as indicated on the box with the added version of Windows XP.
In the near future, we will need to enter a name for our computer and a password for the administrator account.
Let's name our PC: VirtualXP
The password is as follows: 1 (If you are installing the system on a physical PC, it is recommended to set a more complex password!).

Set up the time. As everything is covered, embossed " far", otherwise, we introduce our own meanings.
The marginal parameters are stripped of "Significant parameters" and embossed with " Dali»

I set the working group - by entering “HATA1” because All my home computers are included in this group. You can specify another one. This parameter is useful for setting up direct access to PC directories along the border. " Dali>»

Now we check that the installation process is complete. As a rule, a wine borrows 15-30 coins. After completion, the system will be re-enabled.
When we first start it, we will be asked to specify the update parameters and enter the name of the cloud account.
I am turning on the update, let the authorities decide, but please provide the legal version for anyone. Tisnemo " Dali»

Skip the Internet connection settings. We will adjust them later. Tisnemo " Skip».
Registration with Microsoft, for example, “No, just like another time.” Tisnemo " Dali»
At the next window, you can specify the names of the cloud records. Then we will emboss " Dali"ta" Ready».

This completes the installation of Windows XP. As you say, there’s nothing foldable.


