Download Windows from a flash drive to a laptop. How can I enable backup of the system from a flash drive in Bios? Detailed guide with photos. The process of selecting settings in AMI BIOS
Nowadays, manufacturers of laptops, nettops, all-in-one computers and stationary PCs are increasingly releasing them from warehouse systems that do not require an optical drive. It’s not surprising, even though the digital industry has practically expanded the range of content in optical storage.
Due to the fact that the computer does not have an optical drive, computer users began to experience problems with the installation of the operating system on the new one. Most often, when installing an OS via a DVD drive, computers do not carry out regular adjustments in the BIOS, as the first device is installed on a new DVD-ROM. The only option for systems that do not support DVD-ROM is installation from a flash drive.
To install the OS from a flash drive or from a portable USB HDD, you need set options for advanced USB devices in the BIOS. In order for our readers to be able to independently access USB storage devices, we have prepared material in which we describe the process of setting up the BIOS for accessing USB flash drives for various systems.
We are preparing our USB storage device
First of all, to install a flash drive with an additional BIOS, you need to create an appropriate one. For example, take a licensed disk with Windows 7 OS and create an ISO image from it. The image can be created using the additional program DAEMON Tools or Alcohol 120%. You can also download the original disk image with the license key from the official Microsoft website, along with the license key.
Having edited the image file, let's move on to another step. This product includes the creation of a portable USB flash drive with additional utilities. Rufus. This utility was not chosen for nothing. The special feature of the utility Rufus There are those that can burn valuable USB flash drives both for the original BIOS and for UEFI BIOS. We are preserving the utility Rufus From this official page you can launch it immediately, as long as it does not require installation.
In the program window you can see what is in the first combined list " Extensions» A 16 GB flash drive is displayed. After choosing a USB device, you need to enter the program Rufus Let's go to the iso image of Windows 7. To do this, press the button with the laser disk icon and select the image. After this, we will emboss the Start button and mark the completion of the creation of our valuable USB storage device.
This is how you can create beautiful flash drives for Windows 8, 10 and XP, and other operating systems. Be especially careful when asking for help Rufus I'll get a USB flash drive from Windows XP. This is due to the fact that most ways to create a private flash drive with Windows XP are even more difficult for the average PC user. Z Rufus And, by the way, saving money with Windows XP is easy and quick.
Once the desired flash drive is created, you can proceed to installing or reinstalling the memory card behind it. In this article, we will describe the process of installing the flash drive we created on a computer with UEFI BIOS.
Installing a USB storage device on a computer with UEFI BIOS
On computers with support for UEFI BIOS, you can use Windows OS, either with or without support for the new BIOS. For this example, we take a computer that does not have an optical drive or memory storage on the motherboard. MSI A58M-E33 with support UEFI BIOS. Now we need to install the flash drive that was previously installed on our computer. For easy access to storage in motherboards under the UEFI BIOS, there is a special Boot Menu. This menu allows you to select your favorite storage device without accessing the main BIOS menu. On different computers Boot Menu You can click through F12 and F11 . Our version has an MSI A58M-E33 motherboard Boot Menu Click via the F11 key.
From this menu you can see the item “ UEFI: KingstonDataTraveler 2.0PMAM"ta" KingstonDataTraveler 2.0PMAM" If we select the first item, Windows 7 will install with support. UEFI BIOS, and if it is different, then for the help of the primary Bios. After selecting the first or other item, you will see the availability of installation files.
It is significant that if we created a proprietary USB flash drive using a proprietary program using the Microsoft Windows USB/DVD Download Tool, we would not be able to install an OS that supports UEFI BIOS, since we created a proprietary flash drive because there is no support UEFI.
We're crumbling away. Now we’ll try to set up USB devices from the BIOS of the MSI A58M-E33 motherboard. To do this, when starting the computer, press the Del key. This is how to change the BIOS of the motherboard.
In the main BIOS window, go to the tab “ Settings", after which the setup menu will open. In this menu you need to select the item “”. After your choice, a newfound attraction will emerge.
In these parameters, it is clear that the first important device is the hard drive.
Having installed this, our valuable flash drive will be installed first when the system starts. In the same way, you can install and run a flash drive on most PCs under the Phoenix BIOS.
We can install data from a USB drive on an old AMIBIOS computer
Let's take a look at launching a flash drive on a PC running AMI BIOS. disintegration by the American company American Megatrends Incorporated, which leads to the shortening of its name AMI. This BIOS is made available to PC users through the start logo when the system starts.

Let's turn off the computer and move on to setting up the additional Del key. At the BIOS window we need to go to the “setup” item.
 After completing these actions, settings will open that allow you to set the priority of storage devices at system startup, including flash drives.

In the same way, you can install and run flash storage on most computers running AMIBIOS.
Problems with the installed task on AMIBIOS and Phoenix BIOS
Users of even older laptops and stationary computers may have problems launching an expensive USB device.
This problem is related to the fact that even older computers running AMIBIOS and Phoenix BIOS have no support for launching USB devices at system startup. Therefore, the only exciting device would be an optical drive.
Another nuance in our current situation may be different versions of AMIBIOS and Phoenix BIOS, which vary depending on the above. The main responsibility can be the interface and other customization. It’s not easy for anyone to get bored, because adjusting the configuration is not a priority for the distributors, and they can be identified and adjusted in the future by analogy with higher-order butts.
You can install data from a USB storage device on your PC
New mini PC Compute Stick From the Intel company, it has quickly gained popularity among computer users, with a computer running Windows on board, which in many cases outweighs the size of a standard flash drive. Thanks to such dimensions, there are no more interfaces than stationary PCs and laptops. For example, it does not support the RJ45 interface and does not support the DisplayPort interface for digital monitors.

So like Intel Compute Stick comes with a pre-installed operating system Windows 8 or 10, then most buyers do not have problems installing on a new OS. However, this will not happen if the OS was damaged by viruses and system files were deleted.
In this situation, a valuable flash drive can help Boot Menu Bios. For example, let's take the Intel analogue Compute Stick under the name Meegopad T02. To reinstall Windows on your computer, you need to download the OS image on the official website of the Meegopad T02 manufacturer www.x86pad.com. After downloading and creating a secure flash drive, install it in Meegopad T02. Then let's take a look at Meegopad T02, having previously been attracted to Boot Menu Bios with additional key F10.

U Boot Menu You can select a flash drive and install it using Windows. For permanent storage of the flash drive at system startup, you can open the BIOS and adjust the storage priority for different USB drives.
We pad the pouch
After reading the above descriptions of the application, the average PC user can easily set the priority of flash drives on systems with different BIOS versions. Once you start inserting the flash drive first at the time of installation, you will understand how quickly and manually you can install various operating systems on your PC.
We hope that our article will help you get started with flash drives and install an operating system, as well as help you install them on your computer without damaging the optical drive.
Video on the topic
There are no more problems that newbies face. And one of them is setting up the BIOS for installing Windows from a flash drive. This is the first step from which everything begins, and even here everyone stumbles.
The problem is that there are different versions of BIOS. And, having read the instructions on how to insert data from a flash drive into the BIOS, the newcomer still may not get into it. And all that is simply not the same BIOS version, there is no such row as in the screenshot and, apparently, nothing comes out.
It doesn’t matter what brand of laptop or computer you have. The version of the operating system (Windows 10, 8, 7 or XP) also does not matter. What is important is the BIOS version. And the easiest way to find out about it is by launching it.
How to enter the BIOS settings
Before you go into the BIOS setup, you need to insert the flash drive with installation into the USB port. Why bother? Write it down correctly. Otherwise, you simply won’t be attracted.
After that, restart your PC or laptop and continuously press the Delete or F2 button until the BIOS window opens. The button can be identified depending on the brand of the laptop or motherboard on the computer, so you will see a prompt on the first black screen.
Then the BIOS is adjusted.
Setting up Award BIOS
How can you tell that you have an Award BIOS? Behind the screenshot below:

If you have such a blue screen, then this is an Award. Most often, this option is used on a PC.
Control in the BIOS operates only behind an additional keyboard - arrows and subbuttons (see the instructions at the bottom of the screen for their list).
First of all, you need to set the USB option in the BIOS, you need to check that it is disabled (otherwise the USB flash drive simply will not appear). For whom:

Instructions are available:


In the screenshot, on the 1st place there is a HDD drive, and on the other there is a USB flash drive. We need to lift the mountain. As you can see from the prompts at the bottom of the screen, you can set the priority of preferences in the BIOS using the + and – (plus and minus) buttons. You see a USB flash drive and press the plus sign - you must move to the first row. Then press Esc to turn back.
Then you see the First Boot Device item, press Enter and select USB-HDD. Press the Esc button again. To exit the BIOS, press the F10 button, and then Esc (Save and Exit).

Setting up AMI BIOS
AMI BIOS looks like this:

And most often it occurs on laptops. Once again, I need to restart to turn on the USB controller. For whom:

 Now let's look at how to add a flash drive via BIOS to a laptop:

Sometimes, to change the priority of devices (put the flash drive first), you need to press other buttons. This can be not only + i (plus/minus), but also F6/F7, etc. Follow the instructions, where it says what to do with a specific button (these instructions are always right-handed or below).
Setting up Phoenix-Award BIOS
Phoenix-Award looks like this:

This is a rare (more precisely, old) version, but for a complete picture we will look at it through the Phoenix-Award BIOS.
Now go to the Peripherals tab and make sure that the first two items are set to Enabled. You charge more for consumption.


Next, go to the Exit tab (at the top menu) and select the Save & Exit row to exit the BIOS.
Setting up BIOS UEFI
BIOS UEFI – a new version of the old BIOS has been reduced in price. There is a manual interface, so setting up the BIOS for installing Windows is even simpler here.
All you need to do is find the icon of the USB device, place it in the first place with the help of the bear, and then press the Exit item with the bear (in the right corner). And don’t forget to save your adjustments!
In this simple way, you can import from a flash drive through the UEFI BIOS. Of course, this method is the simplest and the most sensible. For this reason, a new graphical interface was developed.
If during the installation of a Windows PC or laptop you are first re-installed, you will need to go into the BIOS again and update the previous settings. So, put the HDD storage device on the first place, and put the flash drive on the other or third.
Or if, after re-enablement, a black screen appears with a row of “Press any key...” (“Press any button”), do nothing.

Otherwise, Windows will start installing right from the start. And you can walk around the stake like this for years.
Once again: during the installation process after the first reboot, either go into the BIOS and turn all the previous settings, or just don’t press anything. As an option, you can simply remove the flash drive from the USB port (or if you restart your PC or laptop).
Update 2016: The user has been given ways to install data from a flash drive in UEFI and BIOS on new computers with Windows 8, 8.1 (which is also suitable for Windows 10). In addition, there are two ways to access a USB storage device without changing the BIOS settings. Options for changing the order of hardware devices for older motherboards are also in the instructions. And one more important point: if transferring from a flash drive is not supported on a computer with UEFI, try it.
In some cases, in order to enter the BIOS setup utility, you need to enter essentially the same thing: immediately after turning on the computer, when the first black screen appears with information about the installed memory or logo computer generator or motherboard, press the required button on the keyboard - the most advanced options are Delete and F2.
Press the Del key to go to BIOS
See this information at the bottom of the main screen: Press Del to enter Setup, Press F2 for Settings and similar. After pressing the required button at the required moment (before, and more briefly, you need to work before starting to install the operating system), you will go to the setup menu - BIOS Setup Utility. The appearance of this menu may vary, but we will look at some of the most extensive options.
On modern motherboards, the BIOS interface, or more precisely, the UEFI interface, is usually graphical and, perhaps, more reasonable in that there is no need to change the order of the hardware devices.

With most options, for example, on Gigabyte (not all) or Asus motherboards, you can change the order of display by simply dragging the drive images behind the appropriate one.

Since there is no such possibility, look in the BIOS Features section, in the Boot Options item (the remaining item can be in another place, but the order of installation is set there).
Adjusting the settings for flash drives in AMI BIOS

Please note that in order to try all the steps that are described, the flash drive must be connected to the computer at the back, before entering the BIOS. To install a flash drive into the AMI BIOS:
- In the menu, press the “right” key and select “Boot”.
- After this, select the item “Hard Disk Drives” and in the menu, press Enter on “1st Drive”
- From the list, select the name of the flash drive - on another small one, for example, this - Kingmax USB 2.0 Flash Disk. Press Enter, then Esc.


Stepping speed:
- Select the item "Boot device priority"
- Select the item "First boot device", press Enter,
- I’ll tell you, bring in the flash drive.

If you need to download from a CD, you need a DVD ROM drive. Press Esc, in the menu from the Boot item, move to the Exit item and select Save changes and exit or Exit saving changes - ask about those you have entered in order to save changes. , you will need to select Yes or type “Y” from the keyboard, then press Enter. After that, re-enable your computer and again select the selected flash drive, disk or other device to re-enable.
Wanting a flash drive in Bios AWARD or Phoenix

In order to select a boot device in the Award BIOS, select Advanced BIOS Features in the main setup menu, then press Enter after selecting the First Boot Device item.

A list of devices that can be attached will appear - HDD-0, HDD-1, etc., CD-ROM, USB-HDD and others. To use a flash drive, you need to install a USB-HDD or USB-Flash. To download a CD DVD or CD - CD-ROM. Then go one level up the hill, press Esc, and select the “Save & Exit Setup” menu item.
Adjusting the import of external devices in H2O BIOS

To install a flash drive in the InsydeH20 BIOS, which is common on rich laptops, in the main menu, using the right-hand key, you need to go to the Boot item. Set the External Device Boot item to the Enabled position. Below, under the Boot Priority section, using the F5 and F6 keys, set External Device to the first position. If you need to download from DVD or CD, select Internal Optic Disc Drive.
Then go to the Exit item in the menu and select Save and Exit Setup. The computer will be re-engaged as needed.
Access to USB without BIOS input (only for Windows 8, 8.1 and Windows 10 with UEFI)
If your computer has one of the remaining versions of Windows installed, and the motherboard has UEFI software, then you can download from a flash drive without entering the BIOS parameters.
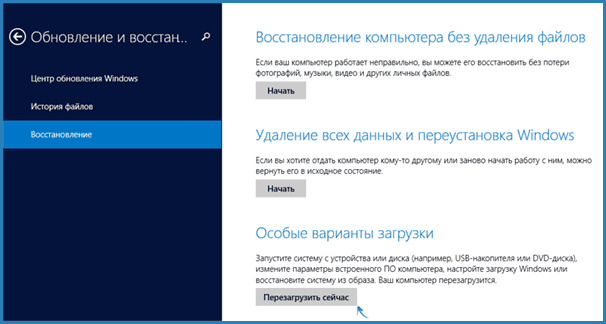
For this: go to the settings - change computer settings (via the right-hand panel in Windows 8 and 8.1), then open “Updates and updates” - “Update” and click the “Re-update” button under the “Special options for upgrading”.

On the “Select Actions” screen, select “Victory Devices.” USB device, connection to video or DVD."

On the next screen you will see a list of devices that you can use, including your flash drive. If it’s not available, click “Look at other devices.” After selecting your computer, restart from the USB storage device you designated.
What to do if you don’t have to go out, go into Bios to install the flash drive
Due to the fact that current operating systems use highly advanced technologies, you may find that you simply cannot go into the BIOS in order to change the settings and access the required device . And here I can make two decisions.
Another thing is to try turning on the Windows browser, then go into the BIOS in the usual way, using the Del or F2 key. To turn on the power supply, go to the electrical control panel. From the list of actions, select the item “Activity buttons”.

And in the next window, select the item “Disable fast startup” - this will help you use the keys after the computer is turned on.
I can judge as much as possible by describing all the typical options: one of them is guilty of obligatory help, in my opinion, because the greedy hoarder himself is in order. If I don’t want to go on a rampage, I’ll check the comments.
Today we will find out how to remove data from a flash drive in the BIOS of various devices. It doesn’t matter what version you have, the order of body ruins will be:
1. We insert our fancy flash drive into the USB port of your computer. I recommend inserting them into the port located directly on the motherboard. From the back side of the system unit.
2. Turn on the computer and press the key Delete(or F2), then go to the BIOS. Depending on the version of the BIOS, other keys (Esc, F1, Tab) may be jammed, so you need to carefully read the on-screen prompts.
In Bios, you can switch tabs using an additional keyboard.
Below I will briefly describe this process using the most recent BIOS versions.
Respect! Remember that if you are installing the operating system from a flash drive or CD and have selected the desired device in the BIOS, and not in the desired menu, after the first automatic re-installation of Windows, you must enter the BIOS again and turn back tightening the hard drive. If you can’t do anything, you’ll need to auto-enable again from a flash drive or CD, and Windows will start the first stage of the procedure again. installations.
Setting up Award Bios for acquiring a flash drive
Award Bios:
Let’s check now that the USB controller is installed. Demo up to “Integrated Peripherals”. Use the arrow on the keyboard to navigate to the USB Controller item. Press the “Enter” key and select “Enable” from the window (also follow “Enter”). The “USB Controller 2.0” checkbox may also be “Enable”.
 You can exit from this tab by pressing Esc.
Then we'll go to “Advanced BIOS Features” – “Hard Disk Boot Priority”.In my case, I initially have a hard drive, and maybe a flash drive.
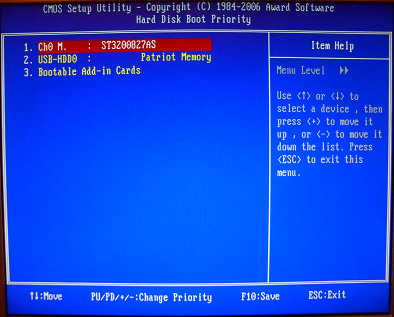 Place it in a row with the name of our flash drive (Patriot Memory) and move it up using the additional “+” key on the keyboard.
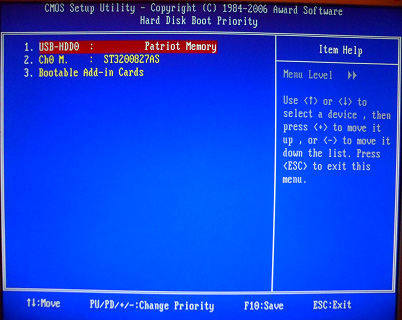 You can exit by pressing Esc.
Setting up AMI Bios for acquiring a flash drive
If you upgraded to BIOS and see such a screen, it means you have AMI Bios:
 Let's check now that the USB controller is installed. Go to the "Advanced" - "USB Configuration" tab.
 Opposite the items “USB Function” and “USB 2.0 Controller” may be “Enabled”.
 If this is not the case, stand on this row and press the “Enter” key. From the list, select “Enabled” (also use “Enter”).
Then exit from all tabs by pressing Esc.
Idemo in the tab "Boot" - "Hard Disk Drives".
 Right now I have a hard drive in my first place, and I need to put a flash drive here. We stand on the first row, stamp “Enter” and in the window that appears, select our Patriot Memory flash drive.
 Please do this:
 You can exit via “Esc”.
Select "Boot Device Priority". Here, the first most exciting device is a flash drive.
 Embossed Esc.
Then we exit the Bios, saving all the settings. For whom go to Exit - Exit & Save Changes - OK.

Setting up Phoenix-Award Bios for flash drive acquisition
If you upgraded to BIOS and see such a screen, it means you have Phoenix-Award BIOS :
 Let’s check now that the USB controller is installed. Go to the “Peripherals” tab - opposite the “USB Controller” and “USB 2.0 Controller” items are “Enabled”.
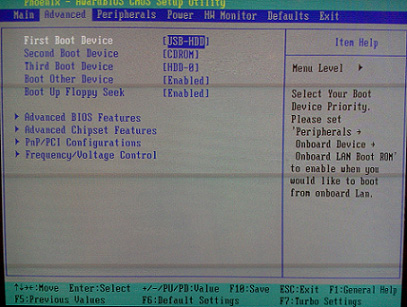
 Then we go to the Advanced tab and under First Boot Device, install the USB-HDD.
 After this, exit the Bios, saving the changes. For this, go to “Exit” - “Save & Exit Setup” - press the “Y” key - “Enter”
 The axis is practical and everything you need to know in order to become interested in flash drives. In my article, I described the process of adjusting the BIOS to the most popular versions: Awardі AMI. The third one has ideas Phoenix-Award Bios, which is becoming more common.
For different versions of BIOS descriptions, the order of actions may vary. Alas, let’s make sure you understand the very principle of adjustment.
One more thing we would like to add: in order to select which device to use on your computer, do not necessarily change the settings in the BIOS. You can immediately, after opening your computer, click on a special menu for selecting accessories (you can use the additional keys F8, F10, F11, F12 or Esc). So as not to guess about the keys, pay attention to the monitor immediately after turning it on. We need to be able to write on the icon: “Press Esc to select boot device”. My option required pressing “Esc”.
Hello everyone! Today I want to tell you, How to set the BIOS to flash drives. Why might you need it, for example, you created a fancy flash drive and want, for example, to install Windows 10. You can also benefit: if necessary, install the DVD and CD backup in the BIOS. There are a lot of administrators who are new to this, for example, with an updated system, they can, through ignorance, say for a lot of time, without understanding that they should not work correctly. I am confident that the instructions have been given to you to show yourself clearly and that you will understand the principle of this action,
Via the Boot Menu to acquire a flash drive
In most cases, you will need to install data from a flash drive in the BIOS for any one-time task: installing Windows, checking your computer for viruses using LiveCD, resetting your Windows password.
In all these cases, it is not necessary to change the settings of the BIOS or UEFI, just click the Boot Menu when the computer is turned on and select the flash drive once as the storage device.

For example, when Windows is installed, you press the required key, select the USB drive connection from the system distribution kit, begin the installation - setup, copying files, etc., and after you first restart the computer itself remove the hard drive and continue the installation process in normal mode.
I wrote in detail about logging into this menu on laptops and computers of different brands in the article How to get to the Boot Menu.
How to go to the BIOS to select options

In some cases, in order to enter the BIOS setup utility, you need to enter essentially the same thing: immediately after turning on the computer, when the first black screen appears with information about the installed memory or logo computer generator or motherboard, press the required button on the keyboard - the most advanced options are Delete and F2. See this information at the bottom of the main screen: Press Del to enter Setup, Press F2 for Settings and similar. After pressing the required button at the required moment (before, and more briefly, you need to work before starting to install the operating system), you will go to the setup menu - BIOS Setup Utility. The appearance of this menu may vary, but we will look at some of the most extensive options.
I would like to give you a table of all the keys for entering the BIOS of various devices.

Change the order of implementation in the UEFI BIOS
On modern motherboards, the BIOS interface, or more precisely, the UEFI interface, is usually graphical and, perhaps, more reasonable in that there is no need to change the order of the hardware devices.

With most options, for example, on Gigabyte (not all) or Asus motherboards, you can change the order of display by simply dragging the drive images behind the appropriate one.

Since there is no such possibility, look in the BIOS Features section, in the Boot Options item (the remaining item can be in another place, but the order of installation is set there).
Adjusting the settings for flash drives in AMI BIOS

Please note that in order to try all the steps that are described, the flash drive must be connected to the computer at the back, before entering the BIOS. To install a flash drive into the AMI BIOS:
- In the menu, press the “right” key and select “Boot”.
- After this, select the item Hard Disk Drives and in the menu, press Enter on 1st Drive.
- From the list, select the name of the flash drive - on another small one, for example, this - Kingmax USB 2.0 Flash Disk. Press Enter, then Esc.

Menu for setting up BIOS settings

Stepping speed:
- Select the item "Boot device priority"
- Select the item "First boot device", press Enter,
- I’ll tell you, bring in the flash drive.

If you need to download from a CD, you need a DVD ROM drive. Press Esc, in the menu from the Boot item, scroll down to the Exit item and select Save changes and exit or “Exit saving changes” - ask about those you have entered in that If you want to save money, you will need to select Yes or type Y on the keyboard, then press Enter. After that, re-enable your computer and again select the selected flash drive, disk or other device to re-enable.
Wanting a flash drive in Bios AWARD or Phoenix

To select a boot device in the Award BIOS, select Advanced BIOS Features from the main setup menu, then press Enter with the First Boot Device item selected.

A list of devices that can be attached will appear - HDD-0, HDD-1, etc., CD-ROM, USB-HDD and others. To use a flash drive, you need to install a USB-HDD or USB-Flash. To download a CD DVD or CD - CD-ROM. Then go one level up the hill, press Esc, and select the “Save & Exit Setup” menu item.
Adjusting the import of external devices in H2O BIOS

To install a flash drive in the InsydeH20 BIOS, which is common on rich laptops, in the main menu, using the right-hand key, you need to go to the Boot item. Set the External Device Boot item to the Enabled position. Below, under the Boot Priority section, using the F5 and F6 keys, set External Device to the first position. If you need to download from DVD or CD, select Internal Optic Disc Drive.
Then go to the Exit item in the menu and select Save and Exit Setup. The computer will be re-engaged as needed.
Access to USB without BIOS input (only for Windows 8, 8.1 and Windows 10 with UEFI)
If your computer has one of the remaining versions of Windows installed, and the motherboard has UEFI software, then you can download from a flash drive without entering the BIOS parameters.

For this: go to the settings - change computer settings (via the right-hand panel in Windows 8 and 8.1), then open “Updates and updates” - “Update” and click the “Re-update” button under the “Special options for upgrading”.

On the “Select Actions” screen, select “Victory Devices.” USB device, connection to video or DVD."

On the next screen you will see a list of devices that you can use, including your flash drive. If it’s not available, click “Look at other devices.” After selecting your computer, restart from the USB storage device you designated.


