Install the program for transferring files to a memory card in your Android phone. How to transfer a program to a memory card How to transfer a program to a flash drive
Current devices on Android support the expansion of internal memory with cards of a decent size. This is interesting for many reasons. For example, if you restore to factory settings or other breakdowns, you will not waste important programs and special information. In addition, on weak smartphones and tablets, this allows you to slightly speed up the device, depriving it of additional space for creating a swap file.
Introducing a method for transferring programs to an SD card in Android
For many programs there is a native method of transferring to the card. To find out if you can transfer the program to another drive, go to the “Options” -> “Programs” section and look to see if the button labeled “Move to SD” is active. If so, bravely push and wait until the system breaks away from the tasks on its own. If the button is not active, it is possible that this function has been blocked by the distributors (working with the inserted disk is behind the scenes). We go to section 2 and use third-party PZ.
Programs for transferring to SD card in Android
There are no paid or cost-free programs that can help us with this task. However, the most popular of them is AppMgr III, also known as App 2 SD. In addition to its main function (transferring programs to the card), it also clears the cache and displays the accumulated information on files, their division into groups, and the available place on the device. The program is extremely simple: the entire tablet phone is divided into 3 sections - “On phones”, “On the map”, “Telephones on phones”. Also, using the “On the map” program you can move to the “On the phone” section, and the third group, unfortunately, cannot be transferred at all. It’s great that App 2 SD encourages the possibility of mass viewing and transferring, so you don’t have to spend a lot of time dragging programs one at a time.
Transfer cache to SD card in Android
The important thing about optimizing devices on Android is that the cache can take up more space than program files. So you can do this by transferring the cache to an SD card. For this purpose, you will need another program called FolderMount, as well as first unroot. If your device demonstrates these benefits, we will install the program as follows:
- launch FolderMount and stamp “+” on the top right corner of the screen;
- In the “Im” row, enter the name of the program whose cache you want to move;
- In the “Dzherelo” row, we definitely write the address of the folder with the cache, for example *SD/Android/obb/program folder*;
- in the “Application” row, select the end location;
- We will emboss the daw on the bright side and the pin icon opposite the name of the first item on the list;
- When the transfer is completed, the “hairpin” will be in green color.


If you are planning to transfer programs to an external card through those devices that have begun to work in full use, do not rush to make yourself uncomfortable with this process. It is possible to quickly use special programs to clean up space on disks, after which devices will regain their functionality again.
If you have a lot of installed programs, but the amount of internal memory is not very large, then you will not run out of space to install new programs. In this case, the same solutions will transfer the data from the game and the program to the riddle about SD cards. This can be implemented in a number of ways, and I will tell you about them today.
Of course, many programs can be independently transferred to the memory card, so to begin with, go to “Settings”, go to the “Programs” item and click on the required program or program. You will need to see that the "Move to SD card" button is active. If so, you can transfer the program data to an SD card.
However, some software packages block this function by moving the data to external memory, so that the internal memory will save the data, but the SD card will have great speed. For such episodes we need special programs. They gave about them.
How to transfer programs to a memory card in Android
Come on, let's see. There are several ways to transfer cached programs to an SD card, but the shortest option is AppMgr III (App 2 SD). It is absolutely cost-free and can move your games and programs from the memory of your smartphone or tablet to an SD card, clear the cache and much more.
Keruvati's program is simpler. All programs installed on your device are divided into groups:
- On phone (moved) - before this group, play the programs that are in the internal memory, or support transfer to SD
- On SD card - programs that have already been moved to external memory
- Phone only (on the phone) - this page contains only games and programs that cannot be transferred to SD

In AppMgr III (App 2 SD) there are even basic functions, such as clearing the cache with one tap, mass visibility, notification when the installation of a program is completed, and adding an account to a program from the program menu.

How to transfer the cache of add-ons to a memory card in Android
This method is much more complicated than before, because you can always transfer the cache of add-ons, which therefore takes up much more than the program itself.

When using an Android smartphone, files will inevitably accumulate in its memory. Over time, these files become so plentiful that they occupy the entire free space and the computer runs out of space when installing add-ons or importing new files.
This problem can often be resolved by moving files to the memory card. Such personal files as photos and videos can be easily transferred to a memory card and thereby free up a little space in the internal memory of the smartphone.
In order to move files from internal memory to the memory card, you first need to install a file manager. For this purpose, use a file manager, or better yet, choose one that clearly identifies the internal memory and memory card. For example, this function is available in the add-on.
Install the file manager and launch it on your Android smartphone. After starting, you will see two folders: “Device” and “SD card”. The “Appliances” folder is the internal memory of your Android smartphone. Open this folder and find the files there that you would like to move to the SD memory card.

Let's say you found a file that you want to move to the memory card.

In order to initiate the file transfer operation, you need to place the icon opposite the desired file and click on the “Move” button, which is located in the lower left corner of the screen.

At the bottom of the screen, the “Snap” and “Paste” buttons will appear. The "Save" button - transfers files, and the "Insert" button - transfers previously selected files to the folder that is currently open.

Now you need to press the “Add Home” button at the top left corner of the program. This will take you to the main screen of the file manager.

After this you need to switch to the SD memory card. For this, click on the “SD card” folder.

After that, on the memory card you need to open the folder where you want to move the files, and click the “Insert” button.

After this selection, files will be moved from the internal memory of the smartphone to the SD memory card.
Many Android users are aware of the problem of lack of internal memory in their phones or tablets. One of the main ways to do this is to transfer games and add-ons to a memory card, such as one.
However, if you decide to transfer the game to an SD card, you will encounter various difficulties. Let's try to look up this information and look for a couple of useful programs to transfer data to Android.
To begin with, it means that transferring programs to a memory card can be done without third-party programs using special methods. However, the very possibility of the transfer may lie under a specific skin program. Some vendors block this ability, perhaps because the internal memory will steal the lower SD card's speed code.
To check that you can transfer the program to the memory card, in the system settings, open the “Programs” item and see that the “Move to SD card” button is active.
If the button is active, the program supports the transfer, but if the button is disabled, the transfer is not supported.

Transferring add-ons to AppMgr Pro III
A more manual way to transfer add-ons is a special add-on AppMgr Pro III (App 2 SD), which, in addition to transferring add-ons, also has a number of basic functions:
- Selecting programs in the program menu
- Notice about the completion of installation of the program
- Clear cache with one tap
The main advantage of AppMgr Pro III lies in the automatic sorting of programs through reorganization. The following sorting is divided into tabs:
- On phone – programs in the phone that are in memory and support transfer to the memory card
- On SD card – programs that have already been moved to the SD card
- Phone only – programs that do not support transfer

Transfer cache to memory card
The first method does not work. (And it doesn’t work in other versions of Android)
The methods described above are good, but, as has already been said, they do not work all the time, and in addition, they deprive the internal memory of the cache, which often takes up much more money. The FolderMount program, administrated under AppMgr Pro III, allows you to move not the program itself, but its cache, to a memory card. To operate this program, you need root rights, because you don’t know what it is or how to remove it.
Transferred to the cache, I’ll try to do a few simple things:
- Launch the program and press the “+” icon at the top right corner
- In the “Name” column of the menu, indicate the name of the program whose cache you want to transfer
- In the “Dzherelo” column, indicate the folder with the cache that you have Android/obb/ your folder is called programs
- In the “Destination” column, select the folder on your external SD card where you want to transfer the cache
- After everything is filled in, press the right hand on the check mark and then on the “pin” opposite the name you gave in the first step.

After the transfer of data is completed, the “hairpin” will become a green color. After this you can use the program
Android programs are installed in the internal memory section. Therefore, owners of devices with 8/16 GB storage devices often struggle with the lack of free space on the Android device, which can lead to the possibility of transferring add-ons to an SD memory card. If you can’t create anything, you can’t install programs on a smartphone or tablet, you can’t download data from the Internet or receive a file via bluetooth/NFC/Wi-Fi. Remnants for whom, behind the struggles, internal memory is revealed.
To continue to fully use your smartphone or tablet, you need to transfer large programs to a different memory partition. How to transfer add-ons from internal memory to an SD card on Android, read on.
Peredmova
Programs are made up of two main components - the program itself and the cache. It remains an additional file for correct work, and do not get confused with the timely data. Most often, this approach is used by igors, where publishers place graphics and additional content, totaling 15-100 MB and up to 2-3 GB. Also, like most programs, after a small effort, it doesn’t make any sense to strengthen the cache of an additional file.
Early versions of Android allow you to transfer the cache to a memory card. Please note that this function must be supported by the OS, for which the standard driver and distributor must enable the possibility of transferring to the add-on. Otherwise, you won’t be able to do without ROOT rights.
Standard method
Android devices up to 4.0 and some models with version 4.2 and higher allow you to move programs and/or cache through the setup menu. To do this, you need to open the device settings, select the “program” item and select the desired program. After information about memory usage, there is a “move to SD card” button. Please stop beating you in any other name.
Main advantages:
- Simplicity. ROOT rights are not required.
Main shortcomings:
- Moving programs to an SD card is not available on all devices.
- It is not possible to transfer the program because the function is not implemented by the manufacturer or the manufacturer.

Third party programs
Since the standard method does not work or is not easy, it is recommended to try third-party programs as an alternative: AppMgr III (App 2 SD), Link2SD or Folder Mount. A list of utilities allows you to find programs to navigate, view detailed information about space usage, etc.
AppMgr III (App2SD)
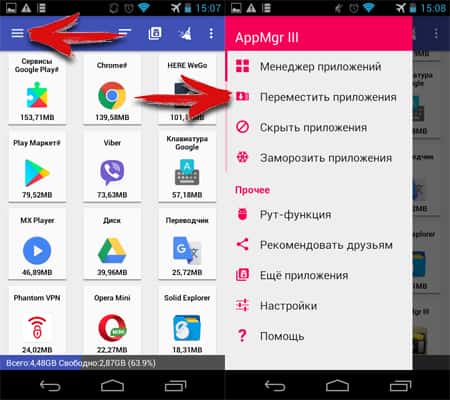
It’s just that you don’t need the additions for transferring programs to a memory card, looking at the right place, clearing the time cache, etc. To move the program:
- Open the attached panel by pressing on the 3 lines at the top left of the screen.
- Select the item “Move programs”.
- On the "Movements" tab, select the program.
- In the new year, confirm the flow.

By giving AppMgr III ROOT rights, the ability of programs to expand, allowing you to transfer previously inaccessible programs.
Main advantages:
- Information content.
- Additional functions: freezing programs, clearing clock cache, etc.
- Neobov'yazkova is clear ROOT rights.
Main shortcomings:
- On devices where the transferred program is blocked at the system level, the transfer is not supported.
- Additional features are not available without ROOT rights.
- All functions are available in the free version of the program.
Link2SD
A more functional utility, with the emphasis on transferring add-ons to a MicroSD card in three different ways:
Posilannya
The program, including system and all associated files, is transferred to the first section of the 2nd section on the MicroSD card. At the same time, a request is made so that the system continues to “respect” the movement of additions installed in the internal memory section. Required ROOT.
Uploading external data folders
The method is similar to the previous one, in which the creation of the additional partition on the MicroSD card is not required. This is the best option if you need to transfer a large cache to your application. The instructions are simple and follow the confirmed steps:
- You need to select the program and click on the “send” button.
- This means what data needs to be moved.
- In the new window, select a section, since the card is divided into two or more parts.
- Check for completion of the procedure.

Transfer to MicroSD card (App2SD)
The method is similar to that described in AppMgr III. Allows you to transfer programs and cache. ROOT is not required.
Main advantages:
- Information content.
- There is a wide range of options for transferring caches and add-ons.
- It is not necessary to have ROOT rights for the App2SD method.
Main shortcomings:
- The transfer does not work on devices, but the function is blocked on the system level.
- For full-time work, you need ROOT.
- Most functions are not available in the no-cost version of the program.
Folder Mount
The utility allows you to transfer folders with add-on data, beyond the requirements for the system, in order to preserve the correct operation. To move you need:
- Launch Folder Mount and create a pair. For this purpose, press the “+” button, the beast, or at the entrance of the window of evil, which opens up by pressing the button at the sight of three dark eyes.
- Set parameters. The name is for understanding as the program has been transferred. Dzherelo is a folder that needs to be moved. Purpose – folder for final retouching.
- Place a pictogram near the animal's check mark.
- Make a choice in the window: “so” - the end folder will be created automatically, “no” - select the end folder manually.
- Wait until the file transfer is complete.


Main advantages:
- Ease of transferring programs.
Main shortcomings:
- Requires ROOT for full-time operation.
How to transfer programs to a memory card using Adoptable storage
The function is available on all devices starting with Android 6.0. The principle of operation lies in the creation of a single mass of data from internal and external storage. After activating Adoptable storage, programs are installed on the internal disk, and then transferred in the “Standard way”, described on the beginning of the article, to the external area - MicroSD. The Adoptable storage method does not require ROOT rights, but will require the first formatting of the memory card so that all the visible information is removed.
Instructions for activating Adoptable storage:
- Insert a MicroSD card and read the instructions about how to get notified. The gear icon allows you to customize the map.
- In the new window, select the item “Internal memory” and click “Next”.
- Confirm this and click the “clear and format” button. Please note, all data on the MicroSD will be deleted.
- Check that the formatting is complete.
- The system prompts you to transfer some of the data to an external storage device in order to free up space on the internal disk. It's not easy to transfer files at once.
- After that, go to settings, then program. Select the program and in the new window the item “Convergence”. The "change" button allows you to transfer the program to the outer area of the counter disk.


Important! For Adoptable storage, it is recommended to use a memory card with high data exchange speed of at least class 10. Otherwise, the productivity of the device will change.
Main advantages:
- Simplicity of the method.
- No ROOT rights required.
Main shortcomings:
- MicroSD data is encrypted, which prevents the card from being stolen in other devices. If the device fails, you will not be able to remove photos from the memory card.
- Devices running Android 6.0 and even higher are supported.
- For effective operation, a MicroSD card with high data transfer speed is required.
Visnovok
If you don’t have enough internal space, you asked yourself: how to transfer programs to a memory card on Androids, one of the described ways to easily help. The simplest way is to check the transfer settings using the App2SD method. For owners of devices with the current version of Android, 6.0, the Adoptable storage method is available. Otherwise, you need ROOT rights to move the program anywhere or only a folder with large data that is included in the Folder Mount and Link2SD.
(3 ratings, average: 5,00 iz 5)


