A dry way to install Windows 7. How to reinstall Windows: instructions for installation. A couple of words about Windows installation
Good day, administrator of the site remontcompa.ru, I have food for you - how to install Windows 7 on a new computer, so on a clean hard drive without any extensions? Singing, є yakіs rules and yakscho їх not dorimuvatisya, obov'yazkovo blaming problems, yakі want to get away. George.
Installed Windows 7
Hello friends! Installing Windows 7 on your desktop computer or laptop from a disk, as well as flash drives, is not guilty of any difficulties after reading our article. We prepared for you a detailed description of the skin crocus and added rich illustrations. Go through all the stages of installation together with us, next time you will install Windows 7 without third-party help.
- First, the official distribution of Windows 7 64-bit can be purchased on the official one.
- In a different way, what do you have UEFI BIOS If you want to install Windows 7 on a GPT disk, but don't know how to install it, read our article.
- Thirdly, if you bought a new laptop with Windows 8.1 and want to replace it with Windows 7, then all manipulations with BIOS UEFI and the process of further installation of the system.
- Fourthly, in case of problems with the installation of Windows 7, go back to our article -.
- At five, if you don't have a floppy drive, you can use our instructions.
- As a matter of fact, if you are installing Windows 7 from a flash drive, you should know that Windows 7 does not support USB 3.0 (the port sounds blue-colored), if your USB 3.0 flash drive, insert it into a USB 2.0 port.
Otzhe, the rest of the preparation before the installation of the operating system. What do you need to call us forward?
If you install Windows 7 on a hard disk with the already essential partitions, then you will need to copy all your data from the partition, on whichever you install Windows 7. During the installation process, this partition will be formatted and the information from the new one will be visible.
If you install Windows 7 on a clean hard drive, you don't need to do anything, just read the article below.
There is nothing collapsible for everything, on the very cob of interest it is pressed on the keyboard, in most cases the keys F2 or Delete, went up to the BIOS, here we need the "Boot Sequence" or "Boo t". The BIOS is basically two types, given the Ami BIOS, which has been improved and reviewed in our article, as it will always be modified by the interface, which means you have - Award BIOS, about those, like a new practice, it is written in our article "BIOS zavantagen disk".
As mi bachimo, the first zavantazhuvalnym pristroyam installations hard drive - HDD: PM-MAXTOR STM3, the first point 1st Boot Device is visible with arrows and it is pressed Enter.
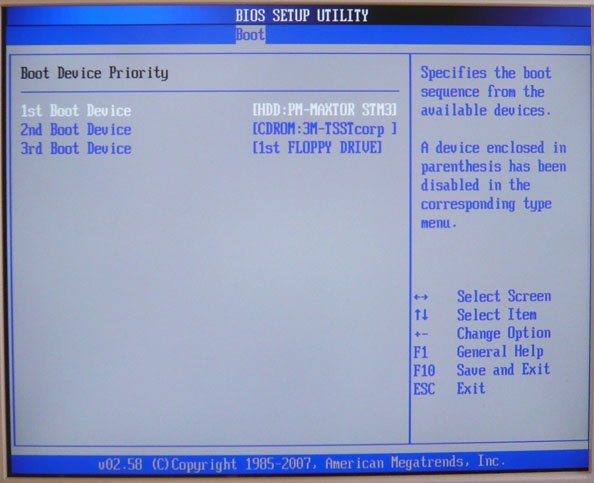
At this menu, we put the first zavantazhuvalnym (First Boot Device) CD-ROM, we see it behind the help arrows on the keyboard, gave Enter.

Also the first disk drive, and the other one has a hard disk, which is necessary.

We take care of the fix (embossed with F10) and re-adjust.
If you correctly set the advancement in the BIOS from the disk drive and in the new you have the Windows 7 installation disk, then when the computer is attacked, we see on the monitor the advancement from the Windows 7 installation disk - Press any key to boot from CD or DVD. We press whether it’s a key on the keyboard, roll it, if you don’t catch it with a stretch of ten seconds, the system goes into re-engagement and it starts all over the cob.

The process of installing the operating system is starting, patiently check

Here it is necessary to choose a language system.

Insert

Accept please please

We select a new installation

I have a lot of space on my hard drive with a capacity of 500 GB ( Disk 0) subdivided into two divisions (Department 1 and Division 2). Windows 7 operating system is already installed on the hard drive, I don’t need it especially, and I want to reinstall it. Before the installation, I saw all the divisions on the Winchester and we create them anew. As a rule, if you want to clear the pardons of the Windows 7 installation, it’s better to see all the essential parts before installing and creating them again, or install the operating system directly into the non-partitions of the space.
We see the left mouse Disk 0 Partition 2 and embossed on the button visuality.


We see the left mouse Disk 0 Partition 1 and embossed on the button Vidality.


The old ones have split up the visions, we are creating new ones.
We see the left mouse Free space on disk 0 i tisnemo Create.

For whom it is necessary to choose the size of our future disk (C :), Windows 7 will be installed on the new one. Choose 200 GB, I think it will be enough. Tisnemo Zastosuvati.

For the correct operation of Windows 7, it is necessary to create attachments with a volume of 100 Mb from attachment files.
Therefore, on the proposition "To ensure the correct work of all its capabilities, Windows can create add-ons for system files" is OK.

On Disk 0, we have received a distribution of attachments Section 1: Reserved by the system(usually 100 megabytes) from Win 7 files.
So another partition 2 appeared, it will be the system drive (C :), it will have 196.1 GB.
Do not occupy a place, we will turn it into a distribution. We see the left mouse and emboss Create, if there is a disk (D:).

Zastosuvati

Windows 7 will be installed on Disk 0 Partition 2: (probably disk C:), see it with the left mouse and press the Next button.

The process of installing Windows 7 is starting.
In this article, you know how to reinstall Windows 7 independently. It didn’t sound like a scary thing, reinstalling Windows is just as easy. During the hours of Windows 95 and 98 unacknowledged people, the procedure for reinstalling the operating system could be a mystical rite. Lyudina, as a request for tse robiti - obov'yazkovo called a programmer, and entered the guru in a computer closet.
From their side, such gurus, stuffing their own price, all the time zalyakuly their clients with terrible computer terms and stories about viruses and burned computers. At your helper, you will change, what is wrong with you and what should you install or reinstall Windows on your laptop or computer, it’s simple and accessible, practical for any person, like you can be a computer bear.
Zroblyu is not very guarded. This article will tell you how to install Windows 7 on your own using an additional DVD. If your computer or laptop does not have a DVD drive, then you will need to install Windows from a USB flash drive or from a memory card, I'll tell you about it in another time.
Before that, how to start reinstalling Windows, read the entire article to the end, and if you have a printer, then rozdrukayte її.
Reinstalling Windows 7 consists of a number of steps:
- Preparation of the computer before the installation of Windows 7;
- Preparing an installation disk from Windows 7;
- Customized computer BIOS for downloading from a DVD;
- Installed Windows 7;
Now let's go through the stages of reporting.
1. Preparation before installing Windows 7
First, install Windows, you need to do a little preparation.
At the same time, you need to copy all the information from the C disk. Place, where on the "C:" drive, maybe your original information is not so rich, just sound the working style and "My Documents". Another option is to look into the root of the "C:" drive, sometimes people don't know how to save the files. Copy all the files you need to another disk (for example, “D:”), a DVD disk, or to a USB flash drive.
On the future, check that it is better to save information on a different disk partition, on which the system is installed, and, of course, create backup copies.
If you only got a computer, or if you know that there is no valuable information in the sky, then naturally you can not fool around
One more moment, like a varto transfer, before it, how to install Windows, the driver for the merging card. As soon as you installed it, it turns out that your Windows distribution didn’t have drivers for your merging card, otherwise the stench didn’t install correctly for some reason, then you don’t have drivers and without the Internet. Therefore, download new drivers, at least, for the merging card.
2. Preparing the installation disk for Windows 7
Tim, who already has a Windows 7 installation disc, you can skip this step. Since you don’t have such a disk, it’s necessary to write it down or come. If you want to get Windows on the Internet, check out the clean MSDN collection.
Tsim wi secure yourself any possible pardons from the robotic installed system.
Disks from Windows 7 on the Internet, as a rule, are expanded by looking at disk images in the ".iso" format. De download I will not say because. it is not legal to take this width. I can please, before that, how to download the image, read the comments before the release, the problematic disks sound loudly at the sight of buying angry videos.
At which stage you decide which version of Windows 7 to install on your computer, 32-bit or 64-bit. I won't go into details, but I can write a few pieces on this topic. I will say only that a 64-bit system can be used, with a limited amount of operational memory, if it is a 32-bit maximum back, it is only about 3.25 GB. At the same time, a 64-bit system sends 64-bit indicators to the address, which means more memory when working. Tse zbіshuє obsyag memory, how to occupy programs.
Also, on the melancholy of a 64-bit system, varto vrahuvati, which, with victorious 64-bit add-ons, will bring a good increase in productivity.
Visnovok: A 64-bit system needs to be broken down so that your computer has 4 or more gigabytes of RAM, which in principle is already becoming the norm for a modern computer.
If you need to burn the image of the capture onto a DVD disc, then you can proceed to the installation.
3. Customizing the computer's BIOS to capture from a DVD
To install Windows, it is not enough just to insert a DVD disc into the drive, it is necessary to start the computer in such a way when it is turned on, so that the disk can be started. Tse rush at the BIOS. Bios is practical in any computer or laptop, in the new one there are important adjustments, one of these adjustments is the order of attachments. Tse nalashtuvannya us at once and click.
In order to get into the BIOS, you need to immediately press the first key on the keyboard when the computer is turned on. Sound when zavantazhenni on the screen it is written, what you need to press, what to eat in the BIOS menu. The most common key is Delete, Esc or F2. About those that you have gone, you know, having swung the BIOS menu in front of you.
The following options are most commonly used:


If the test failed, change the computer and try again. Below is a table with possible options for entering the BIOS.
| Virobnik BIOS | Keys |
| ALR Advanced Logic Research, Inc. | F2, Ctrl+Alt+Esc |
| AMD (Advanced Micro Devices, Inc.) BIOS | F1 |
| AMI (American Megatrends, Inc.) BIOS | Del |
| Award BIOS | Ctrl+Alt+Esc |
| DTK (Datatech Enterprises Co.) BIOS | Esc |
| Phoenix BIOS | Ctrl+Alt+Esc, Ctrl+Alt+S, Ctrl+Alt+Ins |
| Virobnik PC | Keys |
| Acer | F1, F2, Ctrl+Alt+Esc |
| AST | Ctrl+Alt+Esc, Ctrl+Alt+Del |
| Compaq | F10 |
| CompUSA | Del |
| cybermax | Esc |
| Dell 400 | F3, F1 |
| Dell Dimension | F2, Del |
| Dell Inspiron | F2 |
| Dell Latitude | Fn+F1 |
| Dell Latitude | F2 |
| Dell Optiplex | Del, F2 |
| Dell Precision | F2 |
| eMachine | Del |
| Gateway | F1, F2 |
| HP | F1, F2 |
| IBM | F1 |
| IBM E-pro Laptop | F2 |
| IBM PS/2 | Ctrl+Alt+Ins then Ctrl+Alt+Del |
| IBM Thinkpad | From Windows: Programs > Thinkpad CFG |
| Intel Tangent | Del |
| Micron | F1, F2, or Del |
| Packard Bell | F1, F2, Del |
| Sony VAIO | F2, F3 |
| Tiger | Del |
| Toshiba | Esc, F1 |
After that, as you have entered in the BIOS, it is necessary to know the option that determines the order of attachments. As a rule, it is necessary to shuffle in the menu, in the name of which there is the word BOOT, there are also other options, but it seems like - "Whoever jokes, then always know."
To make it easier, I’ll make a joke, I’ll bring a sprat of applications, as if looking alive:


If I choose to add the first one, start ringing for additional keys, the arrows on the keyboard, and then there are other ways to navigate through the BIOS menu, so that it’s not far off, you can marvel at the way, as a rule, in the BIOS on the spot.
Choose as the first advanced CD/DVD drive and exit the BIOS saving all changes. For which it is necessary to change the Save and Exit Setup item. It will be necessary to restart the computer and we, in such a rank, have risen to the offensive stage, for the sake of it, well, everything has begun.
4 Installed Windows 7
If the disk we have recorded is correct and in the BIOS it was set up correctly, we would like to see such an inscription in front of us. Press the key to grab from CD or DVD.
Looking like this:

Let's press the key
If you didn’t write such a thing, then, perhaps, from what you wrote, you did it wrong. In such a situation, the BIOS is reversed again, so that the DVD drive is saved, so that everything is installed correctly in the BIOS, then, more than anything, your disk is not exciting and you happen to find another installation disk or download another image of Windows 7.
I have a small guard in my misery. You can use the Windows 7 installation disk, on whichever Windows itself, write additional utilities, in this case, to start the installation, you need to select the required item in the menu of your disk. Also varto designate that in these disks, most of the operations described below will take place automatically, without your participation. Do not worry about this drive, all adjustments can be changed for the reason after the Windows installation is completed.

To install on the cob tisnemo "Install"

Before you will choose which version of Windows to install. It is necessary to choose the one that you have the key for. If you have a laptop, then often a sticker with a key for that version of Windows is glued to the bottom. We need the key itself in the installation. In principle, yoga can be introduced not immediately, but for a stretch of 30 days.

Let's wait for the mind's license and press "Dali"

We select each installed.

Choose the partition for which you will install Windows 7 and click "Install Disk"

At any place in an uninformed person, food can be blamed, we will look at this report.
Hard disc fixation
Often on the hard disk of your computer there are a lot of distributions, about which you know (such as C: D: E: etc.), there may be one or more attached distributions. Notebooks are especially valuable, as they were sold with an already installed operating system. So they split the worker to work in order to be able to upgrade the system and bring the laptop to its factory settings.
It is also common to encrypt attachments with a 100Mb expansion, which is created by Windows 7 itself. So the axis of the given partition is rozdashovuetsya program, like when the encryption is encoded, the system partition. In order to sort out the problem, you can ask for help preparing the hard disk of the computer before installing Windows 7. For this, it is best to use special programs, for example, Acronis Disc Director.
Let's go back to the installation.
Press "Format the disk" and "Format"

The installer is ahead of you about those that all the data from this distribution will be deleted, but we are not afraid, even though we were preparing for it and ahead of time, we made a backup copy of all the information we need, for that we will happily press the "OK" button.

After the completion of formatting, press "Dali"

Check it out, while you complete the installation

Once installed, you will be prompted to enter your computer's name.


We enter the key, you can also stick it on the laptop from the bottom, or you can see the stickers on the system block.

Set the safe mode

Set the date, hour and time zone

If the computer is not connected and the system knows the driver for your connection card, Windows will prompt you to select the type of connection

On which Windows 7 installation is completed, and you can proceed to the installation of drivers and programs you need.

Nasamkinets do not forget to turn on the BIOS settings, as we changed in paragraph 3 of our curation. It is required to install a hard disk in the BIOS with the first capture attachment, otherwise, when running the computer on the skin, it will almost start to capture from DVD.
(209 votes)
I love you, blog readers.
Practically all short-term mobile computers are sooner informed about the situation, if their attachments require a new operating system. If you don’t know how to install Windows 7 on a laptop. At the article, I will try to find a detailed instruction, and I will also describe a few important respects. The process touches on all aspects, starting with the creation of a special portable memory, and finishing with a complete robotic unit.
In front of him, as if to proceed without interruption to the very process, I wanted to hang a sprat in front of the coristuvachas, whose knowledge of the computer is on the cob level.
So, you have a laptop, on which the current version of the Microsoft OS is already installed. Moreover, at the same time, from her, bathed in additions. You want a new operating system, the shards on the device are experiencing problems in the power supply of the robot, the wines are zavantazhuvatisya or a virus appears.
Let me tell you once again that this time it’s more likely to move in the face of the coming rocks and speed up with a special division on the Winchester. In addition, without a flash drive and a disk, turn the unit at the camp, at which point the remaining purchases at the store.
With this procedure, the procedure may be carried out automatically. To start the process, it is enough to press the last button on the keyboard for an hour to restart the system. At each other, the virobniks proponuyut different buttons. For example, in Asus laptops - F9”, Toshiba-“ F8» or « F11", HP - " F10» or « F11". Details can be found on the web site of the virobnik.
In addition, the situation is getting worse, if you want to remember the actual license fee, let's say homework", in pirate, ale" Maximum". From one side, in this way, the stench takes away the extensions of the functionality. Ale z іnshoy - similar solutions to the future are often made before the appearance of problems, but if you waste information.
Varto also say that with a new installation, the best option is to save the distribution of renewal. Obviously, a computer can't be bought without an operating system either with Linux or DOS. Believe me, put 20 GB on a hard disk, sound, do not play a big role. And the axis is marked by the area є important element.
Disk( )
Let me tell you right away that I have already guessed the point of creating an exciting portable memory more than once.
BIOS( )
With this varto, it means that in most cases it is not enough to simply spread the portable attachment to the avian nest. It is also necessary to work in such a way that the computer is first turned on its own to the required distribution. It is installed through the BIOS - the area of the computer, important settings are not saved. The first order of interest is the only one of them.
Also, for the necessary distribution, restart the attachment and press the key " Del". On the Lenovo Tse, you can also use the button " F1», « F10» or navit poednannya kіlkoh. Acer and Samsung may have their own meaning. All lie down in the virobnik. Sound the stench shown on the screen. Golovne - do not miss the moment. If they didn’t catch it - repeat, you don’t waste the docks at the required distribution.


Vin can be different.


After that, as you have jumped into the BIOS, it is broken in the menu, in which there is the word BOOT. Now it is necessary for us to install our portable device on the first place, such as a plastic disk, or a flash drive. Move to help with the arrows on the keyboard. Selected and confirmed by the button " Enter". In some versions, you can put it in the right middle for help " F5» ta « F6". Suggestions are given in order.


We put up a strong attachment and then we press " F10”, and then we confirm it. Tim ourselves saves and apparently.
Installed( )
After restarting the computer, a dark screen will appear, which will tell you about those who need to press a key to start the process from a flash drive. If you don’t mind, it’s possible that things were wrong.


Appear at once, in which language we choose, the layout of the keyboard and press "".


Click us button " Insert».


Before the koristuvachs, stand vibrating, as if choosing an operating system to vindicate. It is recommended to use zupinitis, like a key. If we are talking about laptops, you can look for different symbols on the stickers on the bottom part. The code itself is less likely to be needed at the end of the procedure.


Now the dovga koristuvalnitska favor will appear. Read and confirm.


Vіknі "" choose " Povnu».


A menu will appear in front of us, where it is necessary to specify the settings. Take a look at this item in more detail.


Disk repair( )
Often on a hard drive of a computer, in known areas (C:, D:), you can use it in others - sound attached. Notebooks are especially valuable, as they are implemented from an already installed OS. Qi divided are created by a virobnik. The stench is recognized for renovation and will be built to factory settings.
In addition, zustrichaєtsya prihovat area rozmіr ї to become 100 Mb. It is created by the system and is recognized for the implementation of the BitLocker function, which is valid for encryption. When you are blessed, you can get lost. Ale is still not recommended to work.


Otzhe, we choose a disk, and then we press " Nashtuvannya…". Additional functions are being considered. Since we don’t want to change anything in the plan of the Winchester, we just say “confirmation” and confirm the decision.


Important! From the required distribution, you can see all the information, including the files of the koristuvach. For whatever reason, you didn’t manage to save important documents, after the installation is completed, you can speed it up with special programs that allow you to turn everything around in the result in a number of formats. I’ll tell you right now that it’s unlikely that it will help for video and music.
Check for the end and press "".


Pochnetsya without intermediary installation.


If someone is prompted to enter the name of the koristuvach of that computer.


At the next menu, a password is set (which you can and not rob by typing "").


You will be asked to enter the key.


We choose the safety rib. For yoga, you can be remembered in the future.
The era of the popular operating system Windows XP (and below) is behind us. Despite the fact that a lot of time has passed since the release of Windows 7, its popularity has not changed, the zest of simplicity is in spite of beautiful design. And it was released later in 2009, a year later, after the release of a not-so-famous twin under the name Windows Vista.
I'm guessing, the fact that soma part of the OS is better, lower and lower analogues, doesn't mean to anyone to ask?! Now let's talk about installing Windows 7 (maximum), whether it's a distribution kit, investigating from the Internet, buying from a licensed salon, selling Microsoft or sending orders.
First, on what varto turn respect - computer resources. Although the characteristics of the computer are lower, the lower is stated in the Windows 7 windows - start namagatisya, tk. the operating system, if it won’t get up, then it’s a lot of galmuvatima and diatim on your nerves. That and not vyklyuchenі problems іz zalіzom, yakі can zіpsuvatisya vіd overvoltage too soon.
Preparation before installing Windows 7 Maximum
Minimal systemic benefits are as follows:
- x86 or x64-bit processor, with a frequency greater than 1 GHz;
- Thus, the installation is transferred to a 32-bit system (x86) - 1 gigabyte (or GB) of operational (RAM) memory. For x64 systems - 2 GB. i more;
- video card with DiectX 9 support. It is necessary to include the possibility of transparency (napіvprozorostі) of the window and the panel of the day;
- free space on the computer's hard disk of 15 GB. For x64 systems - 20 GB.
If your computer can pull on your own "monster" - boldly move on to the next step, let's talk about the creation and preparation of the BIOS to capture from DVD or flash drives.
Preparation before installation
As your BIOS supports flash drives, you create a flash drive (multi-capture flash drive). To fight for additional programs (you can win, whether it is otherwise), available in the least on a cost-free basis.
Otherwise, we will quickly get old, but we will change the method through a DVD-ROM. Capture image of OS Windows 7 Maximum writeable on optical media. For which vicariist program is UltraISO.
Run UltraISO, press the button "Trial period...", to start in a no-cost mode.
Press the right button of the bear on the region, where the type of storage and the size of the data that are written to the disk are indicated, we select the menu item "Show type of wear" and activating DVD inserts (look at screenshot #1).
 Open the "Tools" menu, emboss "Burn CD Image" that “Record” button (see screenshot No. 2)
 It is clear that the recording of the disk has been completed and it is possible to step over to the stepping stone, in which case the BIOS has been set.
BIOS setup
We are taking the DVD disc from the drive.
Rezavantazhuemo computer. Quite differently (until the BIOS is set to be changed) the Del key (for some models of the motherboard F2 or F11) the computer is upgraded, but before that, the operating system is more likely to take off.
Guiltyly open the BIOS, then select the Boot tab, go to the First menu, select the CD-Rom Drive item and press the F10 key on the keyboard to save and exit. Whenever possible, the process of re-engineering the system.
UVAGA! The change of points and the name of the change in BIOS settings can be changed.
As if everything was broken down correctly in the forward steps - it is to blame for asking / informing about those who need to press the key in order to continue the launch from the DVD drive. Thumb be-like a key ...
Check for the initialization of the Windows 7 installation files.
Vіdkryєtsya vіkno "Installing Windows", de vibiraemo mov, the format of the hour and the layout of the keyboard, as if it would be a vikoristan for the locks. Press the "Dali" button. At the vіknі it’s pressing “Restore” (marvel at screenshot No. 3).
 Check for the completion of the process "Ear of Installation", let's wait for the license, by ticking the checkbox in the paragraph "I accept my licenses" and embossed "Dali".
To show up at the end, in which case you need to choose the type of system installation: upgrade old Windows to Windows 7 Maximum or speed up the function "Povna installation". Select the rest, select the hard drive where our system will be installed and press the "Next" button.
Five Windows installation processes are to blame (see screenshot #4). Check and restart the computer (do not boast, it will be automatic). After restarting our installation of windows pidide to the final stage. Check for the end, after which the first (anterior) start of the system will be, it will be necessary to enter it and press “Dali”. Dotrimuєmosya podkazok on the screen, pushing "Dalі", docks z'appear working style Windows 7 Maximum.
The stage of installing the operating system has been successfully completed. Take a drink and find out new possibilities for this product.
Hello everyone! We continue the topic of OS installation. This article will describe the process of installing the Windows 7 operating system from Microsoft Corporation on a computer or a laptop, on which it can read DVD discs.
Nasampered, it is necessary to take care of the protection of data (special service information, documents, music, films, photographs). And just like that, copy them to an external storage device (flash drive, CD / DVD disks, old hard disk) or another partition of your hard drive.
Capture a computer from an optical disk.
We are going to install the drive from the DVD drive. For which you need to go up to the BIOS (basic input / output system). The BIOS has the option of setting up connections to the computer, as well as the parameters that are responsible for the system's initial involvement (which we need).
You can get into the BIOS like this:
Installed Windows 7
Copies of the necessary files for installation on the hard drive
If you have installed everything correctly, then after restarting the computer, the DVD drive will be restored.
The installer will copy the necessary files to a hard disk, after which you will find it in order to select a movie.
wrap Ukrainian and press the button Dali.

At the coming century it is necessary to press Insert.


The program prompts you to select the type of installation from the two prompts. Select “Re-installed (additional parameters)”

Choose a distribution for the installation of the system
On tsmu krotsі sled divide the area of the disk and split її into splits. Once the molds were divided, you can skip the whole cut.
If the disk is new (image below), then the wine may appear unrecognized, so the program will give us the opportunity to fix the disk by pressing on the force Disk repair.

In this case, shown in the image, the size of the entire hard disk becomes 20 GB, so there is no sense of yoga length.
As a result of guessing, the installation might look like this: "To ensure that the robot has all its capabilities, Windows can create add-ons for system files." Wait a minute, press with him OK.
Choose a distribution for installation
At this stage, you need to choose the partition where the system will be installed. In this case, one distributed (the other - 100 Mb of creations by the system automatically and reservations) then there is no choice. As if you have a sprig of distributions, select the mouse you need with the left button, to the one where you want to install the system, and click on the power Format.

The installation seems to be aware that on which distribution there may be important data, as it will be used as a result of formatting. Being aware that there is no important information there (special photographs, videos, documentation), press OK. Partition of the hard disk will be formatted. Call the formatting procedure in the installation wizard, it takes no more than five seconds, after which you press Dali.
One more moment. As you have created some of the MAIN divisions in UNDESIGNATED AREAS (so there is no information there), all of them need to be formatted, otherwise the system will not work after installation. Enter like this: format all the main distributions on the head, then see the one where Windows will be installed and typing Dal. Ale, there is nothing terrible, so don’t hurt Vitsogo.
Nareshti, all the necessary adjustments for the installation of the vikonan.
Windows installed
At this stage, copying, unpacking files in Windows and installing the necessary components and updating on the partition of the hard disk, which you selected from the front of the disk, are made. Zalezhno vіd svidkodії ї kom'yutera, tse loan deyaky hour. When the computer is automatically rebooted, the installer will update the registry parameters and start the necessary services.
At the stages of re-adaptation, be careful, even if the computer is re-uploaded from an optical disk, then the newly installed one will start from the very cob. So with the first re-advantage, it is quicker to get an optical disc from a DVD drive.

Adjusting the necessary parameters
On the shortest possible time, the installation master will adjust the deeds of the additional parameters, so that you can change it, if after the installation is completed.
Save fields. In the field "Im'ya Koristuvacha" enter your own name or else. The computer name field will be filled in automatically, or better yet, give the computer name in English, so that the Installation Master can use Russian characters. Press Dali.

Then it is necessary to set a password for your oblіkovogo record. If you want to enter the system without a password, then do not fill in the given fields and skip them by pressing Dali.

Then the installer will ask you to enter the product key, or more quickly, if you have set up an Internet connection. Leave the field empty and press Dali.

At the next click, press “Check recommended settings”.

You can set the date and hour for the upcoming weekend. Whose next to press Dali.

I repeat, that all the parameters described in the final section can be changed at any time for an indefinite number of times.


