Making a case for a touchscreen mobile phone.
Basic functionality Today it is important to recognize life without mobile phone
We practically take Yogo with us everywhere, actively vikorist day after day.
In order not to damage such a necessary device for people, for protection, use a cover.
Of course, you can buy hoods in a store, but they are expensive and will never be exclusive.
You can sew incredibly beautiful covers yourself.
There are a lot of sewing crochets for sewing cases, they can be sewn from felt, hide, fabric, from any materials you choose to suit your imagination.
Let's try to sew a phone case with our own hands.
It’s not difficult at all!
First of all, you need to choose a material from which to make a pencil case for your phone with your own hands, for example, leather, jeans, wood.
You also need to choose the style of the cover: with a tab, with a Velcro fastener, with a glitter.
The main stages of the process of sewing a cover:
1.Cutting
2. Cutting
3. Poshittya
Let's look at the algorithm step by step in the report.
Form
The first stage is the preparation of a molded case for the phone.
The process is extraordinary.
- Place the mobile device on a piece of cardboard and surround it with olive.
- When leaving work on the phone, remove seam allowances.
- decorative stitch;
- sewing machine;
- knives;
- line
We cut two parts, one long and one short. 
The long detail on one edge is responsible for the sound - there will be the smell of the cover that covers the cut.
You can see your mobile device and adjust the seam allowance to a tight fit. 
We sew the top of the short part with an overlock stitch. 
Let's add a decorative stitch.
We fold two parts at once and sew them together.
Phone stand
The process is extraordinary.
- With your own hands, you can make simple stands for your phone from available materials, for example, paper, cardboard, plastic cards, parts from construction sets, and stationery paper.
We are looking for a cardboard stand option. 
sheet of cardboard.
It is cut out of a cardboard sheet measuring 10 x 20 cm. It can be folded to make short cuts.
 Painting the figure. The line will be lost in its entirety. The pouch is a hand-held pouch and stand for the phone.
The process is extraordinary.
- Case for charging your phone
- In order to
- charger
- for your mobile phone did not get lost, did not get damaged, you can sew a case for it with your own hands.
- Main fabric (two parts 27x15 cm)
- Fabric for sauerkraut (two parts in the shape of a trapezoid, 18 cm and 15 cm at the base, 13 cm height)
Non-woven fabric (two parts, 27 x 15 cm and 18 x 13 cm) 
Stitch 25 cm

Fringe with pompoms 76 cm  Plastic eyelet for curtains
  We glue the parts with non-woven material: the main part of the casserole.
  We sew the parts.
  Fold it in the middle and pass it through.
We sew on a stitch and a bow.
 Place the jelly on top of the main part, glued with non-woven material.
The process is extraordinary.

Sew along the edges.
The pomponies are straight to the center, the ends of the fringe lie overlapping. 
Sew around the perimeter.  Warped, expired parts, leaving no opening for screwing.
Turn it in, press it through, and then manually sew up the opening. 
Install the grommet.
Skinny cover
The leather cover is practical, durable and does not rub.
 Skin is expensive, so you can buy old skins, for example, a bag, which will definitely replace the cost.
The process is extraordinary.
- Depending on the size of the phone, there are 4 patterns based on the skin of a rectangular shape.
- and one dark woman.
- The Velcro is cut into a square or rectangular shape.
- satin stitch;
- knives;
- glue "Moment";
- sewing head
 To prepare the pattern, transfer the outline from the phone to a paper.
  Add seam allowances.
  When the pattern is ready, place it on felt.
  Two details can be seen along the contour.

Robimo brighten up. 
 The finished application is glued to one of the parts of the pencil case.
After this, the offending parts are folded and sewn.
The master class presentations are more popular and simple, you will be pleased with the work and the finished product.

Video of sewing with felt
The process is extraordinary.
- The simplest phone case
- The easiest way to make a phone case is to make one from a crib.
- crib;
- hairpins;
- threads;
- head;
Velcro;  sewing machine.
  We cut a wide strip from the crib.
We are celebrating the birthday of the phone bag. 


The crib is steamed, then we sew it up so that it is the same size throughout the day.
The edges of the crib are folded and sewn.
I won't leave a piece of the crib. 
We lift the left edge of the crib up, sew along the edges, not forgetting to sew in the handle.
 The process is extraordinary.
- We sew the case.
- Phone case with felt shape
- crib;
- Felt is a brown material for creativity.
- It is thick, it does not sag during the work process, it is used to sew and glue highly resistant particles.
Great palette of colors for the material.  Felt only ever gives in to power.
It is priced for its value, and with the purchase of phone cases, this power is important.
 The process is extraordinary.
- Vikriyka phone case with felt
- Fabric cover
- shkarpetka;
- sewing head;
- completely;
- knives;
- crib;
- knives.
We draw the shape according to the size of the phone. 
We cut the rubber of the scraper and then cut the application. 
Then the sock is cut vertically. 
The two halves are folded there, separated, at the trikutnik. 
Stitch the short sides to the edge, or add additional decorative stitching from the skin side. 
At a distance of 1.5 cm from the edge, make another loop of the same width as the first one. 
The other loop is sewn closer to the front edge of the cover. 
Pin the fabric around the loop with pins.
Sew on a decorative element. 
Fold the piece across, with the right side facing out, and stitch along the sides with a 0.5 cm seam at the edge, starting with a row extending 0.5-0.7 cm from the top edge.
Pull the stitch out from the top loop, insert a loop, fold 1 cm of stitch and pin with a pin.
Sew.


The pencil case is ready.
You can add a magnet to the strap of the phone bag. As a sewing expert, you are a beginner: work, dare, don’t be afraid to create beauty on yourself. Video master class sewing a cover with a foam
Photos of covers for tension
Chantly, today you won’t find a person who doesn’t know your dear mobile phone.
Everyone here is making fun of them: both the older generation and the younger. On the market of mobile accessories you can find a variety of cases for mobile phones. If you sound original and unlike everyone else, then this article suits you.
- Here you can understand,
- How to make a case for your phone with your own hands
- And what does it take for someone to be at your side?
- Original and simple ideas are on your radar today.
- How to create a phone case for a paper?
- We take the phone out of the case in order to make it easier to tan the bundles.
This maneuver should be timid in order to cover the shape we have created. The paper cover is ready before use. On your “creation” you have no more than three khvilins, so this is the way to prepare “protection” for
mobile extension

It's simple and efficient. Now your phone is safe to be stolen from the dirt and board, and with a calm soul you can take it with you wherever you go. If you want, you can paint it or paint it at the end for the screen and speaker so that it doesn’t happen to be missing, but in this case the screen needs to be covered with dry melt.
Now you know
how to make a phone case yourself
From the original arkush paper.
- Please note that you will not need glue or tape. Yak zrobiti z humok phone case? Rainbow gummies have been a hit for more than one season.
- It’s really easy to work with them and create germs.
Today it’s clear how to independently weave a bright summer cover for your mobile device using a variety of different colors.
Why do we need:
- 800 gumok ( color palette choose independently)
- hook and workbench for wickerwork The short list of required tools is not to mention the simplicity of the process, since the preparation of such a casing requires patience, patience and effort. It’s simply impossible to say that it’s simply not possible to make such a cover, because the process is trivial.

- Detailed preparation instructions:
- First of all, it is necessary to consider the number of colors in which your cover will be made (
- best option
- 10 colors).
- We turn the bench over and begin to thread rubber bands diagonally in a similar pattern so that x-like shapes come out.
- One rubber band is pressed on the outermost column of the bench vertically, and from one side or the other.
- Using your fingers, lower the elastic bands to the very bottom so that you can more easily place the rows of rubber bands on your feet.
- If you step on a couple of hummocks (of a different color), you need to throw them from one column to another in the same row, right-handed to the left.
- So continue to chew until the end of the row, vikorist two gummies of skin color.

- Viconati performs the same “maneuver” on the other side of the verstat.
- The row of leather gums must be sealed on both sides with black gums, as in the first row.
- Now we need a hook to start the weaving.
- At all stages it is necessary to remove the two lower gums.
- To go out - we throw on one row, then we drop the two lower gums - this will be our weaving.

- We squash the two lower gums and move them to the center.
So timid with the skin foot on both sides of the bench.
We lower all the elastic bands down to manually throw the weave on the next row of elastic bands.
- In order for the transition of colors to covers to be smooth, it is necessary to throw on the next row of gums, pushing the color onto one side.
- To ensure that the first one is not empty, it is necessary to throw a gum of a different color on it.

- Now we repeat everything, starting from the eleventh point, destroying the skin once in color per step for a smooth transition.
The leather row is secured with black gum.
The process of weaving can take a long time, and it is very difficult to complete the work at a time.
If the lower part of the case is large enough, you need to check how many more rows are needed to make the phone fit into it. how to make a phone case at home, vikoristuyuchi zvichaina bag:
- Let's put on a bag.
- There is no need to inflate large, medium-sized bags - those that are required
- Place it on a flat surface, pressing the inflating area with your fingers so that it does not leak
- Place a mobile phone on top of the bag
- We press him down to the bag, step by step lowering the wind from the bag with the other hand.
Robimo is very careful and completely
- When I lower my bag, I press the phone harder to the surface
If you completely release the bag from yourself, you will carefully “wrap” your phone with its surface, thereby you can protect it from vlogs, saws and blows.
- If the tip of the bag is important to you, just respect it
- This case is a budget option, as follows:
- cheap
- practical

Yogo is easy to earn and you can change the colors of the cover whenever you want Before that
universal option
However, some parts are suitable for most models of current mobile devices and tablets.
- How to make a phone case with glue?
- We all knew that hot glue can be used to glue and glue, and with this help you can create a unique, practical and original case for your phone.
- Size, shape and model of installation do not play any role in this situation.
- So, to make our case perfect, we need:
hot glue gun
- parchment paper
- scotch
- for decoration – colored varnishes
- Everything is so easy and simple, let’s get started:
- Turn on the gun for heating in the new glue.
- While it is heating up, it is necessary to light up our phone near the parchment paper.
- It is necessary to do this in such a way that no folds are left on the paper; the parchment paper must be burned tightly and into one ball (which can be helped by tape).

Lay out a parchment paper on a flat surface and place it on your phone. We use hot glue to paint different prints on the surface of the parchment paper in which to place the mobile (the design and prints are chosen independently, based on the similarity and mastery of the painting)..
Don't forget to leave room for speakers, openings for charging and headphones.
Check until the glue is on the surface, so that you can carefully remove the stuck case from the phone. We decorate it with all kinds of colored varnishes. what about silicone? It turns out that not everything is as smooth as it could have been. Well, obviously,
- How can you buy a case for your phone?
- From silicone.
- We need:
- disposable plate
starch (potato or kukurudzyany)
- silicone
- farbi
- Instructions for making a silicone case:
- We drop some starch onto a plastic plate.
- You can get it at any grocery store or supermarket.
- Pour some silicone onto the starch and carefully combine the two ingredients.
- Add farbi to the prepared “dough” (choose colors to suit your taste) to get the color we need.
- We knead the silicone like plasticine until it becomes soft and elastic, and so that the color becomes even.
- Now you need to start preparing your phone.
- To do this, you need to wrap it over the entire surface with grub spit.
- We sprinkle the table with starch so that the silicone does not stick to the surface, and we begin to rock the silicone “ball” that we have formed.
- We put the phone on the animal and form a case.

We remove all the unevenness and crispy starch with a gancher, but it’s just plain dry.
We cut off all unnecessary excess silicone.
With excess silicone bag you can glue additional forms, toppers, and decor onto the case. We glue them to the casing with silicone. Open for the sensor, microphone and headset. If you like, you can decorate the cover in any color. How can you get a book case for your phone?
Today, book covers have become a popular way to protect phones and tablets.
- Let's be clear
- yak zrobiti phone case made of cardboard and felt
- without
- outside help
- To get a model of a cover - a book, without wasting more than 15 coins.
- Prepare the vidraza:
- cardboard (thick)
- felt - several colors
knives
- gum for whiteness
- rizak
- Behind the baskets there is a self-adhesive decor with a visible rhinestone

- line with olive
- glue gun
- Preparation instructions:
- The remaining piece of cardboard needs to be covered with felt in the same color as was chosen at the previous point.
- Along the edges it is glued onto a new small rubber band, which will trim our mobile phone.
- I’ll make a piece of paper with gum and glue it onto a piece of cardboard, because I’ve lost the first part of our Maybut cover that’s not glued on.
- We glue Velcro to the finished cover to serve as a fastener.
- We decorate the cover-book with rhinestones, stickers or beads.

For bazhannyam, just like that The cover can be made from skin or any other fabric.
If you wanted to “make” a phone case with your own hands, for which you can use various materials such as felt, silicone, fabric, glue, etc.
Here is a smut - your fantasy and figment to create with your own hands, something original and unconventional.
The methods presented here are very simple and do not require special expenses, so choose one of them and go ahead and create your “mysteries.”
Video: How to make a case for your phone? We present, to your respect, a selection of creative ideas with a master class in making phone cases with your own hands.
You will need:
- arkush paper, A4 format, whatever color, PVA glue.
- Meister class
- Place the paper paper horizontally.
- Place the phone on top.
- Ignite the phone until the end of the fire.
- Wrap the bottom part of the paper around the phone several times.
Video: How to make a case for your phone? Bend the knitted fabrics at the lower part of the arch until it burns.
You will need:
- Secure the edges with glue.
- gums of 3 colors for a quantity of 500 pieces, a hammer, a workbench for weaving (there are 2 rows on the new one: the opening in the bottom row should go to the right, and the top one to the left).
- Pull the rubber bands from the top row of another pin, then from this one pull them onto the cross on the third pin of the bottom row.
- Pull the rubber bands crosswise onto the crossbone, from another pin of the bottom row to the third pin of the top row.
- Pull the gums in the same way from the third pin of the top row to the fourth pin of the top row.
- Three Christians are to blame.
- Pass two lines in the center and weave the same way through the cross lines.
- Attach, without intersecting, other gums along the top row - one by one, without missing the two middle lines.
- You can complete the bottom row this way by using a rubber band from the other side.
- Remove two rubber bands at a time from the bottom row of skin stitches.
- If you skip the middle lines, you may end up with two gums left on each line.
- Take gums of a different color and make the next row in the same way as the third.
- Slip off the bottom two loops and tighten the rubber bands of a different color over the stake again, then remove the bottom loops.
- Work two rows in the same way, drawing colors.
- (For one row - tighten the loops once, then remove).
- To open the screen, use this method: turn the wheel vertically, and the left row will look at you.
- From the third stitch of the left row, remove the bottom rubber band and place it on the fourth stitch.
- It is to blame for the remaining loop to be thrown onto the seventh side.
- Remove the loop from the middle heels of the stitches.
- It is culpable to lose three stripes with elastic bands on the sides.
- Knit the front row in this way: start from the third working stitch and weave elastic band by elastic band behind the year arrow.
- Make five stitches on one side.
- Remove the bottom stitches; you may lose two loops on the pins.
- Knit another eleven rows using the same method for black and white colors.
- Knit a row, following the anniversary arrow, filling in all the stitches.
- Remove the bottom rubber strips, and do not remove the stitches that were not touched before.
- Skip two working stitches in a row where there are stitches that are not knitted, remove the bottom loop from the third stitch and pull it onto the next stitch.
- Work like this until the two remaining lines become empty.
- Carry out one row.
- Take the bench vertically, remove the bottom loop from the right row of the other working stitch and pull it onto the next bagnet.
- Remove the bottom loops and remove the gum from which the hangers were broken.
- You may lose three loops on the bottom stitch.
- Place the bottom loop of the skin stitch onto the step pin.
The same way to create an offensive row.
Video: How to make a case for your phone? Rub the bag with additional rubber from the right side, then remove the cover from there.
You will need:
- Knit the jacket and straighten the loops to wash it, and then put the case on your phone. Bumper case for mobile phone with hot glue glue gun, nail polish, tape, parchment paper.
- Take a parchment paper and cover the phone so that
- back panel
- Those barrel panels were without sticks.
- Secure the sticks with tape in the area of the screen.
- Determine the location where the camera, sockets and buttons are located.
- Apply hot glue to the side of the phone, then follow the contour of the designated area.
- Determine the location where the camera, sockets and buttons are located.
- Open the screen on the back panel of the phone in such a way that you are connected to the main part of the phone.
Don't worry about hanging again.
Video: How to make a case for your phone? Apply nail polish in your favorite color, mixed with paint.
You will need:
- Put a cover on your phone.
- Case for mobile phone with a glass case (budget option)
- The bag of the beloved color was restored.
- Take the bag, inflate it and do not tie it.
- Place the phone on the animal's bag with its screen facing up.
Video: How to make a case for your phone? Squeeze the phone next to your hand, step by step, blowing it.
You will need:
- Release the bag when there is little left and continue pressing the phone against the bag.
- Wait until you get your hands on the phone, this is a sign that the cover is ready.
- a notebook with a rubber band the size of your phone, a stationery knife, a ruler, glue, felt, plain olive, cardboard, a rubber band.
- Use a utility knife to trim the leaves and other parts of the notebook.
- Divide one side of the notebook in half, calling it a simple sheep.
- Cut along a line to the outermost fiber of the notepad cover using a utility knife, then place a half-centimeter wide strip in this place for the next cut.
- Glue the inside sides of the cover to the notepad.
- Cover the cover of the notebook with felt and wrap it around it.
- Place the felt on the inside of the notepad cover, then cut the felt from the side fold.
- Glue it to the cover of the notebook made from felt.
- Place the phone on a piece of cardboard, then shape the workpiece.
- Glue the cardboard to the felt and place it behind the required shape, extending a centimeter from the cardboard.
- Open the screen on the back panel of the phone in such a way that you are connected to the main part of the phone.
Video: How to make a case for your phone? a sheet of cardboard in any color, scissors, glue, marker, gum.
You will need:
- Place two telephones on cardboard about a centimeter apart and line them up.
- Work along the lines, at the center of the workpiece, two lines.
- Glue one side of the case to the back cover of the phone.
- Attach a thin piece of gum to the cover so that the cover can close immediately.
Video: How to make a case for your phone? felt in any colors, felt, thread, glue gun, scissors, ruler, simple olive.
You will need:

Mobile phone case made of fabric
Video: How to make a case for your phone? fine fabric, bare thread, acrylic fabric, colored paper, scissors, glue, stencil, ruler.
You will need:
- Measure the dimensions of your phone and use a stencil to draw two new pieces with ragged edges.
- Draw SpongeBob's face on one blank.
- Get some colored paper for the sponge and stick it on it.
- Sew the blanks together on the twisted side.
Case for mobile phone from the skin
Video: How to make a case for your phone? hide in any color, scissors, pins, sewing thread, cardboard template, pliers for installing eyelets, two gypsy heads, for decoration (two eyelets, decorative thread), pen, ruler.
You will need:
- Determine the size of your phone, add a centimeter to the width, and add two centimeters to the width, remember the parameters.
- Test two new skin preparations using the required parameters.
- Round off the pieces.
- Make round openings on a cardboard template with a 5 mm spacer.
- Fold the blanks from the skin with the inner side one to one and apply the template.
- Use tongs to open the bottom and sides.
- Fix the embedding template.
- Pull two heads onto the thread from both sides.
- Sew on the side in this manner: go through the first hole with one needle, straighten the thread, then sew through the two needles, pulling them into one hole, and on the opposite sides.
- Sew the entire cover, then fasten the thread several times.
- Make two open openings about a centimeter apart on the top of the cover.
- Pull the egleta onto the end of the decorative thread.
Video: How to make a case for your phone? Pull a decorative thread through the opening and tie a bow.
You will need:
- yarn, scissors, glue gun, tape, parchment paper, ruler, hot paper.
- Turn the phone over with a parchment paper.
- Secure the corners and sticks with tape to the side of the screen. Build a foundation on posterior covers
- phone, vikorist and glue gun, covering the entire back and side surface with hot glue to the opening of the camera and microphone.
- Wait until you hang up completely and remove the basis from the phone.
- Wind the thread onto the line parallel to the width of the phone.
- Wait until it is completely dry and cut the thread along the running edge of the ruler, then move the thread into a skein.
- Fill the entire cover with yarn fluffs, space 5 mm between rows.
Video: How to make a case for your phone? beads of any color, any size, glue gun, toothpick, cardboard.
You will need:
- Place a few beads on the table.
- Apply a dot of hot glue to the cardboard.
- Place the tip of a toothpick in a dot of hot glue.
- Touch the toothpick to the bead.
- Embed the bead in a drop of hot glue.
- Glue the bead to the phone.
- Glue the beads onto the back and side of the phone in the same way.
Video: How to make a case for your phone? Make sure that the robot picks up and takes at least an hour, but you need to work at a pace so that the hot glue quickly catches.
You will need:
- rivets (to cover the entire phone you will need 80 rivets, often for a small one - 31), glue gun, cardboard, tongs or tweezers.
- Prepare the rivets by letting them burn with hot parts.
- Take the rivet with tweezers.
- Apply a small bead of hot glue to the rivet.
- Glue the rivet to the phone.
Video: How to make a case for your phone? Glue all the rivets in this way.
You will need:
- cosmetic glitter, penzlik, hairspray, clear nail polish.
- Spray hairspray on the back cover of the phone.
- Apply glitter to the tire using a pencil.
- Apply glitter at a slow pace as the polish dries and the glitter may not stick.
- Seal with a good ball of transparent varnish.
Video: How to make a case for your phone? Let it dry.
You will need:
Video: How to make a case for your phone? beads, glue gun, forceps or tweezers.
You will need:
- bavovnyana or wovnyana thread for knitting (white, black color), neck, gachok (clover 1.8 mm), black marker, cotton wool. Select the required number of loops so that they match the width of the phone.(

- Standard size

- - 20 double loops, designated - VP).
- Knit 4 rows, 19 single crochet stitches (designated - RLS), make 20 loops with a rise and make a turn.
The basis of the cover is to blame. Knit the warps according to the RLS stake until the required height of the cover.(Standard size – 10 cm).
To keep your phone from losing its original appearance and to protect it from damage as much as possible, I simply need a case.
You can easily make cases for your mobile phone at home.
Moreover, it is not obligatory for anyone to use expensive materials.
- This cardboard bag is a handbag with only its main functions, and it looks extraordinary and even beautiful.
- What is needed:
- cardboard;
- glue;
- epoxy resin;
- wooden sticks;
- acetone;
cotton sticks;
- elements of decor.
- Robot head:
- First of all, you need to get off the phone.
- Roll the heated workpiece out of the cardboard one-half centimeter more, lower than the device.
- Secure the edge of the cover with a vikorist stick and a wooden stick.
- Glue cardboard to it.
- So just mark the lower part of the workpiece.
Coat all gluing areas with resin.
Glue it to the next cover and decorate it.


For additional use of epoxy resin, also coat the surface.
Caulk for about an hour until the resin dries.
Gallery: DIY phone case (25 photos)

DIY budget phone cases (video)
cotton sticks;
- Self-sealing skinny case for smartphone
- You can sew a classic slipcover yourself, without the hassle of buying it in a store.
- For whom no special skills are required.
- Sew a case for a mobile device that is completely skin-friendly.
- You can sew a classic cover from the skin yourself
- From the main cut of the skin there is an upright cutlet.
- It is necessary to measure the dimensions, bury the smartphone with the waste material, and add excess seam allowances.
- Mark the line of the hem seam at a distance of half a centimeter from the edge.
- Use an awl to open the opening of the cut piece.
- Use a vikorist screwdriver to drill all the necessary openings.
After this, give the skin opening the correct appearance, creating grooves.
After sewing the sides, vikorist for this purpose twisted nylon thread, rubbed with paraffin.
Leave the ends of the threads uncut; after giving the case a shape, the remaining stitch will need to be made. Place the workpiece in water for a couple of years and then place a plywood blank of the same shape in it..

Such a look will lose its vitality until it completely dies.
Head of Vikonanny:
- Circle the cover around the perimeter, add another centimeter and paint an additional line.
- After this, cut out the base of the new cover.
- On the turn of the suede, cross a couple of axial lines, placing exactly a centimeter between them.
- Trace the pattern of the largest part from one side to the other, along the axles.
- Cut the shape by one centimeter and circle the cut piece under the frame.
- Circle the offending sides, the axial side and the inner part.
- Cut the frame that came out, loosen the allowances along the inside edge, turn it to the turning side and sew short edges.
- Place the finished frame on top.
- Sew the inner and outer parts of the fabric together to fit together with the outside.
- Now fold the parts in the middle with the twisted side and sew, joining the central parts.
- Place a relief seam behind the contour of this part, as it is smaller in size.
- Now cut out the jelly and belt, two and a half centimeters wide.
- Sew a strap and attach it to the next button, sew on the front and middle of the cover.
At the inner part of the workpiece, secure the pastry with threads and cut the edge in such a way that it reaches the edge of the inner part.
How to renew an old case: ideas
It’s never too late to replace your original, even if scuffed, old accessory with a new one.
It’s not easy to get distracted by so many speeches. Ale decision when it comes. You can simply repair the old cover, glue in new unnecessary parts and add original decoration.
- There are a lot of ideas for restoring old covers.
- You have your own particular design of the cover.
- Most original and
- simple options
- Please refer to the following materials for help:
- Vasya-stitch.
Phone case made of silicone glue
One of the most creative options for making a cover can rightfully be called the whole thing. The accessory is simply impossible to match with all the purchased options.
Moreover, it is not obligatory for anyone to use expensive materials.
- Vіn looks even unpretentious and presentable.
- hot glue gun;
- silicone glue sticks;
- scotch;
- papir, purposes for vipikany;
- painter's stitch;
- rhinestones;
- nail polish;

Olivets.
Please Korisna
Whatever the insight, a silicone or plastic case for a smartphone can be decorated to suit your taste.
There are a number of ways to earn money.
You can decorate the cover with nail polish, acrylic paints, rhinestones and other small details.
There are a number of options for how you can decorate the case of your smartphone with your own hands:
How to decorate a cover with a washi stitch.

Video: How to make a case for your phone?
Option 1: geometric positions.
With the help of some Japanese colored tape (available at stationery stores), you can decorate almost anything you need.
Prozory cover
Vasya-stitch
Stationery Nizh
A surface for carving (a board or a special slab). 1. Prepare a bunch of types of washi stitches. 2. Start cutting out pieces of colored tape and carefully gluing them until

external parties

cool, varied colors, as you prefer.


3. Carefully cut the camera opening with a utility knife.

Video: How to make a case for your phone?
How to decorate a phone case with a washi stitch.
Option 2 (photo).
How to decorate a cover with your own hands: using acrylic paint
Option 1: geometric positions.
Acrylic farb

Penzlik
Masking tape

Cotton stick (for consumption).

1. Glue a piece of masking tape to the inner side of the transparent cover - then divide the cover into 2 parts.
You can cut out the shape of the cover from a white paper, insert it into the middle of the cover and then prepare it.

You can use a stationery knife to cut the opening for the camera and bed.

2. Using acrylic fabric, paint the top part with one color, and the bottom part with another color - paint only in the middle of the cover, DO NOT call it.

Video: How to make a case for your phone?
Option 1: geometric positions.
3. When the farba is dry, apply another ball. * To make sure everything is neat, turn the edges of the cover over, and if necessary, clean them using a cotton swab. 4. When the other farby ball is dry, remove the masking tape and you’re done!
How to decorate a phone case with your own hands: a paper with arrows
Phone case template (cases for iPhone 5S, iPhone 6 and
Option 2 (photo).
Prozory cover
HTC One

you can know)

Color paper
* You can draw a template for the cover and design it yourself.

3. Open up the little ones and the little ones and glue them to the template.
* You can simply paint little ones like little ones or create little ones on a template, without having to break them up.

4. Insert the small template into the case and pull the case onto the phone.

How can you decorate a cover with nail polish?

Video: How to make a case for your phone?
Option 1: geometric positions.
Nail polish (can be used in several colors).

1. Cover the cover with dots of varnish.


Change the colors as best suits you.
2. Wait until the varnish dries.

Video: How to make a case for your phone?
Option 1: geometric positions.
How to decorate a silicone case with watercolor paints
Watercolor paper
Option 2 (photo).
Watercolor farbies

Waterproof handle (if necessary).
1. For the basket, you can open up the template of the cover on a watercolor paper.

2. Use a waterproof pen to paint the image on the template.
3. Use watercolor pastes to fuse the little ones and let the farbs dry.

4. Create the template and insert it into the clear case.

Video: How to make a case for your phone?
Put the case on your phone.
Option 1: geometric positions.
How to decorate a prosperous cover: confetti

Nail polish (several colors)

Toothpicks.

1. Using toothpicks, apply a sprinkling of nail polish.

Vikoristivte rizni colori varnish.

Video: How to make a case for your phone?
2. Place the transparent case on your phone and you’re done!
* For bags (especially if you have a dark-colored phone), you can insert a white paper under the cover, cut to match the shape of the cover.

How to decorate a case with rhinestones Glue (PVA, humic chi superglue) 1. Add glue drop by drop to the leather rhinestone and carefully, starting at the edge of the case, glue it on.
2. Vickory rhinestones

Video: How to make a case for your phone?
different sizes
.
It’s better to start with great rhinestones, and then fill up the clearings with small ones.
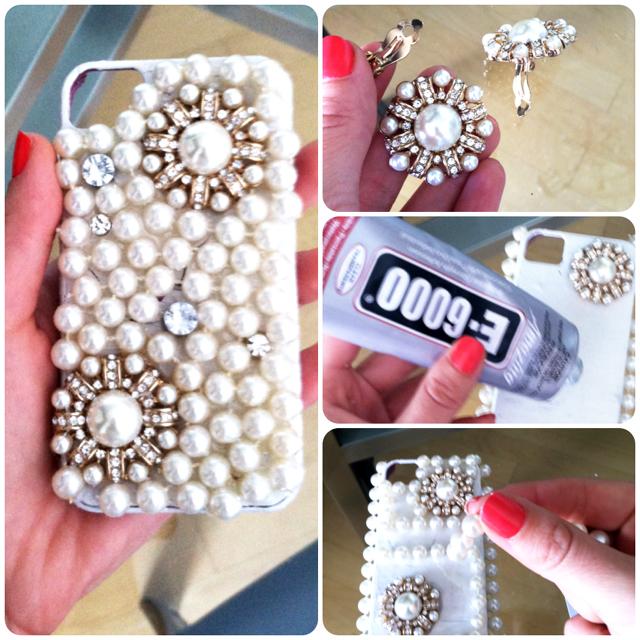
How to make a garniy cover with namistin and perlin

Namistini, pearls and other embellishments

Sorry cover.
1. Think about what kind of beaded baby you want to depict on the covers.

2. Using additional glue, start gluing and decorating it as you planned, so that the whole thing looks neat and neat.


