Like the ability to work with large screens, Windows can be propagated. How to turn the program around in the middle of Windows, so that it starts up on an unknown other screen
What is it like to run the program on an unknown screen? In the meantime, the program displays on the panel of the day, it lights up as active when turning up to new, but it cannot be accessible for viewing on the streaming monitor of the computer. So, if another monitor or TV was connected to the computer, the work with the program, apparently, was carried out on another such monitor or TV.
The other display was turned off by the hardware, but in the Windows system settings, information is saved about the new dossi. Moved to another display, the software will continue to run on the new one.
Here you can work differently.
1. System screen adjustment
In order for the program to move to the main display, in Windows settings it is necessary to see information about the other display. For whom in Windows 7і 8.1 it is necessary on the working table to click the context menu and select .


Give a number on the screen 1 , 2 and given in order, as more monitors were connected. І axis tsyu number should be selected in the options below, in the column. Please enter a value "Imagine a working steel on ..." and then choose 1 or 2 . But another number. Choose and emboss "Zastosuvat".


In the middle of Windows 10, everything works the same way, but in the format UWP-Parameters. On the working table, choose "Screen Options".

Tisnemo.

Select lower “Show me more…” that you specify the number of the streaming monitor.

2. Menu for adjusting screens using the Win + P keys
As on the right, I can cover the situation, which is the same window of the keying panel or the program "Parameters" Win10, everything that is described above is decoded, it appears on an indistinct display, you can go into the offensive method.
Press the Win + P keys to launch a simplified menu for adjusting screens. Here you can immediately turn on another display by turning either "Only a computer screen", or "Only another screen". But for whom it is necessary to know exactly which screen under which number appears in the system. As soon as the main monitor is switched on, if it happens to be launched in safe mode. So scho is more beautiful in the choice menu vibrati "Duplicate", which will dub the image on all connected screens.
Then we can adjust the main monitor as shown in the first paragraph of the article.

The menu behind the keys Win + P works for all current Windows - 7 , 8.1 і 10 .
As soon as the system will be set up for one screen, all programs will move to the new one. І start only on a new one.
If you need to reconnect another display, you will need to turn the setting back. Otherwise another monitor or Windows TV will not work.
3. Moving the window for help with hot keys
A way, in which you can easily rotate more than one required program to the main monitor, while not bothering with the system settings of screens - just moving such a window for the help of hot keys.
Activate the program by clicking on the shortcut on the Windows taskbar. І dalі tisnemo Win + Shift + right/lefthand arrow. You can reap, be it from the arrows. This combination works for all current Windows and serves for quick moving windows between displays.
Windows does not particularly care about the choice of month for the appearance of a new window, leaving it to the court to add to the task of remembering the position of the windows. The problem is that a lot of programs are badly remembered, de stinks were known when closed, and the number of decal screens only worsened the situation.
With new versions of Windows, you can look at a small trick. Repair from the launch of the program and watch for it, it will be seen all the time. Drag the window to another screen, after which, pressing Shift, press the close button. The next time, if you see the program, you will show up on the same screen. Option Shift-H not spratsyuvav? A number of programs use utilities to monitor them in the required area, for example, the Actual Tools Multiple Monitors program, is described in the front section, allowing you to specify, which can be displayed on the active screen, or on the main screen or on the desktop. You can also prescribe specific rules for the skin program.
This problem can be fixed through the video card drivers; go to the website of your video card builder and request a driver update, then try again.
In fact, the retailer of the program itself is guilty of perekonatisya in the fact that the program remembers, on which screen the recovery was launched. How the program behaves for itself for an hour of work with a large number of monitors incorrectly, without being afraid to go to the retailer and inquire about ways to fix malfunctions.
How to fire up one program or a group on a sprig of screens
It is possible that the most common solution for a computer with a large number of monitors is that Windows does not allow opening windows outside the boundaries of one screen. Obviously, it is possible to stretch more and more supplements for the entire workbench manually, but even more so for the worker of the job, even if it can only be done with one click on the button.
The DisplayFusion utility, created earlier, allows you to turn the screen on the entire Working Style, as well as to play hot keys.
Most people blame problems with games and watching videos. Be it a program, like a victorious 3D-video card processor or a video overlay, it can be incorrectly processed when one window is stretched more lower on one screen. In order to test, how well the computer behaves when reloading the video, open the clip for the help of the Windows media program, and then re-tighten it in such a way that one half of it is expanded on one screen, and the other half - on the other. If it does not work, it means that the hardware does not support the hybrid expansion mode. Otherwise, change the driver update for your video card. The driver is a key factor in determining how well your PC works with the function of desktop monitors. If you have two monitors using the same video adapter, or if you have two video cards with the same graphics chip, which can be handled by one driver, then you can get 3D-games on a monitor monitor.
Introduced chimalі zusillya into the ambitious project of intertwining reality and holograms - Microsoft HoloLens eyepieces, a software company navigating the current Windows 10, unfortunately, is less than the basic functionality for revealing the potential of the other, less ambitious, but the real and accessible practical skin horizon "expanding There are robots with a kіlkom connected to the computer with screens. Let another monitor not be used by the skin koristuvach, as it is not a professional in the gallery for the design and graphics, but for the bagatioh in the booth it is a digital TV, which is. Such efficiency and transparency of the hour of displaying media content from a computer to a TV set, like a way of transferring a video player to another screen, does not prevent the current technology of streaming broadcasting of data. Direct connection to a computer (via VGA, DVI, HDMI) to transform any budget low-functional TV to the largest portal of communication. Not a small amount of the TV set, like another computer screen, we will understand. Vіn appear less due to the fate of the situation of two: if one koristuvach marvels at the TV, and the other - vikoristovuvat the main monitor for the needs. And yet, it’s not enough time to get lost, yakby Windows have a little bit of maneuverability in this plan.
How many opportunities among your regular arsenal can you get Windows for work with desktop screens? For whom, the details are discussed below. Let's take a quick look at what Microsoft's operating system can't have on our plan yet.
1. What can not Windows in the minds of robots with k_lkom screens
Implemented in the remaining version of Windows 10, the function of supporting a number of work tables is no more than a lower tool for the psychological organization of virtual space, for example, for work, for igor, for web surfing.
With the help of Windows, it is still impossible to organize a completely autonomous work of two and more screens. Can't move to a different working style on just one screen. It is not possible to close behind the skin one of them, the launch of quiet chi other games and programs. And when you see it, be it with the program, the label is like transferring to the working style of the add-on screen, it’s always on the screen, it won’t be closed. The task of expanding the Windows screen is literally the same as another monitor as a logical continuation of the first.
Extended Screen Mode is only available in Windows environments and is not available in advanced 3D software environments. It’s safe, that in the system it’s possible to link even 3D add-ons, even big windows before the launch, only on the main screen, for gamers, like you can enjoy playing on the big screen of the TV, connected not like the main one, but the second, the second one Ways to expand - either permanently mimic the main monitor in the hardware, or just change the extension mode to the mode of displaying only on the other screen.

Also, Windows has added an additional panel for manual switching between display modes, which activates the hour of pressing the keys for quick access + P.

Possibly, Windows today and offers the very necessary package of possibilities, more than that of a hard worker, that a computer for web surfing with social resources, media education, office work, and not necessary. Ale for the audience of gamers and professionals at the gallery of graphics and the design of the proponated operating system functionality for the flexible settings of many displays.
Well, now about the possibility. What functionality for working with screens is implemented by Windows?
2. Basic screen adjustments
Direct access to the Windows screen parameters is implemented in the context menu on the desktop. Same item "Screen settings" for Windows 10.

І tse item "Screen adjustment" in Windows 7 and 8.1.

With the Windows screen fixed, you can:
- Designate any of the connected monitors and televisions as the main display, and decide as additional ones;

- Set the following screen-to-screen modes as follows: duplication (no cloning), expansion (these are the most logical continuation of the computer space of the first display on another display), display only on one of the screens;
- set the position of the display in the space visible one by one for the convenience of moving the cursor;

- Apply landscape, portrait and inverted orientation for skin screens;
- Install a different permit;
- Set the screen refresh rate.

3. Different scales
Starting with version 8, Windows has learned to tweak for different screens at different scales. In order to adjust the screen size of Windows 8.1, you need to first click on the required display, then select the option to change the layout of the text and other elements.

Then uncheck the box to set a single scale for all displays.

After that, the screen scaling button will appear. Make changes to the next step with the pop-up button at the bottom.

Scaling the skin-enhanced screen in Windows 10 is simpler - both, because the first time the screen is scaled, and then, after making the change, it is not necessary, like in Windows 8.1, to restart the system.

4. Different backgrounds of the working table
Let Windows still not learn how to distinguish a single image for the skin screen like the body of a working table, but, starting with this version of system 8, different pictures on different screens can be displayed with different themes, which can be downloaded on the Microsoft website, please from the beginning of the year I have divided the personalization.

Different pictures on desktops in Windows 8.1 and 10 will also be different when installing a background slideshow from photo collections.

And for two identical monitors, you can choose panoramic trellises from a small selection of themes on the same Microsoft website.

5. Hot keys for moving windows between screens
You can drag windows between screens not only with a mouse, but with hot keys. Keys Windows + Shift + arrow right-handed / left-handed mittevo transfer the window to the next monitor i, even though it is not lit up on the whole screen, place it in the same area, de it was placed on the front monitor.
6. Change the position of the taskbar
Starting, I'm starting again, since version 8, Windows now displays the task bar on all screens. The system does not change the setting of a different position - in the mountains, below, left-handed, right-handed - on different screens, but I don’t know about the appearance of such options in the authorities of the panel. You can manually adjust the position of the panel on different screens manually. Click on the context menu, click on the checkbox next to "Close the task panel", then turn on "Power".

Activate the option to display the task bar on all screens. At the time of consumption, you can set the type of grouping of labels in the selected windows. Tisnemo at the bottom "Zastosuvati".

Then the panel is pressed with the left button of the mouse and pulled in the right place - uphill, to the left or to the right side of the screen. After that, the context menu is clicked again and back, “Close the task panel” is activated.

7. Improved Windows is not enough: what is the robit?
Three farther possibilities of Windows have been added video card drivers, like for different screens to offer more operating systems, finer color adjustments, better power supply with non-standard different buildings, a larger selection of modes in screen interaction and other nuances. But it's not about the skin video card and the її driver. So, for example, inaccessible in custom Windows Span-mode for screens that expand the image on them vertically or horizontally, do not need to be transferred by the video driver settings, the screens of the video card themselves on it may not be opened.
More opportunities and Windows, and video card drivers can only require special programs that provide autonomous adjustment for desktop screens. Crazy, there are only functional, as a rule, paid programs, like, for example, Actual Multiple Monitors or DisplayFusion.

Even a lot of cost-free minimalistic utilities for customizing desktop screens, creating your own time to solve problems in versions of the XP, Vista and 7 systems, in the process of its evolution, Windows made them irrelevant.
Well, let's talk about the cardinal method of "expanding horizons." One garna river is always better for two words so so. Although the display is not yet available, and for igor or professional activity, it is planned to purchase two of the same monitors, it is possible, as an alternative, to look at the addition of one monitor, but also from the great diagonal of the screen. True, if you add an IPS matrix to the large diagonal of the screen and a low indicator of speed, you can finish an expensive project. One, but a large screen is guaranteed to relieve possible problems in the process of adjusting the planned Span-mode for two or more displays, as well as expanding the potential for a rich tasking of the operating system for the screen under the screen in the area. Those who are dissatisfied with the capabilities of the standard Windows Snap function, can always use their own alternative software for executing a task. Plus, these modern monitors are equipped with all-in-one software for implementing the screen sub-screen function, which allows you to split the space into a few areas and win the “picture in picture” mode. Such capabilities can be used for models of monitors LG, Samsung, Dell.
Have a wonderful day!
Under the hour of the creation of Windows 10, the facsimiles of Microsoft Corporation have changed the primary interface of the screen parameters. Vіn becoming more forgive, which allowed the koristuvachs to win the difference on the intuitive level. The selection of the optimal parameters of the screen is determined during the installation of the system in automatic mode. It’s too much to fill up on their sing-song koristuvach, as if it’s necessary. The parameters are set according to the maximum screen capacity of the video adapter. This is the best way to draw graphics and color schemes.
Adjustment of the rozdіlnosti screen
Setting up a screen on a personal computer, tablet or laptop with Windows 10 does not become a great fold for any kind of koristuvach. The interface is simple and intuitively intelligent, which allows you to click the mouse to view the screen on your mind. Schob vikonati nalashtuvannya:
- Click on the "Parameters" icon. At the "Start" menu, click on the "Settings" icon
- Click on the “System” icon at the “Parameters” window.
 At the "Parameters" window, click on the "System" icon
 - Go to the "Screen" tab.
 Take a look at your screen settings
 - Reverse the screen layout. It is up to you to comply with the recommendations of the distribution of buildings for the annex.
- If the distribution of buildings is set correctly, press the button "Power of the graphic adapter".
 Click on the "Graphic Adapter Power" button
 - Check that the adapter type tab is set to your adapter itself.
 Check the correct installation of the video adapter
 - Close "Graphic Adapter Power" by pressing the "OK" button.
- Change the size of the screen.
- Close the system parameters window.
- Screen adjustment is complete.
Other screen parameters can be adjusted as required.
When you install Windows 10, all screen settings will be set automatically. Vignatok є rіdkіsnі аbо outdated types іdеоаdаdаnеrіv, drivers оf аіѕ vіdsutnі in the database оn the servers оf Microsoft corporation. At this time, the driver will be installed from the site of the vibrator or installed from the optical disk, which is connected to the computer or laptop for an hour of sale. On the new one, distribution kits of all drivers for installation of attachments.
Video: How to change the screen size on a computer, monitor or tablet in Windows 10
Improvement or change of brightness and contrast of the screen
Brightness and contrast are one of the main improvements to the screen. Kozhen koristuvach pidlashtovuє їх іх іхіdually pіd svoї voїmogi.
Contrast on laptops and tablets is adjusted automatically. On monitors and displays of personal computers, there is a Menu button, for which you can adjust the contrast for an additional menu.
Use a few options to change the brightness settings of the screen, so you can stop.
Change screen brightness in system settings
There are two ways to query the screen parameters:

Video: How to change the brightness of the screen for additional settings in Windows 10
Changing the brightness of the screen behind the help of the keyboard
Mayzhe on all current types of keyboards you can change the brightness of the screen without going into system options. Previously, only laptops were possible, but at the same time, such a function is attached to many types of keyboards of personal computers. As a rule, you can change the clarity by using two additional keys, on which the icon of the son and the arrow is applied, which means an increase or a change in the clarity. The stench is mostly found in the upper or lower case of the keyboard.
 Use the keys to adjust the brightness of the screen
 In some cases, to change the brightness of the screen, it is necessary to press the Fn key at once with these keys.
If the keys do not allow the commands to change the brightness, then you need to install the keyboard driver from the site of the typing company.
Changing the brightness of the screen through the "Reminder Center"
At the center of the word, you can set the rіven of the brightness of the screen less at the fixed positions. To change the ribcage of brilliance, vikonate like this:

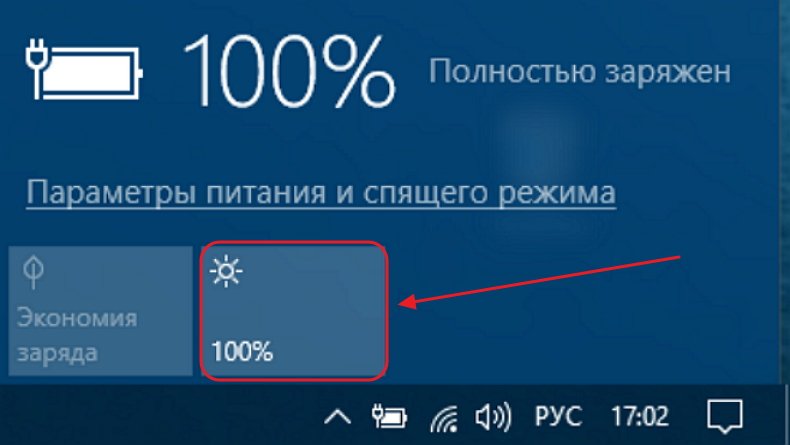
Changing the brightness of the screen behind the additional indicator of battery charge on the panel
Notebooks and tablets have a battery charge indicator on the panel, which can also be changed to change the brightness of the screen:
- Click the left mouse button on the battery charge indicator.
 Click on the battery charge indicator
 - Click on the tiles to change the brightness of the screen.
 Adjust the brightness of the screen
 - You can change the brightness level for fixed values from 0 to 100% with a margin of 25%.
- Click on the "Life and Sleep Settings" tab.
 Click on the "Life parameters and sleep mode" tab
 - Click on the row "Additional parameters of life" at the right side of the window "Parameters".
 Click on the tab "Additional living parameters"
 - At the “Electric Life” window, install the necessary brightness for the help of the “Screen Brightness” scroller.
 Adjust the riven of the bright screen for the help of the runner
 - Click on the tab "Setting up the scheme of living".
 Click on the tab “Establishment of the electric power scheme”
 - At the panel “Change the parameters of the scheme”, which has opened, for the help of the “Adjust brightness” scroller, reach the optimal level with live wires and battery types.
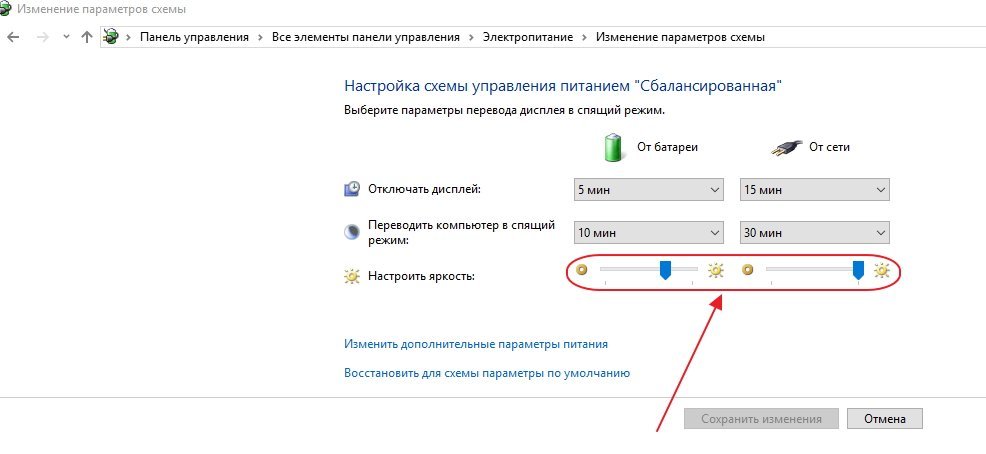 Adjust the brightness for the hour of life in the form of a fence and in the form of a battery
Changing the brightness of the screen through the Start menu
The "Start" key can also be tapped to go to the panel to change the parameters of the brightness of the screen. For whom it is necessary to do the following:

What is robiti, how is the screen blinking
Frequent screen blinking in Windows 10 can have two problems:
- replacement of outdated video adapter drivers;
- the inconsistency of the software installed on the computer and the system vimog.
The problem does not appear as often as in the period when Windows 10 only began to expand.
It is due to the fact that the main companies that produce components for computers have brought their software add-ons to the required parameters. On quiet computers, where video adapters were installed, they were prepared 6-7 years ago, having shown some inconsistency, the fragments of their drivers were rozroblyalis without fixing the current vimog.
To use a pardon, it is necessary to tell, the driver, or the software is secure with this dzherel, as if creating a blinking screen. To solve the problem and restore the normal robotic screen and video adapter, it is necessary to use the following method:
- Right-click the mouse on the task bar.
- Click on the row "Dispatcher".
 At the menu, click in the order "Dispatcher"
 - Change the presence of the blink in the Task Manager panel. If the panel blinks at once from the screen, then the reason is with the old video adapter driver. If nothing is seen, then the reason is in one of the installed software programs.
 Change the visibility of the blinker of the "Task Manager" panel
 - Double-click on the "Control Panel" icon on the "Desktop".
 On the "Working table" double-click on the icon "Control Panel"
 - Click on the "Administration" icon at the "All elements of the service panel" window.
 Click on the icon "Administration"
 - Double-click the item "Keruvannya computer" at the window "Administration".
 Double click on the item "Keruvannya computer"
 - Go to the tab "Checking out" at the window "Keruvannya by computer".
 Expand the tab "Review Podіy"
 - Open the "Windows Logs" tab.
 Explore the "Windows Logs" catalog
 - Flip the tabs "Program" and "System" to show pardons.
- As a pardon was shown for the consistency of the software program in the “Program” tab, see. Then download the rest of the edition of the program from the website of the retail company and install it on a hard storage device.
 Click on the “Addendum” tab and reverse the appearance of pardons
 - As a pardon at the “System” tab, it indicates that the driver of the video adapter needs to be updated, so you can change the same operation yourself, as well as for the software program.
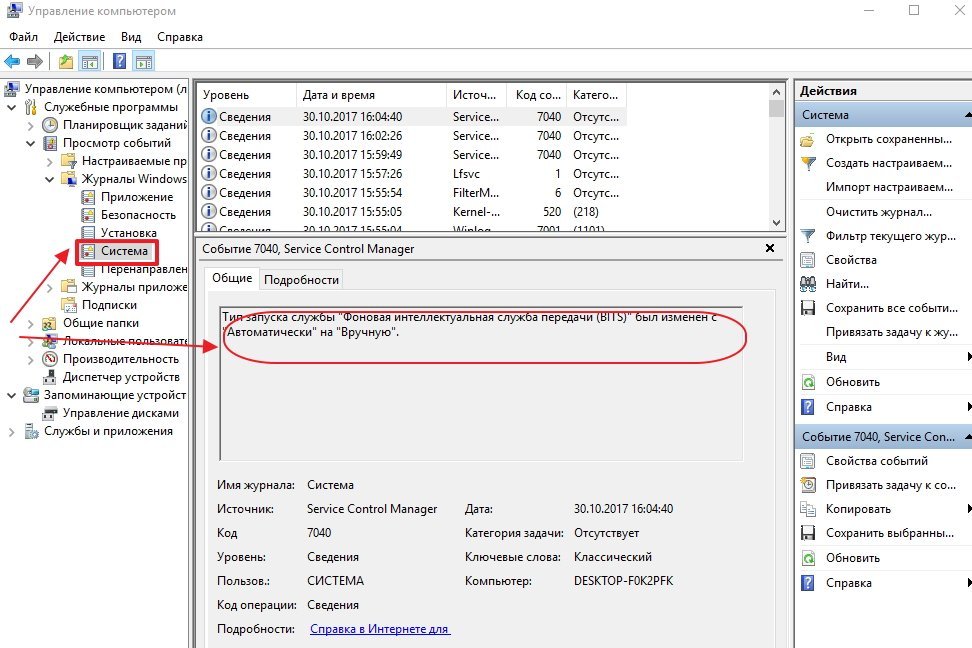 Click on the “System” tab and reverse the pardon
Video: How to update video adapter drivers in Windows 10
What work, like programs or games do not display on the whole screen
All current programs will automatically update when the screen is expanded. If you install the program abo gro, as if it were rozrobleni richly rokіv that under the old editions of Windows, the stench can turn into a changed rozmіrі. At this point, blame it for the need to open it up on the whole screen. Іsnuє kіlka ways to solve this problem:
- Hotkeys stuck:
- one hour press the Alt and Enter keys on the keyboard;
- the program rages on the whole screen;
- with repeated pressure on the keys, the program will turn to the front.
- Change startup parameters:
- with the right mouse button, click on the pictograms of the grid or the programs on the "Working table";
- select “Power” from the pop-up menu;
 At the menu that you see, select the row "Power"
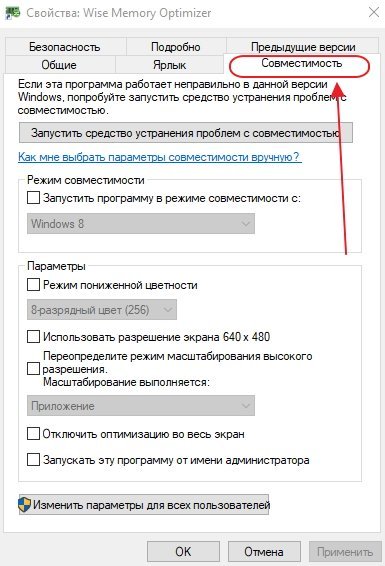
 - at the panel that has opened, click on the tab "Miss";
 Click on the "Miss" tab
 - press the button "Start zasib susunennya problems іz sumіsnistyu";
 Click on the button "Start troubleshooting from the summation"
 - If the program does not open up to the full screen, then check the box "Summary mode" and select from the list, which you will see, the necessary version of Windows. It is necessary for mothers to know that the editors of Windows 10 are on the list every day. The rest of the list will be Windows 8.
 Choose which edition of Windows you want
 - click the OK button.
- Video adapter driver update:
- select the video adapter model in the Attachment Manager;
- go to the website of the company-maker;
- download and install a new driver.
- Change of graphic adjustments:
- start the game;
- to see at the nail;
- find the item to change screen parameters;
- set the repeated screen mode;
- reboot computer.
- Changing the screen size:

If the program needs a 640X480 screen size for the game, then you can install it in the "Parameters" section on the "Mission" tab. Ale tse may yet be even an old gra or a program, as if it were happening for an hour when Windows appeared on the software market.
Video: how to run a program in summation mode in Windows 10
Calibrating the touchscreen on Windows 10 tablets
Calibration of the touch screen is necessary to calibrate for an adequate response of the tablet to finger sticking. If the attachment is not calibrated, then the replacement letters on the screen will appear otherwise, or the image will be rotated one hundred and fifty degrees.
To calibrate the touch screen, you need to calibrate the following:

Switching off switching off or dimming the screen
In case of trivality of idleness, the display screen will go out after a singing period, and even after a sprat of whilin, the computer will switch to sleep mode, again mimicking. In the system settings, you can set the option, if you switch to sleep mode, that screen dimming will be disabled. To turn on the energy-saving mode, it is necessary to carry out a number of operations:
- Click the left mouse button on the "Start" button.
- Open "Parameters".
- Select "System".
- Click on the icon "Life and sleep mode".
- Press the button "Additional parameters of life".
- At the window "Electricity" click on the button "Setting up the scheme of electricity".
 Select "Setting up the power supply scheme"
 - In the “Turn off the display” row, turn on the darkening of the screen for an hour of work or for a battery. For whom, in the lists that you can see, select the “Nikoli” item.
 Select "Nikoli" from the list
 - Similarly, in the fields with the pictograms "Transfer the computer to sleep mode", turn on the transfer of the computer to the wake-up camp.
 In the list, what you see, click on the item "Nikoli"
 - Press "Save change".
Video: non-standard way to turn on dimming the screen
One of the main criteria for a graphic interface is brightness, contrast and color scheme. The more you look at the visualization of graphic objects, the more comfortable you will be the robot for the koristuvach. That’s why it’s not necessary to use a vitratoy dekіlkoh hvilin in order to achieve the maximum effect when graphics and text documents are displayed on the screen. The next thing to remember is that the incorrect setting of the screen parameters also spills over to the star's device and can lead to a step-by-step downgrade of the dawn. For adjusting the screen, and fixing small problems from images, you can speed up by pointing at these statistics using methods. Even if the stench does not lead to a bad result, it will turn to fakhіvtsіv service center.
Related posts:
No related records found.
These instructions show dії, for the help of which you can change another monitor in Windows 10
The operating system behind the lock supports multi-monitor systems with different configurations, and therefore you do not need to install other software for customizing display screens.
The need to select another monitor is necessary in order to expand the working space, which in such situations will allow one hour to complete the task.
It is important to note that some video cards do not support the operation of a large number of monitors, and also those that do not have old displays can be connected automatically.
To connect another monitor, a computer (laptop) is required, or with an additional video signal output to the external display, as well as different sockets, such as HDMI, VGA, DVI port or DisplayPort, as well as an external cable, such a monitor connects with roses 'em (port).
ZMIST:Switching between modes of fermentation
By connecting the monitors to the computer, you can choose a different display mode.
Windows 10 has several display modes.
Computer screen only (PC screen only)
The image will be displayed on the first monitor of the computer or on the head screen of the laptop. Another monitor will not work and nothing will be designed.
Duplicate
The main one is copied to another monitor. This option is optimal for presentations.
Two monitors transform into one great virtual screen. Tse allows you to display one file on two monitors, for example, a large photograph.
Lish another screen (Second screen only)
Vykoristovuetsya less dodatkovy monitor. This mode allows you to change the size of another monitor. Obviously, if you have a laptop, the presentation is being projected on a great monitor, choose this option for optimal results.
Depending on what type of vicarist you have, the selected fermentation mode will be automatically selected.
When another monitor is connected to a laptop, the display mode is restored after locking repeater
When another monitor is connected to the desktop computer, the display style is set behind the lock Expansion
To quickly switch between modes, press the + P keys, select the PROJECTION panel with the choice of options.

You can also choose the display mode for additional screen parameters, for which you should select: Screen parameters

Let's press on the right side of the window on the list that is being opened Dekіlka displays and choose one of the points.

Why save the vibrating parameter.

Adjusting the parameters of the fermentation
Adjusting the displays and turning them on for the help of Windows is even simpler, for which you should sequentially open: Windows Settings ➯ System ➯ Display, or right-click the mouse in the empty area of the desktop and select the item in the context menu Screen parameters

Leather from monitors of performances with a small rectangular miniature.

Drag and drop thumbnails on the screen so that they reshape the configuration of the monitors on your table.


Vickory scaling to enlarge the text and the rest in place. (It is suitable for more high permits, or for people from the vadamis zoru).

You can also change the size of the working table.

Select landscape or portrait orientation to change the selected screen orientation.

The option for the number of displays allows the switching of the display modes (as described in the section above).

With additional display parameters, you can look over the main information about connected displays, as well as the power of the video adapter for the display, by clicking on the power supply.

Fitting of the panel
When another monitor is connected, the panel for locking is displayed on all displays. You can clean up the startup panel from one of the monitors, or remove only the icons of the startups on that monitor from the add-ons on the skin panel.
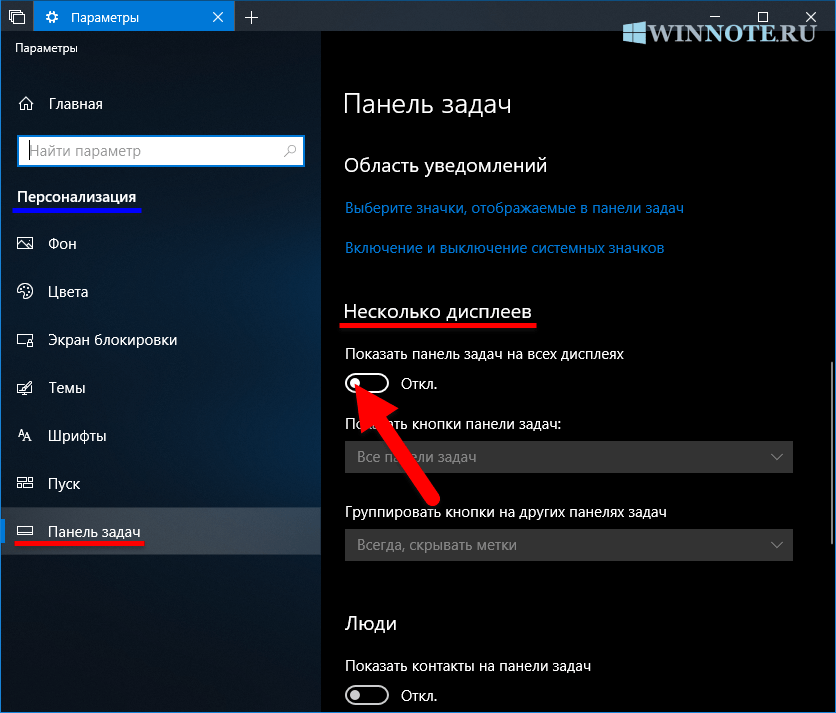
To set up the task panel, in sequence, open: Windows Settings ➯ Personalization ➯ Job Panel, or right-click the mouse in the empty area of the task panel and select the item in the context menu Job panel parameters

So that the control panel was no longer visible on the head monitor, at the distribution Dekіlka displays, install jumper Show task bar on all displays at the position of Vimknuti.
If you see the priority of the tasks behind the locking configuration, if the skin monitor has its own task panel, you can set the behavior of these panels for the additional drop-down list Show task panel buttons:

Usі panels zavdan
Propionation for locking mode, when that very panel is present on both monitors.
The main taskbar is the task bar, in which case
In this case, the start panel on the main monitor will remove the icons of all running programs, in that hour, on the other monitor, only program icons will appear on it, as if they were running on the new one. For example, on the main monitor you run Microsoft Edge and Word, and on the other monitor you run PowerPoint and Excel. The main monitor task bar will replace the Microsoft Edge, Word, PowerPoint and Excel icons. On the other monitor, only PowerPoint and Excel icons appear.
Panel zavdan
In this mode, the launcher panel on the skin monitor is less than the icons of the launches on the program monitor. As a result, as soon as I guess the aims again, on the taskbar of the first monitor, there are no more Microsoft Edge and Word icons, and on the taskbar of another monitor, PowerPoint and Excel.
Adjusting the background on the monitors
With the connection of another monitor, you can personalize the working tables.
To configure the screen design parameters, sequentially open: Windows Settings ➯ Personalization ➯ Background, or right-click on the mouse in the empty area of the desktop and select the Personalization item in the context menu

Let's choose a different background in the right part of the window and click on it with the right mouse button, select one of the menu items in the context menu, for example Set monitor 1

Similarly, choose a background for another monitor.


