Ms 7309 ver 1.3 contact connection. Scheme of connecting the sockets in the front panel of the computer (F_PANEL, F_AUDIO and F_USB). Connecting the front soundbar to the main board
How to connect the motherboard to the front panel, where are all the main buttons and indicators located?
The procedure for attaching the motherboard to the front panel is the same as the standard process for choosing a computer.
Before the beginning of the process of connection, the next step is to detail the appearance of the skin element of the front panel to the computer case and the connection to the motherboard.
Remember! If you connect elements to the main system board in the wrong order, they may not be processed or processed incorrectly.
Vivchiti name all the elements and їhnє roztashuvannya it is easy to finish. All the stench can be singly marked, naming that good looking.
Connecting all buttons and indicators will become
On any case, I will become a robot and a computer, light, buttons, disk drives. Also, there can be other elements.
On the motherboard of the computer, there is an okremy block for connecting diode bulbs (show the status is on) and buttons.
Components to this block are connected for additional four connectors.
Їхній овнішній look of evidence on the little one below. The stench looks the same on all computers, prote phrases, as they are written on them, can be resented (although they mean the same stink).
Z'ednuvachі pokharbovani at raznі kolori.
Zhovtii appointments for the connection of the button on, blue - for the diode I will become the system (shine every hour of the system reconnection).
Switching on the green color switch to the motherboard of the computer, the light indicating the pressing of the life button (after pressing the button, the light turns green).
Chervoniy - cable of the button for raising.
Zhovtim kolor can be pofarbovany z'єdnuvach, which zv'yazuє dynamіє on the hull.
This speaker produces sounds that lull when the computer is turned on, in the process of displaying system pardons, or when connected to a wireless mesh.
All connectors are connected to one single port of the motherboard. As a rule, such a port is right-handed at the bottom on the main board of the system.
Computer parts makers call this port PANEL and its variations (F_PANEL).
Absolutely skin motherboard may have signatures, which indicate those that need to be signed. The little one below shows the required port on the board.
The arrows indicate where it is necessary to connect the leather to the z'ednuvachiv.

On the main board, you can often use a number of roses to connect the speaker, which reacts to pardons in the BIOS and the computer bay.
Roztashuvannya rose'mu is shown on the little one:

When connected to a block with buttons and diodes, you can connect to all front USB inputs, as well as audio outputs.
The process of connecting the front panel to the case of the system unit
The sound of the connectors for USB does not practically sound like those connectors, as they were described above in the article.
However, at the sight of the front wires of the connectors, the stench is at the same time.
Leather connector may be named (depending on USB and HD AUDIO). The eerie look of the darts is shown on the little one below:

The socket for connecting these connectors on the motherboard is located in the lower part and, as a rule, the signatures are named F_USB1 or F_USB2.
There may be more than two sockets for connection (newer versions of motherboards).
It doesn’t matter, where is the connection wire.
All inputs are absolutely identical, the order of their connection does not affect the operation of the components in the front panel of the computer.
It is also impossible to have mercy on the right side of the connector.
The USB socket can be connected on only one side.
Follow the instructions:
- Find out the name of F_USB;
- Find out the details of the difference on the motherboard. Їхнє roztashuvannya indicated for the little one;

- Connect connectors to any kind of roses on the board.
Get respect! If it is indicated on the computer case that the version of USB 3.0 is selected, it is necessary to connect the connector to the main jack. To what you can read yourself in the instructions, how to get to the mother's board.
Connecting the front soundbar to the main board
Now it is necessary to connect the sound device to the motherboard. Everything is practically the same as far as USB plugs are connected.
Konektori tezh z'ednani one with one.
In this way, you can seamlessly connect all components to the computer's motherboard.
On most motherboards, all the sockets for sound are expanded with USB sockets. You can marvel at the little one below:

The most common sound connectors are signed as AC 97.
Connecting the mother's payment - all the same, even individually. Even different models can be mothers of different roses, pink roses and special features. Protefully, you can give a more detailed explanation for the connection of the mother's payment, as I will point out below.
In this article, I will give instructions on how to connect the motherboard to the ASRock P67 Pro3 stock. You can quarrel over some sort of speeches on other boards;
Marvel respectfully and see everything. And if you are not wiishov, then feed, I will help you.
Later, for clarity, I will bring a plan-picture and tell you what to connect to on the motherboard.
In our case, the motherboard is connected to a 24-channel cable, and the processor is connected to an 8-channel cable. Before that, how to connect the motherboard before life, find out which cables and plug them in with the right roses.
Connecting loops to the motherboard
Cables to the motherboard and drives for CDs. Most modern motherboards support two device interfaces - IDE ATA and Sata.
Connecting loops to the motherboard is required for different types of roses: large for ATA, small for Sata. I respect that IDE ATA allows you to connect once two extensions to one port, and Sata allows you to connect only one port to one.
Obviously, if the connection of loops to the mother board is allowed, to їх ліхіні нінців віднаі вінців вінців віднаї - zhorstkі disks or drive CDs with vadpovidnymi іnterfeys ATA or Sata.
How to connect the motherboard to the case
Before that, how to connect the motherboard to the case, let's make it clear that it's possible to get away from the front panel - the start button, restart button, dynamics (likely) and indicator light.
 In the middle of the past, more aspects of this tribnitsa are more complicated, sing-songly, for the rich, and if there is a general instruction about those, how to connect the motherboard to the case, I will not give, because everything is different everywhere.
Before that, how to connect to the motherboard darts from the light-emitting diodes and the panel buttons, to give respect to these roses, there may be marking, as shown in the little picture above. Then you should turn back to the instructions to connect your own payment and connect the cable wires as it is written there. Otherwise, the relevant dates will be indicated on the payment itself.
On whom everything. I will say more, if you have a Floppy drive and a motherboard that supports a third-party connection, then connect it for an additional cable, similar to IDE ATA. However, at the board, as we have sorted out, there is no such rose, and there is no such thing at all current boards.
On this picture, you can see roses of the motherboard for connecting connectors.
Basically (buy vinyatki) under the roses in a different font, the order of connecting the connectors and the polarity is written. My vipad has:
PWR_LED (three sockets) - indication of the switched on computer;
PW- (PWRSW) – PC power on button;
RES+ (RESET) – button to reset the PC;
HD-(IDE_LED, HDD_LED) – LED light for hard drive;
SPEAK- (SPEAKER) - the same signal(s) that the computer looks like when it is turned on, as if a pardon has been detected.
Conectors look like this (div. screenshot)

Two darts go up to the skin connector:
POWER LED (green, white);
H.D.D. LED (yellow, white);
POWER SW (black, white);
RESET SW (orange, white);
SPEAKER (black, red).
In this case, there was a minus "-" or Ground (earth), and colors "+". The connector SPEAKER (black, red) has black "+", and red "-". In order to determine the polarity of the connectors, turn it over to a tilny bik - on the opposite side of one wire a small black trikutnik - tse "+".

Let's move on to the next stage, connecting the front auxiliary USB sockets and the card reader to the F_USB2 and F_USB1 sockets (there is no difference, but rather, start in order). As a connector of "solderings", that is. all postings are selected in one block - the process will be significantly simplified.

Just connect this "great" connector, which is made up of: eight wires, one empty and one soldered rose (ten in total) in such a rank, so that the EMPTY rose will run out of the soldered socket at the connector. (div. screenshot)

And, the axis is like you have a bunch of darts like in the picture - I’ll draw a sketch diagram :)

Here mi bachimo: POWER (Zhivlennya - 2 pcs.), GND (Ground - "earth" 2 pcs.), D3 + (plus), D3- (minus) on one usb port and D2 + (plus), D2- (minus) on other port. Yak Vee already guessed that two POWER connectors are identical and they can be interchanged with each other, like GND. Golovne not confuse POWER and GND.

So now there is no more roses from the F_AUDIO connections for the microphone and headphones.
I know the same, as if you were spared and in the front panel there is a large block with 10 nests, just insert it (you definitely won’t have mercy here). I have a hiccup... :) And, the same connectors: SPK R (right channel output to the front panel), SPK L (left channel output to the front panel), MIC (microphone output to the front panel) and GND.


Having become a happy master of a well-purchased corps, you really want to look closer at the middle. And what kind of cіkavogo can check us. The first thing to rush to is the presence on the walls of the computer case of the fan, as a rule, most of the manufacturers have already adopted the standard for installing an additional fan, which is obvious. Dali mi bachimo kakіs spend, scho go through the front cover of the case.
As you can see in the pictures in the building, there are darts of different colors, yellow red ones, and so on. On the ends of these darts soldered roses or connectors. On the dermal connector, there is a marking in visible short writing. The connectors are attached to the mother's pay at the parent nest. Usі conektori may zahist in the form of an incorrect connection. In order to change the connector, where to come, it is necessary to read the instruction and know the designation (marking) of the nest, then know the marking on the dart and plug it in.
Below I will bring photos with a description of the connectors.
Tsei assignment connector for raising the computer. There is a switch on button on the front side of the case. Vіn not maє markuvannya plus or minus, to that yoga can be connected as always.

Primus computer reset connector

Two small connectors are designated for connecting the computer's light-emitting diode (plus and minus are indicated here, refer to the instructions to the motherboard, so as not to confuse plus and minus)

Light of the work of a hard disk, plus or minus is not indicated here

Audio connection connector. This connector leads to the front panel of the computer, where the contacts for connecting headphones and a microphone are plugged. Connect to the motherboard at the socket where AUDIO is written.
I would like to point out that it is impossible to connect it incorrectly, since the connector has a special key, on the right photo you can see that there is another contact on the left side of the top row, which does not cross over to the milk connection.


Let go the connectors of the external USB sockets on the front side of the computer. As a rule, two or more can be used with a case model with 4 or 6 additional USB. Pіdklyuchayutsya stench to the motherboard there, de write USB.
As you can see on the right picture, here is the key for the wrong connection, here the fault in the bottom row is the best.


The axis of the most important connectors is in the skin case. You can connect additional connectors, say, SPEAKER for them is also on the motherboard socket for connection.
I also want to point out that the sockets for the connection on the mother board are the pins soldered to the mother board.
Good afternoon, dear readers. As you have understood from the title, the mova pide about the connection of the front panel and the sockets of the mat.
For the sake of the article, for small additions to the written material about the folding of the computer, under the same name, I will call "Choose a computer with your own hands" or "What is in the computer, part 2".
To be aware of a small investment, but an important element - the connection of roses (all sorts of buttons, light bulbs) of the front panel.
Let's go.
Connecting the front panel - instructions for connecting
On the front panel of the system unit, sound the buttons for reviving and manually resetting the computer. Їх it is also necessary to connect correctly to . Connecting cables ring at the sight of pins (why do you wonder more).
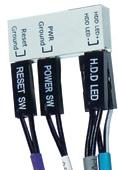
The stinks look something like this (clickable):

Power SW - power button cable; Power LED + - - cables of indicator (light bulbs) of life; HDD LED - charge indicator cable (that bulb itself, as it sounds like it blinks); RESET SW - reset button cable.
The correct connection of the front panel is important, because the computer simply cannot be connected without it.
On the skin of the motherboard, the names of the block of contacts in the Front panel or F-Panel are shortened. Ring the vin to be at the right lower fold, pay, and then the vinyatki will be given. The axis looks like this approximately:

Connecting the front panel and її pins are set manually and for which in supporting documents to the mother's payment of the language and prompts.

Yakshcho documents є, p_klyuchiti p_ni not smoothly. If not, then on the motherboard for some reason or instructed by the F-Panel block, there are hints. As if you were spared bagatorazovo, then in the kit with the motherboard there is such an adapter:
You just build it in, as it is shown more, roses themselves, and then we use the adapter at the motherboard and everything comes out easily and simply. But happiness is not so far for everyone, that th, sing-song, you ate to the one who wants to connect everything for the already large (and not new) mother's pay.
What else varto know
In addition, on the front panel of the system unit, there are USB interfaces (sound a couple of pieces) and ports for connecting headphones/speakers and a microphone. Looks like this:

Cable-pins, for connecting to these external USB-ports, in the middle of the system unit look like this:

The stench is connected to the block pins on the motherboard, which are called F-USB1 and F-USB2, obviously (look at the color and roztashuvannyam may not be so, like on the screenshot below, but behind the shape and number of pins all the same):

Approximately similarly, the ports of the connection of the external sound inputs look, - it depends on the position of the pins, so that the connection of the front panel in this plan is not foldable.
It is easy to connect them (in other pins, stench blocks simply cannot fit). Ale th for them in supporting documents to mat pay tezh є hints:

Vlasne, there is nothing coherent in everything.
Shcho robiti, yakscho did not save the documentation to the mat.
Or take a magnifying glass and respectfully see the fortune-telling of roses for connection to the motherboard of the computer:

Ring out wine at least, but symbolically, signings, just like that, from another or third, you can guess what is up to what and connect everything correctly. They are connected, as a rule, by writing on themselves:

Sometimes another row (distant) marvels at the writings in the next book, but then it’s rare to finish writing. So what else, like I wrote more, not from the first, so from another time - guess :)
Well, if you can’t look at anything (it’s not enough for the weak, or the writing is nasty spelled out), then you open the site of the mat.plati picker and there you look for the distribution of “Pidtrimka” (or something like that), de call you can get the instruction for the mat. .

If you don’t know on the website of the scribe, then on the Internet you can know behind the request “name pay” + the word manual, with a minimum knowledge of the English language for the acquisition of language, you will know, and there you can rightly say, look at that switch.
Pislyamova
Yakscho є yakіs pitanya chi dopovnennya - write in the comments chi for help. Radium help and just listen to you.
PS: The representation on the little ones is shown exclusively for applications and knowledge. Daily advertising.
PS2: The article was written by a human being, as if he were alive in a small town under a friend (a friend and helper of the project). Thank you very much for what.


