Features of vicoristic blocks in AutoCAD. Features of block insertion in AutoCAD Specify the base insertion point
What are blocks in AutoCAD? To inform you about the supply, let’s immediately indicate. A block is a set of elements (sections, polylines, lines, etc.) and other elements that are grouped into a single whole object.
The use of AutoCAD blocks makes it very easy to re-install them both in the middle of one chair and in other projects.
Blocks can be static or dynamic. The dynamism of a block can be affected, for example, by changing its size, shape, scale, etc. Looking ahead, I would like to note that dynamic blocks in AutoCAD allow you to create a wider range of tasks, less static ones. In Fig. 1 views of examples of AutoCAD blocks from the “Cars” collection.
Fig.1. Use of blocks in AutoCAD for cars.
When talking about blocks, You need to clearly understand what is included in the block in AutoCAD, and what is meant.
Assignment to the AutoCAD block.
After you have placed the graphic elements, you need to transfer them to the block. For this purpose, select the “Create block” command, and then specify the name, the base point, and specify the chair elements themselves (report on creating blocks in AutoCAD). Assigned to an AutoCAD block - this is information about the name, the base point and the geometric objects that are included before the block.
Entering the block in AutoCAD.
AutoCAD blocks – the specialness is really important!
It is clear that the special features of AutoCAD blocks are very important. To understand, let's take a look at the butt.
The situation is clear: behind another block they created an element whose appearance on the chair will be repeated many times (for example, a window on the façade of the building). After the completion of the project, at the end of the project manager, vinyl needed to change the external appearance of this element.

Fig.2. Setting up blocks in AutoCAD on the Vikon application.
So, the most important blocks are those that can only edit one block (this is the main description), and the input decision automatically changes. Otherwise, you would have to edit the skin object directly, or make changes for one element, copy it, and paste it again.
Well, it is possible to collectively deal with the authorities of the blocs. It is necessary to understand what blocks for AutoCAD are simply graphically sent to the data area of the file, where the description of the block itself lies. In addition, the use of AutoCAD blocks significantly reduces the size of the file.
Let's bring the pouch. Now you know what blocks you need in AutoCAD. Golovne, so that they understand the importance of their stasis, because To save computer resources, it will make you nervous!
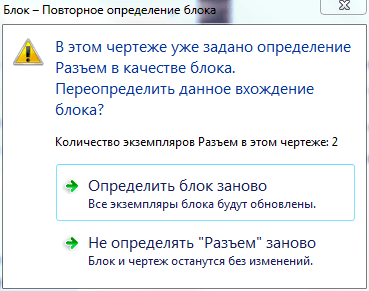
Blocks are a powerful way to automate project work AutoCAD. Often, when selecting blocks, there is a need to re-define the already selected input - change the geometry, attributes, insertion point, etc. Today I will look at possible ways to reassign blocks in AutoCAD chairs.
Dismember and recreate the block
The first, most obvious way is to dissect the original block, correct its geometry and attributes, and then re-create the block with these same names and parameters.
The process is extremely simple:
We insert a block and divide it into the edge of the primitive
We change it according to demand and create the block again. If you try to save a new block under these same names, the system will appear to reassign the main inputs to the block
After a while, we remove the reassigned blocks from each chair

With this method, it is important that the base point of the block and its cob orientation will lose unnecessary weight, otherwise binding the main blocks to “fly” and all the chairs will become unusable.
Insert a new block into the file
Please note that the same blocks are used in different files. It is very easy to reassign blocks in one file by inserting the changed block into another file. In this case, the name and the point of insertion of blocks will inevitably be avoided.
When inserted, the system will ask to update existing inputs to the block.
Block editor
Perhaps the simplest way. To re-assign a block, just open it in the block editor

Change this type until it is deleted and close the editor.

All block entries are updated automatically for each file.

The advantage of this method is that you don’t need to think about insertion points, orientations, and other block parameters that are set by the block editor on a regular basis. But be careful - in the block editor the point with coordinates 0,0 is taken as the insertion point! Do not transfer geometry, otherwise the insertion point will fly off.
Editing by place
Team SILRED (_REFEDIT) Allows you to edit blocks and external messages in place. The advantage of this method is that when you start this method, the edit of the chair, which is not brought up to the block, is darkened and no longer available for bindings. We can edit the block in the context of any geometry.
To edit in place, you can enter the POSTEDIT command and select the block, or select the block and select in the context menu Context cannot be edited for the block

Yak Bachimo, the sharpening of the block has darkened, but is more accessible for binding

After creating the required geometry, you need to press the button save your money on the page
Changing data in block attributes
Editing the assignment of block attributes
Under the block in the warehouse (division)
Editing the value of blocks
Bottom of the page
Procedure
Short story
Change the value of the blocks in the flow of the chair as they are created in the entry of the blocks in the chair, and when they are opened further.
Koristuvach can re-signify the inventory of blocks from the production line. Change the value of blocks in the in-line chair to work with the creation of blocks in the chair, and on the creation of the blocks, and whatever attributes are associated with the blocks.
There are two ways to edit the assignment of a block:
The change is assigned to the block at the in-line chair.
Changing the assignment of the block to the output file and re-inserting it to the exact position.
The choice of method depends on the fact that you need to make changes only to the flow stage, or you also need to change the output file to the block.
Change assigned to the block at the in-line chair
To change the assignment of a block, click on all steps to create a new block, and if you wish to enter a name, be sure to avoid the names of the edited assignment to the block. When reassigned, all obvious inputs to the block in the chair are immediately updated.
To make things easier, you can select the insertion of the block with divisions, and then remove the objects in this way and create a new assignment for the block.
Update the block when changing the output file
Changing the exit armchair to the block does not interfere with the flow of the armchair where the unit is inserted. To update a block in the flow chart inserted from the output file, quickly use the INSERT command.
Updating the unit when changing the component library
When inserting the same name into a block behind the Control Center, the block already present at the seat is not deleted. To update a block from the library, you can use the WBLOCK command, which creates an adjacent file for the block from the component library. Then the INSERT command is used to rewrite the assignment to the block on the chair, de block.
Note When using the command INSERT, descriptions to blocks are discarded. Text descriptions of blocks that are displayed in the “Block assignment” dialog box can be copied between block descriptions via the clipboard.
Editing block descriptions
To change the descriptions of the blocks that are displayed in the Caravan Center, select the BLOCK command. In addition, you can add descriptions to existing blocks in the “Block Assignment” dialog box.
Reassigning block attributes
The association of attributes with a block occurs during its creation or reassignment. Necessary attributes are included before the block when selecting objects for the block. Reassigning attributes in the block description will trigger the next steps in the creation of blocks:
Constant attributes that have fixed values (constants) are lost or replaced by new attributes.
Changed attributes are lost without changes, since there are no attributes in the new block description.
New attributes do not appear in existing blocks.
Div. also
Adding data to blocks (block attributes)
Changing the assignment of dynamic blocks
Procedure
To change the assignment of an explicit block
Vibration editing block.
Right-click on the block and select “Power” from the context menu.
In the "Powerfulness" window, see and change the values Xі Y coordinates of the base point, scale coefficients, rotation point and other parameters
To update the block, change the output file
For editing I will describe the block
Changing data in block attributes
The user can edit the values of the attributes that are attached to the block and inserted at the chair.
There are several ways to edit the values of attributes associated with a block:
Click on the block to open the "Advanced Attribute Editor"
Hold down the Ctrl key and double-click on the block to open the context editor
Open the "Power" panel and select a block.
You can also change the position of attributes in the block using additional handles. In addition, using the additional handles, you can change the width of the text at any time while working with a large number of attributes.
Note When you hold down the CTRL key and click on the attribute that is hyper-powerful, a separate web page will open. To edit an attribute, use one of the safest methods.
Procedure
To edit attributes
Editing the assignment of block attributes
It is possible to edit the value and other powers of the attributes already associated with the blocks inserted at the chair.
Changing the attributes of assigned blocks is done using the Block Attribute Manager. For example, you can edit:
Authorities that indicate the order of assigning values to attributes and indicate the display or suppression of the displayed value in the graphic area
Authorities that follow the displayed text of the attributes on the chair
Powers, what does the ball, color, shape and type of lines mean for displaying attributes
Once completed, the change in attributes is applied to all existing blocks in the flow chair.
Changing the power of attributes of existing input blocks does not affect the values associated with these blocks. For example, if the attribute of a block is named “Value” with the value 19.99, then after changing the attribute name to “Value of one” the value will become unchanged.
Updating attributes with new names may result in unchangeable results. To identify new names and their changes, you can quickly use the Block Attribute Manager.
To update the input blocks of the graphic area after changing their permanent attributes and the attributes of nested blocks, the REGEN command is used.
Changing the order of the entries to the entered attribute value
When the block is assigned, the order in which attributes are selected determines the order in which queries are inherited by their entered value when inserted into the block. You can edit this order using the Block Attribute Manager.
View of block attributes
In a flow-based chair system, you can remove attributes from the value of blocks, as well as all other input blocks. Attributes removed from the input blocks do not know the painting area until the armchair is regenerated using the additional REGEN command.
It is not possible to delete all attributes from a block in this way; I would like to lose one attribute from the block. If you need to delete all attributes, then reassign the block.
Updating block inputs
After making changes to the description of the blocks, the operator can update the input of the blocks at the in-line chair. When you edit attribute authorities in block descriptions using the Block Attribute Manager, automatic updates in the chair will not occur for other block entries. After making changes, the operator can apply the changes to all units of the in-line chair.
You can also use ATRONOVITY to update the attribute powers of input blocks using the assigned blocks method, or to update an instance of a block after reassigning an attribute to a block using the additional commands BLOCK, BLOCK or BLOCKRED.
Updating the attribute powers of the input blocks does not affect the values of these attributes.
Editing attributes at block inputs
You can select an attribute from the input block and use the “Authorities” palette to change their powers, or you can use the Additional Attribute Editor to change all attributes for the selected input block.
Procedure
To edit attributes in block descriptions
To enable and disable the changes to the main input blocks
To lock the changes made to the existing inputs of the blocks, set the command “Stop to the existing inputs”.
To save the changes made until new input blocks, remove the sign “Stop until new input”.
Click "OK".
To find new attribute names in a block
To change the order of the entries by entering the attribute value
For the selected block, a list of attributes is displayed in the order in which they appear before entering their values.
To change the position of an attribute in the list, see it and press the “Up” button to move up the list or the “Down” button to move down.
Note For constant attributes (mode = C), what do you mean by constants, these buttons are not available.
To delete an attribute assigned to a block and from all input blocks
Attributes deleted from existing block instances are not known to the graphic area until the regeneration of the backrest chair using the REGEN command.
To update changed attributes at the original block inputs
To update attributes of entries associated with the selected block description
Enter I'm Then enter the name of the block, and update the entry of each trace.
Enter ? To open the list of blocks, then enter I'm and I'm in the block.
Press Enter and insert a block in the armchair area behind the additional insertion device.
When you enter the name of an unknown block or when you select a block that does not have attributes, a notification about the cancellation appears.
Another way
Press “Zastosuvat” to save changes. The block attribute editor is disabled.
When you press the "Save" button to exit the Block Attribute Editor, all changes saved to the "Save" button are lost.
Click "OK" to save your changes and exit the Block Attribute Editor.
Click "Select block" to edit the attributes of another block. If you change the flow block without saving, before selecting a new block, you will be asked to save.
Under the block in the warehouse (division)
In order to remove the ability to edit the boundaries of the object included in the block, it is necessary to decompose it into components. After this, you can:
Create a new block design
Revalue the value of an explicit block
When the input to the block is divided, it is divided into the warehouses of its object; however, the assignment to the block is saved for the possibility of inserting it later.
There is the possibility of automatic division of blocks at the place of creation of input blocks by setting the “Dismember” proportion in the “Insert” dialog box.
Procedure
The treatment of the authorities during the dismemberment of the object
Enter dismember
Select objects to be divided.
If more than one item is selected, enter і with the method of treatment by authorities for individual objects or enter G with the method of serving as authorities for all selected objects.
Enter an option for the power you need to change.
The power will stop at the storage facility, and the prompt will be displayed again.
Enter another option or enter R for dismembering selected objects.
Selected objects are dissected, and their power is consolidated into component objects.
Dialog box "Block assignment"
Short story
Serve by creating a block and assigning a name to it.

Methods of access
Button
Stitch: The main tab Block panel Create is not available on the page in the current workspace.
Menu: Painting Block CreationNot available in the in-line working space menu.
Panel: Malyuvannya
Entering the command:block
List of parameters
This is how the block is assigned. They can contain up to 255 characters and consist of letters, numbers, spaces, and any special characters that are not affected by the operating system or any other program.
The value assigned to the block is stored at the flow bench.
Pereglyad
As there is a selection block in the “Im” section, the block is looked at first.
Base point
Set the base insertion point for the block. The value for promotional items is 0,0,0.
Show on screen
The image will be prompted to insert the base point when the dialog box is closed.
Specify base insertion point
Time to close the dialog box to insert the base insertion point on the flow chair.
Axis coordinate values X.
Axis coordinate values Y.
Axis coordinate values Z.
Objects
Specifies the objects to be turned on before the block, as well as the behavior of programs related to them after the block is created.
Show on screen
You will be prompted to add an object when the dialog box is closed.
Vibrate objects
Close the dialog box for a time so that the user can select the required objects for the chair unit. After selecting objects and pressing Enter, the “Block Descriptions” dialog box reappears on the screen.
Swedish choice
Displays the “Swipe Select” dialog box, where you can select objects based on their authorities.
Zalishiti
Object selections are removed from the chair without change.
Change to block
The selected objects are transformed into the input of a carefully constructed block.
vidality
Vibrant objects are visible from the chair.
Selected objects
Displays information about the number of selected objects.
Povedinka
This means the robot block mode.
Annotative
It is indicated that the block is annotative. This power allows you to automate the process of scaling annotations for display or display according to the required paper format.
Orientation of the block along the arch
Allows you to match the orientation of the input block on viewports to the space of the arch with the orientation of the arch. This option is not available due to the "Annotative" option.
Single scale
Indicates that input to a block of different scales is protected.
Allow dismemberment
Indicates how it is possible to dismember the entrance to the block
Setting up
Block parameters.
One block
Specifies the insertion units for blocking.
Description
Indicates a description of the text block.
Open in block editor
Displays the exact assignment of the block in the Block Editor when you press “OK”.
Dialog box "Attribute Assignment"
Short story
Here you set the attribute mode, its name, tooltip and initial value, as well as the insertion point and parameters for the text.

Methods of access
Button
Stitch: The main tab Block panel Attribute data is not available on the page in the current workspace.
Menu: Painting Block Defining attributesNot available in the in-line workspace menu.
Entering the command:atopr
List of parameters
The following parameters are displayed.
Mode
Parameters value of block attributes to be inserted at the chair.
Values for transactions are saved in the system change AFLAGS. Changing the AFLAGS value changes the standard mode for descriptions of new attributes and does not affect the descriptions of existing ones.
Prikhovany
Indicates that the attribute values of the inserted block do not appear on the screen or are displayed on the other side. ATEKR redefines the admission mode.
Postiyny
Indicates fixed attribute values for all inputs to the block.
Controls
Allows you to check the correctness of the attribute during the block insertion process.
Establishments
Gives the attribute a value when inserting a block.
Fixed camp
Fixing the position of the attribute in the middle of the block. When you click to fix an attribute, you can move it around the block using additional edit handles; The size of many order attributes can be changed.
Bagatoriadkovy
If you select this option, the attribute values can span multiple rows of text. In this box you can set the width of the attribute frame.
Note In a dynamic block, the attribute position may be fixed to enable the attribute before the operation is performed.
Attribute
Preservation of tributes to the attribute.
The name of the attribute that can be used for everything from entry to the chair. They can be composed of any symbols, besides gaps. All small letters are automatically converted to large ones.
Hint
A tooltip of the attribute that is displayed on the screen immediately when inserting a block that matches this attribute. If you leave the prompt field empty, AutoCAD will use the attribute name prompt. If the "Mode" group has the "Continuous" parameter selected, the "Hint" field is not available.
For the rest
Significance, what is given to the attribute for washing.
Additional fields
The "Field" dialog box appears. Koristuvach can insert a field for all the meanings of the attribute or for any part.
Large text editor button
If the multi-order text mode is selected, the contextual text editor will open from the text formatting panel and line. Depending on the value of the system ATTIPE change, the "Text Formatting" panel is displayed either completely or briefly.
Reporting information div. in the section Context editor.
Note Some functions in the latest version of the text editor are displayed in gray color and are not available; This is designed to ensure consistency with single-row attributes.
Insertion point
The position of the attribute is set. Here you can enter numerical coordinate values or, by clicking the “Insert on Screen” button, select the insertion point for the attribute of the objects associated with this attribute.
Show on screen
Displays the starting point when the dialog box is closed. Use the custom tool to indicate the position of the attribute of the objects to which you will bind.
Specify the coordinate X for the attribute insertion point.
Specify the coordinate Y for the attribute insertion point.
Specify the coordinate Z for the attribute insertion point.
Text parameters
Here you can set the text style, height and rotation of the attribute text.
Virivnyuvnya
Indicates whether the attribute text is validated. Description of div alignment parameters. in the TEXT section.
Text style
Forward the text style for the attribute text. The text style is displayed, attracting at once. To view additional information about the selection and creation of text styles, div. STYLE.
Annotative
It indicates that the attribute is annotative. Since the block is annotative, the orientation of the attribute follows the orientation of the block. Click the information icon to learn more about annotation objects.
Text height
Height of the attribute text. You can enter the value or indicate it on the screen by pressing the button. The height of the text is the height between the two indicated points. Alternatively, if a style with non-zero height values is selected, or if the “Enter” option is selected, the text height input field is not available.
Turn
Indicates the rotation of the attribute text. You can enter the value or indicate it on the screen by pressing the button. The direction of rotation corresponds to the direction between the horizontal line and the given two points in the cut. If the “Fit in” or “Beyond width” option is selected, the rotation input field is not available.
Frame width
Setting the maximum value for two rows of text in the multi-row attribute, and if it is moved, it is transferred to the next row. If the value is set to 0.000, it is divided into two rows of text per day.
Unavailable parameter for single-row attributes.
Follow the front attribute
Placement of the attribute name directly below the name of the first one. If the desired description for the attribute has not yet been created, the option is not available.
ZAVDANNYA


Home improvement: Place the electric lance from the frozen blocks.


