Get a program to burn the image to a flash drive. Program for creating a powerful flash drive Rufus
Previously, before I recorded windows on a flash drive, I immediately discovered a new program. There are millions of them, and the cost is zero. Right now I was trying to earn something, but every single one of them was incompetent. Some need a lot of training, but others record for a long time. Also, paid programs often skipped, but even though I was paid, I had a bi-disk with the original operating system.
For days I needed to boot up Windows again and suddenly I turned to the Rufus program. Singingly, as you already guessed, Rufus capped me and became my favorite program. So, I myself have discovered a lot of fates. A simpler program, like Rufus, doesn’t matter. It has a minimum of functions, and, to be clear, there is no more than a menu for formatting a flash drive.
Everything you see in the screenshot is that, there’s nothing else there. Before that, it’s completely cost-free, you can rock it and scuff it up without any restrictions.
I also noticed one thing: once I start recording the flash drive from the old OS image, recording the completions is obscene and not very good. Shchopravda, tse buv naishvidshi recordwindows to a flash drive! Earlier, on this flash drive, this image was recorded on the 30-50th century. and why 10 times - Bliskavichno.
What can you doRufus:
Having already said about the fast recording of the system, let’s now marvel at all the capabilities of the programs.
What can you write with the Rufus program:
NT Password Registry Editor
Ubuntu, Ultimate Boot CD
Vantage Rufus
https://yadi.sk/d/DUW30yh93RLmZq - Version 2.18
Get addicted to torrent - Version 2.8
No installation required. Just run the program and vikorize it.
Support for rich language. For the implementation of the Russian program. Articles on whatever version of Windows OS.
The program is completely cost-free. You can also use your name all over the place under GPLv3.
How to write windows to a flash drive
An exciting subtitle that has nothing to tell you through the simplicity of this program. Just insert the USB flash drive, select all the options as appropriate and click on the floppy disk icon to select the image to burn. That's it, only the start was lost.
Since nowadays practically no one uses CDs or DVDs anymore, it is only logical that the Windows image for further installation is best written to a USB drive. This approach is effective, much more convenient, and even the flash drive itself is much smaller and it’s even easier to save it in the casserole. Therefore, we will look at all the best methods for creating a new device for further installation of Windows.
To finalize: the creation of the protective device allows for the operating system image to be written to it. This storage will then be used to install the OS on the computer. Previously, before reinstalling the system, we inserted a disk into the computer and installed it. Now for this you can use the original USB storage device.
To earn this, you can quickly use proprietary Microsoft software, an already installed operating system, or other programs. Whatever the case, the creation process is completely awkward. You can get the cob back from him.
All of the following methods assume that you already have an ISO image of the operating system on your computer, which you will write to a flash drive. Well, if you haven’t bought the OS yet, you should get it. It is also your fault that you have an unusually dark nose. This obligation must be sufficient to ensure that the image of your fascination is placed on the new one. In this case, any files can be saved on storage devices and can be easily deleted. However, during the recording process, all information will be irrevocably erased.
Method 1: Vicorist UltraISO
On our website there is a report on this program, so we cannot describe it as a vikorist. There is also a message there, for which you can attract him. To create a flash drive using ultra ISO, do the following:

As soon as I write down, some problems arise, amends appear for everything, the problem is with a damaged image. If you have acquired the program from the official website, there is no need to avoid any difficulties.
Method 2: Rufus
Another very handy program that allows you to easily create an attractive nose. To speed up the process, follow these steps:

It’s worth mentioning that in Rufus there are other settings and recording parameters, but they can be disabled because they stink. For eggplant, you can put a tick on the item "Check the bad blocks" and indicate the number of passages. Finally, after recording, the installation flash drive will be checked for damaged parts. If such things are detected, the system will automatically correct them.
If you know what MBR and GPT are, you can also indicate this feature of the current image under the entry “Partition scheme and type of system interface”. Ale robiti tse is absolutely unnecessary.
Method 3: Windows USB/DVD Download Tool
After the release of Windows 7, Microsoft vendors wanted to create a special feature that allows you to create a private flash drive using the image of the operating system. This is how the program with the name was created. Over the years, it has become clear that this utility can completely secure recording of other operating systems. Today, this utility allows you to record Windows 7, Vista and XP. For those who want to work with Linux or another system other than Windows, this method is not suitable.
To speed up your journey, follow these steps:

Method 4: Windows Installation Media Creation Tool
Microsoft also created a special feature that allows you to install on your computer or create a flash drive with Windows 7, 8 and 10. The Windows Installation Media Creation Tool is the most convenient for those who want to record an image of one of these systems. To quickly get started with the program, do the following:

The same applies, but for Windows 10 the process looks a little different. Check the box now and I’ll write it down “Create an installation site for another computer”. Press "Dali".
And the axis is all the same as in the Windows Installation Media Creation Tool for version 8.1. As for this version, the process there does not differ from what is shown above for 8.1.
Method 5: UNetbootin
This is useful for those who need to create a special Linux flash drive running Windows. To speed up the process, build an axis:

Method 6: Universal USB Installer
Universal USB Installer allows you to burn images of Windows, Linux and other operating systems onto storage devices. It is best to use this feature for Ubuntu and other similar operating systems. To quickly get started with this program, do the following:

Hello dear readers and guests, who came first, today's news about those how to record the image on a flash drive, and the ISO and IMG formats for help portable programs. To do everything for you, it is necessary to choose an image!
How to easily burn an image to a flash drive
Now let's talk about the popular ISO image, which is currently being abused due to its popularity on the Internet. For whom we want the program:
The program is cost-free and portable, that is. does not require installation, which is much easier. You can tolerate it, as often as it is thick. We launch it and just like this: 
If you want to burn the image to a blank flash drive, then .
Now I’ll explain how to write it down:
1. Select what disk image you want. our flash drive.
2 Choose the image itself.
3. Let us point out that this is not a hard drive, but a flash drive.
4. You may have a flash drive inserted, so that’s up to you.
5. Press OK and after about an hour the recording will be successfully completed.
Tse The best program for recording an image on a flash drive I know.

After completion, re-installation is not obligatory. We are pressing the exit. At the time of recording, the program can register and overwrite the file. We press like this.
How to write an IMG image to a flash drive
We can see a very simple interface:

1. Select an image (It may have Russian symbols, otherwise the program may crash).
2. Select the device (before writing the device where you are going to write the image, you must format it).
3. Press White and the image will be recorded.
Now you can no longer save or earn money from programs writing the image to a flash drive, or sent to my site, and such problems are not your fault.
All the best!
It is often necessary to burn some ISO disk image to a flash drive, for example, with Windows installed, with an emergency flash drive created, for a hard drive, etc.
Tim more, that the same installation of Windows from a CD/DVD disk is better (and it will end up stinking more often than a flash drive). I'm not even talking about those that are far from installing a disk drive on every new PC/laptop. Moreover, a flash drive is simpler (it is more universal - it can be connected to any PC with a USB port).
In this article, I will look at a couple of programs that can easily and quickly burn any disk image in ISO format to a flash drive.
Note: ISO is the most popular disc format. More than half of all images are expanded.
Burning an ISO image to a USB flash drive
Method No. 1 - PowerISO
![]()
PowerISO is a very powerful program for robots with ISO images. Allows them to open, edit, extract files from them, add files to ISO images, compress them, burn them to CD/DVD discs and flash drives, etc. Also with PowerISO you can create an image of any of your disks, test it, remove the check amount (For evaluation - a broken file...).
Zagalom, yak PowerISO write the image to a flash drive.
1) First of all, you create an image. Why press the button? "Vidkriti", or open the file menu, and then indicate the image to the file. You can also quickly press the keys Ctrl+O.

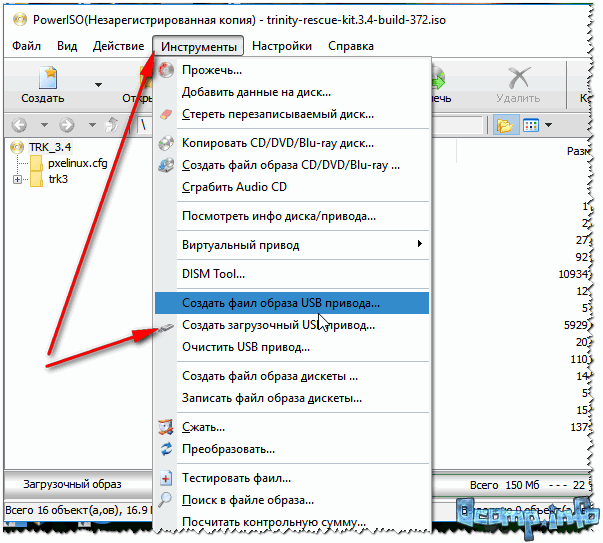
2) If the image has been opened and the program has not been seen before, go to the menu "Instrumenti". Select a function such as "Create an awesome USB drive" (Div. on the arrows in the screenshot below).
3) In some cases, the program will ask you to give it administrator rights. Just wait: the program will be restarted and you will continue the recording process.

4) You need to set up a record in the window:
- in the graph "USB drive" insert your flash drive (Be careful! Do not mix up the letters, because during the recording process, all data on the flash drive will be deleted;
- Burning method: If you are burning a valuable ISO image, select the burning method "USB-HDD"(for example, to record images from Windows);
- a column with a file system can be deleted due to corruption;
- let's press "Start";
- Before speaking, be respectful, at the bottom of the window there is a message on the instructions (the number of messages is due to the image that is being recorded).

Setting up the recording // PowerISO
5) Run the program again so that all data on the selected flash drive will be deleted!

- attracting your PC with third-party applications (I recommend turning on all applications: popular torrents, games, video editors and other programs that greatly influence your PC);
- the size of the image that is being recorded;
- The speed of the USB drive is the same flash drive.
7) If you record what happened well and without pardons: you will receive more information "Writing to USB drive completed successfully" , as in the screenshot below.

Method No. 2 - UltraISO
![]()
UltraISO is the most famous program for working with ISO images. You can work with them practically the same way as in the first place: open, mount, edit and change, burn valuable flash drives, external hard drives, CD/DVD drives, etc.
It’s as easy to get involved with her as with the first one. Offensively, to the point of speech, they encourage the Russian language in full appreciation.
And so, let’s start working in UltraISO
1) To begin with, install and launch the program. There is nothing special to comment on here, except for one thing - run the program as an administrator (otherwise the option to write a USB flash drive may not be available!).
Note! To launch the administrator: just click on the UltraISO program icon - and in the context menu select “Run as administrator”, as shown in the screenshot below.


3) If the image is closed, open the menu (amazing screenshot below).

4) After which it is necessary to set up the recording:
- disk drive: select the letter of your flash drive (the data on it will be deleted, so be careful!)
- recording method: either USB-HDD+ or USB-HDD (this is for recording beautiful noses, which is necessary in most cases) . To say specifically what to choose is important, USB-HDD+ works best - if you don’t change your BIOS version, rewrite the flash drive in USB-HDD mode;
- then press the button "Record" .

Note! In the basic mode, UltraISO automatically formats the device with the FAT32 file system (as previously on the flash drive, NTFS). If NTFS is lost, you need to select ExpressBoot, then click on ExpressWrite. Pouch: when the image is unpacked onto a flash drive, the file system will become unchanged.

6) If everything went well, please write to the program: "Cache synchronization. Writing complete!" . Make sure that there are no errors in the list of programs, otherwise your image will simply show an error when installing Windows (for example).
The example of a successful entry is shown in the screenshot below.

After burning the flash drive, you can proceed before installing Windows.
All the best.
Windows 7 USB/DVD Download Tool is a very simple program for creating a smooth DVD disc or a portable flash drive with the operating system Windows 7, 8 and 10. The program is designed specifically for devices that do not support a DVD drive. You will need a USB drive with 4 GB of free memory or more, and the program will format the USB drive before creating a new flash drive.
SARDU – combines innovative discs into one
SARDU is a simple program that will help you combine all your favorite ISO images into one. Which, in your opinion, can be recorded on any device and become valuable (for the reason that your BIOS supports this capability). Basically, it eliminates the need to carry around a bunch of different expensive discs.
WinToUSB – installing Windows from a USB flash drive
WinToUSB is a simple utility for installing the Windows operating system from a USB-Flash or an external USB drive. To create a private flash drive, the program can be used as a CD/DVD drive or a disk image in ISO format. Plus, the program allows you to transfer your original WinPE disk to a flash drive.
Rufus is a format for creating innovative flash drives.
Rufus is a simple utility that allows you to format flash drives in fat32, ntfs exfat, and also create flash drives for storage. A small program for creating a private flash drive with an operating system (Windows, Linux, etc.) manually, if the system is not installed on the computer.
FlashBoot – create a private flash drive
FlashBoot is a simple software for creating portable USB drives. The program installs selections in the settings of the device that are required for installing the OS. Also, using the additional FlashBoot program, you can copy information about downloaded files from other media, be it a flash drive or a laser disk.
UNetbootin - an innovative flash drive for Linux
UNetbootin allows you to create proprietary USB devices for Ubuntu, Fedora and other Linux distributions. The program is designed to select one of the many distributions that are supported in it, or you can choose your own popular Linux distribution.
WinToFlash - installing Windows from a flash drive
WinToFlash is a program for creating innovative flash drives. It allows you to completely transfer Windows XP, Windows 2003, Windows Vista, Windows 2008, Windows 7, Windows 8 to a flash drive with just a few mouse clicks. After all, you can install Windows from a flash drive, HDD or other storage device onto your computer or netbook.


