Update deleted files on the phone. How to restore deleted files on Android
Sometimes on devices with Android, you will have to carry out the procedure for restoring data from memory. May you need it later total skid settings on the tablet or when buying a new phone. Below is a look at the way that allows you to quickly rotate all the parameters of the files from internal memory on a be-yakoy add-on for Android.
Preparing I will build before booking information
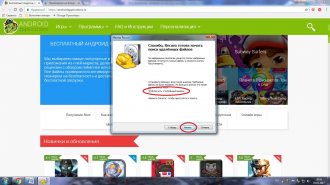
AT Google Play different android programs are available for backup and renewal after the downloading of all the current data without a fault. For whom, recently, it was necessary to take away the rights of a supercorristor or Root before I add it. However, this day is connected with the singing risk and the second guarantee.
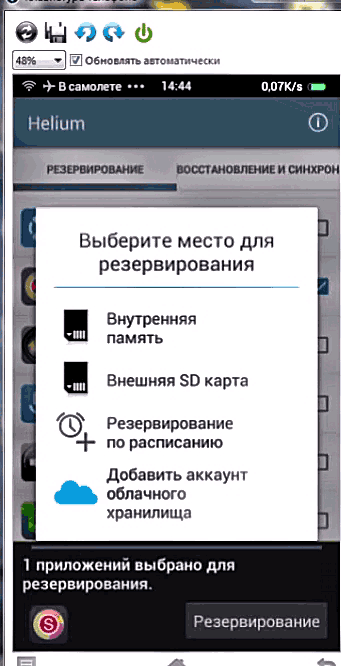
For current versions of Android in the retailer mode, the ability to transfer the program to the computer has been transferred. The authors of the Helium (Carbon) utility have been co-opted. You reserve data by programs without Root, and the saved files are saved from the external, internal memory, or in the "gloom". Installation is carried out in this order:
When you run the program on a Helium device, try to remove the rights of the supercorristuvach. We don’t have any Root keys, the program will switch to the robotic mode without any chimes, about what and tell you about it.
After a few seconds, the computer will display data about the withdrawal of access to the care. Tse means that the program ran. Now you can turn on the android device from the PC and start the backup. If this file is used, the parameters will be to save it from the internal memory, or else to store it - you can safely carry out the procedure of removal and removal, whether it's done.
How to turn off retailer mode
Don't forget that your Android phone settings can still have USB charging enabled. The activation icon is located in the "Retailer Settings" folder.
If you don’t show such a thing, watch it like this:
- at the closings, enter the item “About attachments”, ring out the divisions with the names “Zagalni”, “System” then;
- have a go at this time to hit the rest of the row, to whom the number of the warehouse is indicated;
- if the mode of the retailer is increased, you can see from the other distribution - in double folder to be specified parameters.
You only need to enter a new directory and activate the USB charging capability.
Pratsiyuemo with Helium additive
Backup information in Android for the help of Helium can be done in three ways:
- Files are saved from the dark services Dropbox or Google Drive. Tse allows you to do more than just revise the data, but to synchronize different outbuildings on Android.
- The archives are saved from the device's external memory. The best way.
- The reserved files are transferred to the computer and saved already in memory, which allows you to save a lot of space on the tablet.
The remaining way of revival is good and easy, but it takes a lot of time and takes a lot of memory.
Reservation of hundreds or other programs can take up to 1 hour, with this overworld need for Android, it is not uncommon to cause the program to “fly”.
It is also significant that, as a program (there are still few of them), it can be a mother for such a copy, to inspire Helium for help, without losing the rights of a supercorous person, to reserve it from memory.
Create a backup for help Helium
Wiymіt wired with a USB socket, if you are informed about the success of the connection - the computer is no longer needed. We created a one-time connection in such a rite, as if you would be active until the moment you turn off or restart Android. To update the channel after the drop, it is necessary to re-create the description above.
We create a backup in Android:
At the settings, you can remove or install the ensign next to the point that you want to save in memory only the parameters of the programs without the installation files themselves.
If the function is active, then when the update is carried out, the program will prompt you to go to Google Play to download and install the programs, as if you had already removed it, and even Helium will be able to update it again.
Tse allows you to spare an hour when archiving and significantly change the amount of savings. If you don’t win the opportunity, then save all the data - i installation files, i parameters of the coristuvach. Now navit after seeing a program for Android navit without access to Merezhya can be improved at the same time by usima nalashtuvannya, oblikovy records, progress too.
Extraction of data from the saved archive
Shchob to win backup copy all saved files and data, you also need the Helium program installed on the phone:
- Launch android add-on;
- Choose the name from the archive and in the list, designate the data for confirmation;
- In addition to the backup method, you may need to go to Google Play to download the utility, after which repeat the first two points;
- Press the confirmation button, after one hour the system will notify you about the successful completion of the process.
Those that the program works on devices without Root rights do not mean that it does not work on a rooted smartphone or tablet. Navpaki, in my case, the process of reserving to the computer should take place 3-4 times and swidshe. In addition, for devices with the rights of a super-correct user, a mass of external programs with great functionality is available, which allows you to reanimate whether or not in the distance, including system data.
Hello, shanovni friends and pre-payers of my blog. With this material, I will describe a few methods for restoring the erased information from the annex to the Android operating system. So-so, we will look at you like a reminder deleted files on android.
Programs, about which I'm rozpovіm, razrakhovanі on raznі vipadki, including naivazhchi. Data can be restored after formatting the memory card, clearing the memory of a smartphone or a tablet, and also when resetting to the factory settings (Hard Reset).
A little bit of theory on the back. I'm the first for everything I want to say what given instruction, as you read this year, it is relevant for this river. Tse important, shards android robot h inner treasure Danyh changed a lot. There have been some innovations in the update of the android itself. The way of interfacing with a computer and a portable add-on will also become different, so you can understand and new possibilities for updating information.
Previously, a gadget, connected via USB, was recognized by a computer as a great accumulator. So you could try to redeem the data for additional utilities, deposited on flash-accumulators. At the same time, you can use such programs, so that the files were erased from the memory card, and not from the phone. For example, you can take simple program Recuva, I wrote about yaku in other articles. The axis is one of these articles, for example.
As many of today's attachments are, then more of them are accepted by the Windows operating system and Mac as a media program. I have a preference for the connection to the MTP protocol. We won’t go into details with you, but you can’t change it, as a result, you can’t get into the phone as a USB device. Through tse zasobi updating of information, yak kіlka roki rokіv that, today will be irrelevant. Until then, it’s even more difficult to renew data after a new drop, everything should be left behind, even if the system files were deleted.
In any case, we would like to turn your information back. On this day, I just take a ton of sheets of rich coristuvachs to my mail, just like they ask questions - “How do I restore deleted files on android?”, how to turn all the data from android? What work is it like now to live? Zagalom food chain be of an urgent nature at the hour and therefore it is impossible to deprive yoga posture of respect.
Otzhe, well, the time has come to move on to the practical part of our current article. I have selected a sprat of programs, among them є yak no-cost versions, and paid options. About the way to expand the programs, I will tell you later.
IMPORTANT! There are no guarantees that the file update was successful - it's worth it hard drive on the computer.
As long as your computer does not boot up the phone, in these articles you will find the solution to the problem:
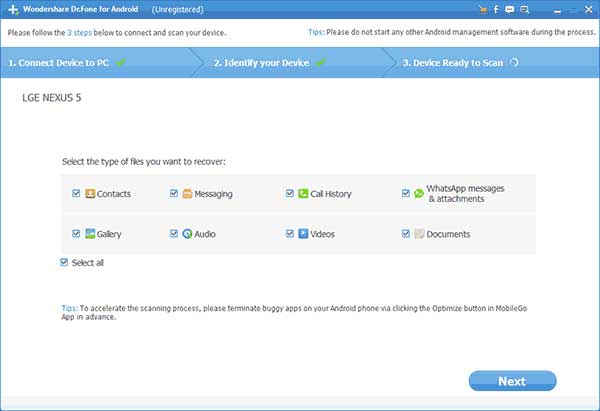
1. We believe the data spent for the assistance of Wondershare Dr.Fone (the program is paid, it is a 30-day trial version)
Although the program is paid, the retailers offer us a free 30-day version, you can download it from this site.
http://www.wondershare.com/data-recovery/android-data-recovery.html
You can find a detailed video of the programs below.
Otzhe, dnovlyuvati danny will be from the new phone, de installed android version 4.4.2. Before that, as a robot with a program, it is necessary to prepare a deed - setup via USB, as a fallow version:
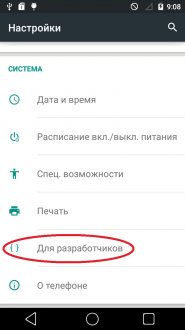
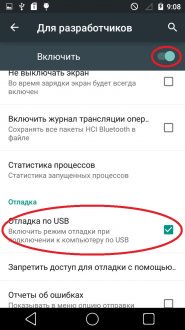
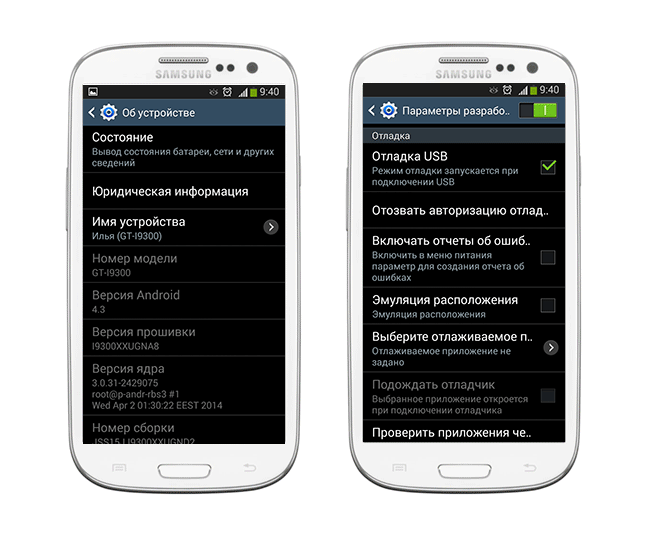
- For Android 4.2-4.4. It is necessary to go to “Parameters” on the phone, then enter “Information about attachments” and press a few times at the warehouse “Folding number” - you need to check the box, the system does not tell you what the retailer is now. Now let's go to the "Retailer Settings", if they have become active, and we will start downloading via USB.
- For Android 3.0-4.1. Go to the “Retailer Settings” and activate the “USB Setup” function.
For older versions. We go to the main “Parameters”, select the “Programs - Rozrobnik” section and turn on the USB setup.
Instructions for updating remote files
USB setup started, now you can go to renewal. Connect the device to the computer for an additional USB cable and run the program.
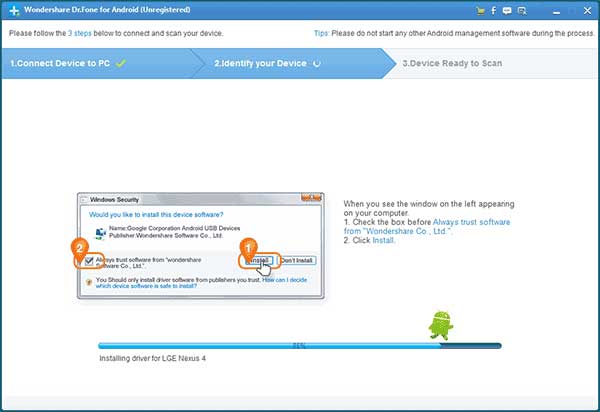
On the cob "Dr.Fone" activate automatic appointment phone or tablet, give the program a power supply, let me ask you to take drivers from the Internet, confirm the report. The coming crock is a confirmation of the salary from the computer.
After the renewal process starts, you need to choose a division, from which important data has been removed.
IMPORTANT!Є ymovіrnist, that the program sees such a pardon:
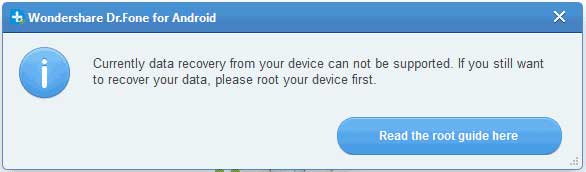
Do not snuggle in such a situation. The program will tell you that it is not possible to download data from this gadget, there are no root rights. In this way, it happens to be quick with another program, because "Dr.Phone" cannot run into such a modern addition. Before the speech, you can look over the video of the remembrance of the distant data.
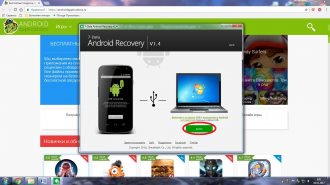
2. Remembrance of data for help programs " Android Recovery» (є free version)
Find a similar setup via USB, as it is described three times more. In case of different types, the program itself allows you to download files on android more easily.
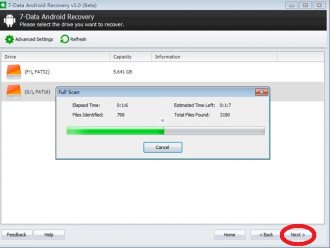
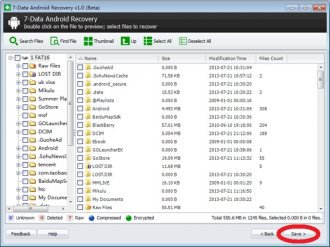
Then, connect your gadget with a USB cable to the computer, and then run "Android Recovery". Press "Dali" and go to the list of accumulatives, yakі є on your extension. Tse mozhe buti less internal memory, or a memory card at once from the internal collection. Choose a site, in which case you need to add data and click on the “Dalі” button.
After that, the scanning of the collection will begin and the information will be revealed in the distance.
Shvidkіst skanuvannya to deposit in the obligatory memory card, the process can take an hour. You have to stock up on patience. Once the scan is complete, please provide a list of used files to see if they have been formatted, removed, or for other reasons.

The found files and folders appeared at the window - you can try to find everything once or twice. Warto say about the function forward revision, as it works with documents, audio and photo files. You can also open folders before the renewal cob.
After selecting data for renewal, it is necessary to press the "Save" button to transfer your personal information to the computer.
3. EASEUS Program Mobisaver (no line).
It is necessary to download the program manually, as it works with paid analogues with a simple interface. It allows you to look ahead, like the files on your Add-on Android available for renewal. Then you can save them for your computer. In order to fully work with the program, you will need Root-rights. For some koristuvachiv, a formal evil will be a minus, but for those who have already taken Root-rights, I recommend victorious, obviously, EASEUS Mobisaver.
Concluding this year’s post “How to restore deleted files on android”, I agree that my instructions in this article turned out to be correct for you and you could easily restore your deleted files on your phone!
If you have come up with a bunch of games on Android and you want to be serious and cuckoo in terms of software, then at the same time put all the changes in the same time, as you can take a look at the streaming reading, get ready and get ready before you will be a cicada. Well, you know that you have deleted the file from the memory card, can you still remember it?
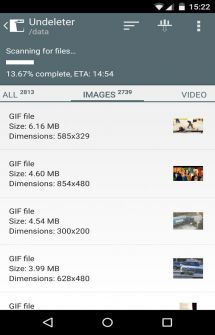
The photo was erased, or the video, the document, the archives, have you now had mercy and now you regret the waste? To tell the truth, even in Android there is no cat, the stars can be used to see the deleted files. Ale, as I wrote earlier, the method of resuscitation is all the same. I help us with an addendum Undeleter.
In fact, having deleted the file from the cat or in Android from the memory card, we did not drive in the remainder, but only marked the sectors, borrowing like wines. Now, during the upcoming recording cycle, they will be recorded as other information. Until then, the file can still be deleted.
As you can see, the name of the program is Undeleter - the program for updating data, for example, Get Data Back, Easy Recovery or Recover4All for PC. Undelete takes care of you by scanning your memory card, find out everything that gives you inspiration and gives you the opportunity. But to allow the file to be nailed is enough so that it is already impossible to get far.
After scanning, you can look through all the results in bulk or by type: photo, video, documents, archives. In addition, it is possible to specify a folder, in the same way, it can be shown earlier, to activate multiple thumbnails, which will significantly simplify the orientation to the found one, and you can also select the repeated operation mode and send the sheet to the retailers.
I don’t know, how often you have misfires, you know that you literally said goodbye to something important and necessary. I’m sure that Undeleter can’t be wounded by anyone, just like that, be a fireman. True, similar software, which does not miraculously affect the presence of root-rights in the system.
features:
- Revision of deleted files from any distribution
- Recognition of documents, photos, videos, music, archives and apk
- Saving updates files directly to Dropbox and Google Drive
Zavantage Undeleter (Change files deleted from SD-cards and internal memory) for Android Android you can ask below.
Retailer: Fahrbot
Platform: Android 2.3 or higher
Get mov interface: Russian (RUS)
Stun: Full ( New version) (isp faces)
Root: Consumed
Today people more and more often use their smartphones as a carrier of information. If you love music, special photos, video recordings, if you like, and create important documents - now save these files on a flash drive, if you can always be handy?
Prote here є th svoї risiki. For example, we updated Android, otherwise the cleaning program erased the information for us, so that we can remember the place in the memory of the annex. Abo themselves vipadkovo saw the required file. In such moods, it’s not easy to fall into a vіdchay and fall into a panic - everything can be corrected and at once mirozpovimo, like a tse robiti.
Important! For more describing methods Root- obov'yazkova umova. How to take the root of the law.
Universal data update on android without using a PC
Cat Dumpster
Tsya program - Tse short version for the most advanced koristuvachiv, yak if you need to save yourself a long way in case of a bad loss important information. The Dumpster cat is an analogue of a cat on a PC, where you can use the deleted files and the stars you can easily rediscover. You can get the program by clicking on .
Instruction:
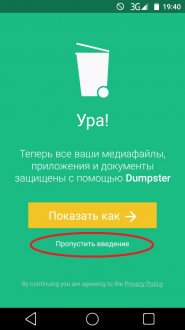
Zavantazhuemo, install it and launch Koshik Dumpster.
How to use the program as it is, embossed "Show me how" or immediately go to the operation by selecting "Skip intro".
As long as the cat is empty, aje mi yogo was set up well. It is necessary to reconsider її efficiency. We go into the memory of the add-on and see whether there is a file. I have, for example, installed apk DiskDigger.
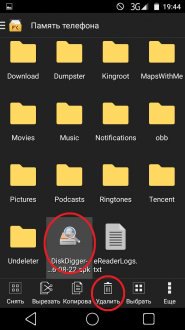
Re-launch the cat and bachimo, in a new file to lie in the file. We see that we are trying to push and press the button at the sight of the arrow - the price and є vіdnovlennya.
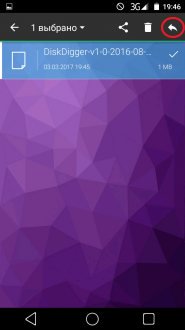
That's all for it - I removed apk from now on in my big place. This method of updating different files is the simplest, most efficient and effective.
In addition, you can secure yourself for the help of the popular program for creating backups - Titanium backup. You can get the program by clicking on . In the same place you will know the instruction from zastosuvannya.
Undeleter - Update Files
A popular program allows you to "reanimate" files remotely. The Undeleter can be purchased by clicking here.
Instruction:
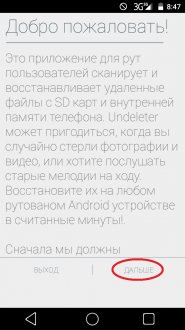
Zavantazhuєmo, install and run the program.
The program to check the smartphone for the presence of root-rights. For which emboss the button "Dalі".
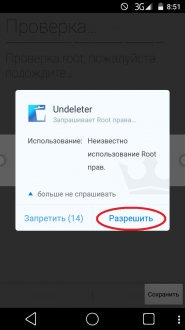
Under the hour of rechecking, it will appear like this in the window. Tisnemo "Permit".
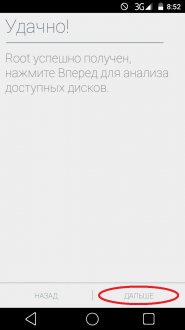
After the process is completed, press the "Next" button again.
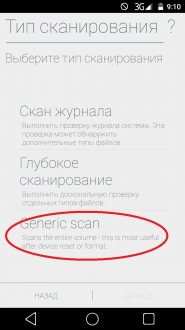
Then Undeleter will tell us to choose the type of renewal. Let's look at the leather type of the report.
"Rotate Files" - the first function of this function is to rotate photos, videos, audio files, and documents. Thumbly on the open button: the program scans all current information and requests to select a place, stars, and to download files. My mind has an Inner memory.
Then you need to choose the type of scan: Journal Scan, Gliboke Scan or Generic Scan. What does it mean skin from them is written under skin types. And why dієviy sposіb- Stop. Tisnemo on new.
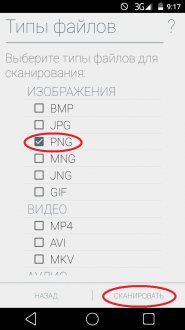
Now you need to choose the file format, so that you can change it. It is not recommended to choose a lot of formats at a time - it will lead to a great system development. Optimal option- One format. For example, select PNG (image) and press the "scan" button.
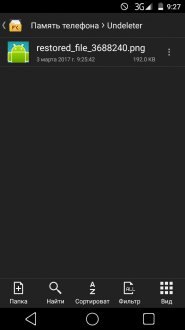
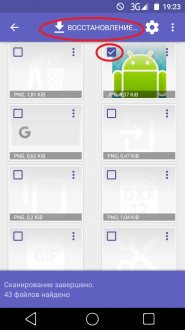
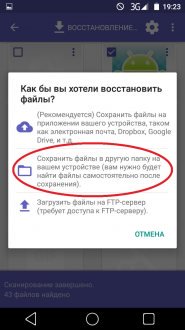
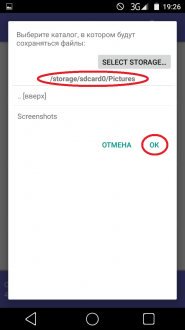
After the process is completed, we will provide a list of files so that you can restore them. We know we will need a picture or a photo and embossed on it. Then we press on the floppy disk icon and choose a place to save the file. We can add yoga directly to the internal memory, or I will add a dark service: Google Drive or Dropbox.
We choose the first point, we introduce a way for saving, or we leave yoga for locks and we press "Recognize".

Now there is a shooing file on the specified path.
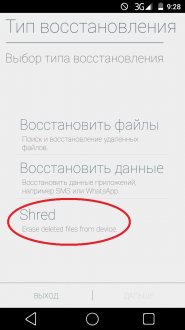
Let's turn back and look at the functions of the programs that are missing.
"Add data" - here we can turn the data of the addendum, for example, deleted SMS. We select a program, for example, SMS and embossed further. The program will scan the memory and add it to know the data you have seen, so it is.
Another function under the name of Shred is not valid for renewal, but for irrevocable removal of data. That is why those who are erased from Shred victories cannot be recognized by anything. Viewing is done in the same way before renewal: the memory is also scanned, having converted the format to the file, and then it is seen that it was already known.
DiskDigger Pro file recovery
Another one popular program, which allows you to take access to remote files for further updates. Zavantazhiti її possible.
Instruction:
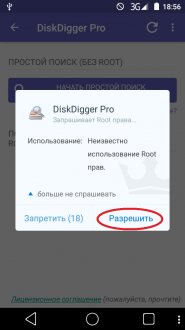
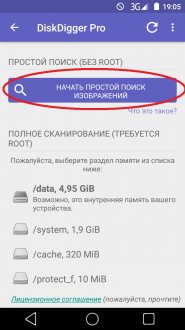
Zavantazhuemo, install it and run DiskDigger Pro file recovery.
I’ll give you my root-rights. Significantly, that the robot is programmable and without rights, but in a limited mode.
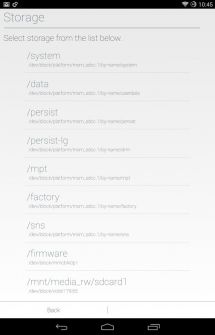
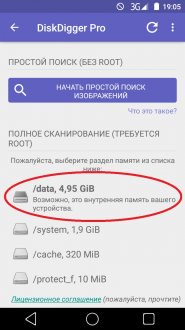
Then we choose to split the memory, the stars were to create the files for us. My mind is /data, so I'll build an internal memory.
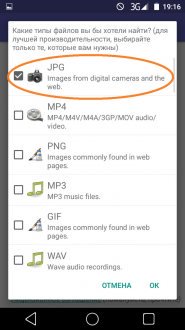
After that, checkmarks indicate the type of files that we have removed. Here you can choose formats for graphics, audio files, text documents and a lot more. I confirm to the onslaught of "ok".
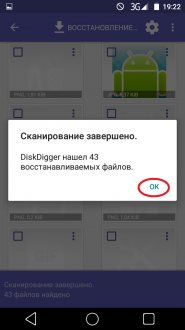
At the end, let us notify that the scanning is completed, so we press "ok".
If so, check the boxes for those files, if we want to rotate them, and press the "Update" button.
Here it is necessary to choose a place where you will save files. Khmarnі services, as well as FTP-servers do not chirp us: we will send a more simple way and we will change the files from the internal memory of our attachment.
The next step is to select a specific folder, for example, Pictures (you can choose for your own reason). Pressing on it and confirming it to the onslaught of "ok".
Mustache. Now let's find out the file we need.

As we have guessed, DiskDigger Pro file recovery can be done without Root rights. In such a mode, wines can only be modified by an image. For rich koristuvachіv tsgogo will be enough. It just hits "Start a simple look at the image" that program knows it. The renewal process is the same as described above.
Universal data renewal on android for an additional PC(works less on older versions of Android OS up to 4.4 inclusive)
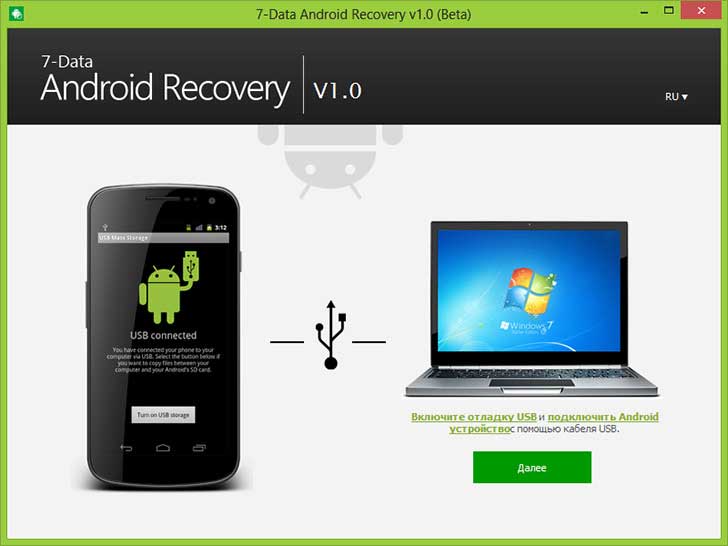
7-Data Android Recovery
You can redeem the data you have spent for an additional PC. For whom, zavantazhuemo qiu program on your computer.
Instruction:
Zavantazhuemo, install and launch 7-Data Android Recovery.
In the case of smartphone upgrades, we go to distribution for retailers.
Turn on the "USB setup" and connect the attachment to a PC, using a USB cord.
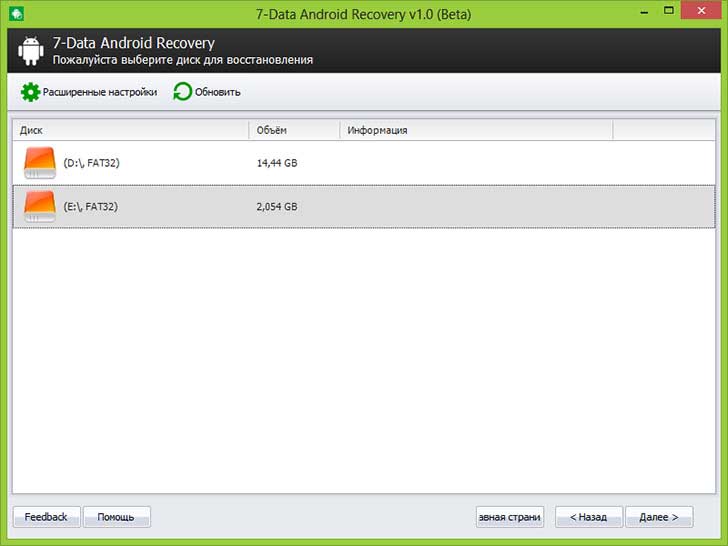
At the vіknі, scho to show up, everything seems to be on the outbuildings of the accumulators. We select the accumulator for which we want to add information, and press the "Next" button.
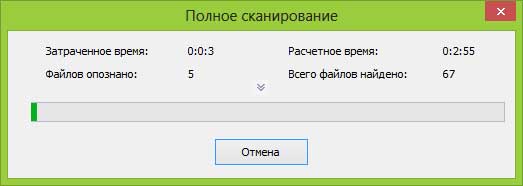
When the scan is completed, it will appear in the window, in which all the found files will be displayed. Checkmarks indicate t, if necessary, and press the Save button. Let's choose a folder on the PC where the files will be saved.
After the completion of the process, we will continue to do so. Now all updated files are saved to your PC on the way, which you have indicated.
![]()
Viewed files can also be used for an additional PC and a program called Recuva, which is recognized for Windows in the first place, but for a smartphone on Android it can also be helped. you can from our website.
Instruction:
Download the program and install it on your computer.
Connect your gadget to the computer, using a USB cord.
We select a specific type of files, if we want to confirm or "All files" and confirm that the "Next" button is pressed.
At the next vіknі we choose "Ні, vіdnoviti directly from the disk" and again press "Dalі".
Then we choose to wear it, for which it is necessary to remember the data spent. Our view is "On the map of memory," tobto on to the big nose. Press "Dali".

At the vіknі we put a tick in the item "Destruction of the analysis", so that the efficiency of the search will increase and it will be pressed "Part".
Upon completion of the scan, we know the file in the list, which we can click on, we see it with a tick and press the button "Apply. Then we need to choose a place where the file will be saved.
Since everything went well, we would like to inform you.
Even more often, data is not seen from the SD card, but internally Android memory. In this situation, the program for updating files on Android does not help. That's why coristuvachi don't only spare valuable data, but also become obscured in the ways of renewal.
What way to remember data from internal memory Android phone I can't call it sorry. Ale vin pratsyuє that I successfully protested. Descriptions of the method of updating by proponing by Wartickler on the forum.xda-developers.com forum and additions to the core article on Habrahabr (more relevant information is brought to the attention. Due to the author for the contribution).
To whom will we corrow the help for the remembrance of the tribute. Scenarios for deleting files on the phone
It appears that it is possible to deeply scan the internal memory of Android. Everything you need to update your data over the phone:
- take advantage cost-free utilities for renewal
- it is important to read the instructions for the data
- repeat the description in nіy diї on Android.
The folding capacity of the phone's internal memory
The internal memory of Android is not connected as a disk, as if you were using an external SD card, you can always connect to the computer. Old memory allows you to create tools for updating data, as if you can scan deleted files and help you rotate them at the manufacturing site.
chime in operating system just see an indicator of the strength in the index, which is to say about those that the file has with such names and wines in its position on the hard drive / in memory. Є effective tools for vidalennya danikh, stink overwrite the file kolka tsikliv, reshuffled by itself in such a rank.
The catch is that the program for updating data needs an actual disk for a deep scan of a photo, a remote one. New models of telephones are often not supported original SD cards, it is even easier to mount disks behind the help of a card reader. All three fold Android updates: internal memory is mounted like MTP/PTP, which is not seen as a disk mount and is not recognized by add-ons for updating data. Prote virishiti tsyu problem give us strength.
Stages of renewal of internal memory
I have a phone samsung galaxy Nexus Toro. I respect that the backup method is suitable for any Android phone with internal memory. We also need Windows 7 or more, sob:
- Vikonati backup copy distributed the internal memory of the phone to the computer as a single massive file RAW format,
- Convert RAW file to virtual hard disk,
- Mount a virtual hard disk like a disk in disk manager,
- Scan virtual mounts hard drive,
- Find outdated files, find out how to update data on an android phone with the Recuva recovery program
Checklist of necessary tools for data renewal
- Android phone with root access
- BusyBox installations (collection of Linux console utilities)
- Installed linux environment for Windows - Cygwin on pv and util-linux from repository. You need to open the Cygwin program, if you want to change it once the /bin folder is created. In addition, I have created a folder in , so that I can place the export file there in the .raw format,
- Netcat Unix utility (zip the ZIP file and extract nc.exe to ),
- (Check out that adb.exe is expensive sharpening Windows),
- USB charging on the add-on may be noted,
- VHD tool is available from Microsoft. Place the file VhdTool.exe in ,
- Piriform Recuva or your favorite tool for updating data
Installable on BusyBox phones and root access is allowed
We need a copy of the distribution of the internal memory of the phone, it is not easy to do so. You will need to type BusyBox unix utilities and root access to perform operations with these programs.
You can get BusyBox and KingoRoot on our website or on w3bsit3-dns.com (registration is required there to download files). We put utilities in the following sequence: KingoRoot, then BusyBox.
The root manager of KingoRoot is easy to install: turn on the Internet on the phone, start the installer. Vіn "rutuє" phone - tobto include povniy access to Android systems. Then we put BusyBox. As a directory for installation, we fill up the paths, placing them behind the locks.
Inspiration from the internal memory of Android. Connect phone from PC in ADB mode
Connect your phone to the computer in ADB mode. The easiest way to do this is to get the adb driver for your phone model and install it on your computer. Bazhano revantaging the computer after that.
On the phone, the charging mode is turned on (Options - Parameters of the retailer - set the ensign " USB setup"). Since there is no such division, we go to the division About attachments, 7 times we press on the row "Inventory number".
Through the usb cable, connect the phone with the computer. Yakshcho on the phone to show up for a salary, pogodzhuёmosya.
Robimo distributed a raw copy on the phone
The method of renewing the internal memory of the telephone of foundations on people's scars, yakі mayut problem and pіd hour kerіvnitstva. I am the rajah to commemorate the new block of memory, the deputy of the distribution of data. My vin is called mmcblk0. Flip it so your disc name doesn't seem to matter. Choose which block you split you want to rotate. I needed to redistribute the data of the koristuvach: /dev/block/mmcblk0p12.
Open the Cygwin console (I'm sure BusyBox is installed at ) if you want . Write in the console the following commands:
adb forward tcp:5555 tcp:5555 adb shell /system/bin/busybox nc -l -p 5555 -e /system/bin/busybox dd if=/dev/block/mmcblk0p12
Open another Cygwin terminal and enter:
adb forward tcp:5555 tcp:5555 cd /nexus nc 127.0.0.1 5555 | pv -i 0.5 > mmcblk0p12.raw
Brew kuhol kawi. Copying 32 GB internal memory takes about three years.
Converting internal memory image to RAW
We need to convert the raw file from the virtual partition of the hard drive. The VhdTool.exe utility simply places the VHD file at the end of the raw file. Open the command line Windows row, go to that click on the command:
VhdTool.exe /convert mmcblk0p12.raw
Mount the image of the internal memory in Windows
It is necessary to mount the VHD image in Windows OS at once. Go to Computer Management (Start - Computer - Management). Go to Keruvannya by discs.
Dia menu - Get a virtual hard drive.
How dzherelo say
With the right mouse button, click on the name of the left hand in the undiscovered space and select Initialize the disk. Select GPT.
Right button on the Unlimited file space - Create a simple volume.
Happen soon after the disk is formatted. DO NOT WELCOME to format the drive at any stage. don't worry it's possible!

Right-click on the mouse in the RAW space and select Format... Specify type file system FAT32. Set a rosemary block for a promotional block. Reconsider that the Shvidke formatting option is set. Aje Vi don't want to rewrite the whole new disc zeros (0) and no data. Shvidke formatting means that Windows needs to delete the index for the disk by creating a new index. Without any option, operating Windows system Wipe the disk with zeros (0), missing your data. Press the OK button.
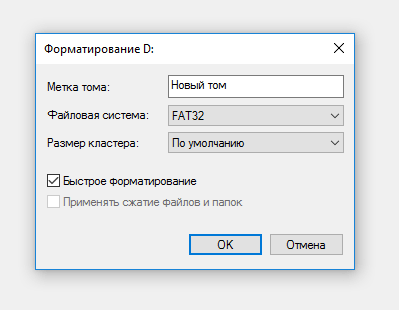
Show up at a window with information about those that, when formatting the distribution, all data will be deleted on the new one. It would have been true if you hadn't really marked the option swedish format bath. Change the keys so that you really set the ensign, and press the OK button.
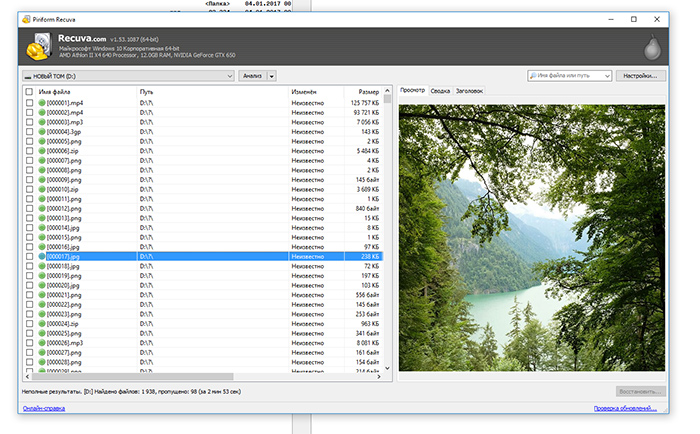
Checking Android internal memory image files for Recuva help
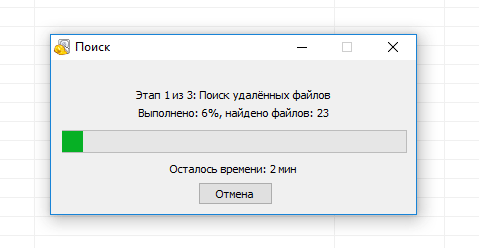
Open Piriform Recuva. At the master's notice, press the "Dal" button. Select "Inshe" and "Dal". Press the button "In the right place" and enter: K: (it is suggested that K is the letter of the mounted disk ...). Press the "Dal" button. Select the Deep Scan option. This is a charіvny parameter, which is to know the files, yakі buli lucheni... but not really seen. Press the "Start" button to scan the disk.
The program can scan deleted files for up to a year in Deep Scan mode. Brew two more kawis!
Since Rekuva sees the results of the scan, you can select files to update for additional ensigns. Press the "Submit..." button and indicate the location where you want to save the files.
Food service
I have a GALAXY 3 NOT phone. Vipadkovo erased voice recordings on Call Recorder. Chuv, what є no-cost program for inspiration. Help, as you know, as you know.
Vidpovid. As audio files are stored on sd-cards, it is practical to be a program for updating files on Android and PC. 3 popular ones - Tenorshare Data Recovery, from universal ones - for the sake of taking advantage of Recuva. If the files were saved from the internal memory of the phone, then do it better. Try an Android app called Undeleter or read the instructions to update your internal memory.
Is it necessary to install the program on the computer or the smartphone itself? I began to install a program on a smartphone, write "insufficient space", wanting enough internal memory. How can Renee Undeleter recover photos from the phone's internal memory? There was no memory card.
Vidpovid. First of all, do not copy the files to Tudi, the stars will be collected and confirmed danich android. Otherwise, the Renee Undeleter program will not undelete files in your situation. Try Recuva or choose a different one depending on the result.
I've moved my important photo to the working folder "Android/data/com.supercell.clashofclans". Potim, if I went to the folder on the phone, the photo appeared. Can I remember my photo from my inner memory phone SAMSUNG GALAXY J2 OC ANDROID 5.1.1?
Vidpovid. So, just follow all the directions, as described in the instructions. Golovne - signify, on which disk were photographs and made a copy of the same distribution. Recuva can restore photographs from internal memory, as the status of renewal of green or greenery.
Can you suggest how to understand how the process of renewal of the bloc is going to be? Everything went fine, but after a set of all commands at the terminal, at the other window, a couple of rows with zeros appeared, but the *.raw file of the nexus folder was created with a size of 0 bytes, and on that everything ended. However, after a certain hour on disk E: (in my case Cygwin is installed) there is a file called vhd with a size of 499 MB (replacing the block with a volume of 12 GB), but find out what was done virtual disk Let's start with the recovery.txt file! What went wrong?
Vidpovid. Everything is correct, the vhd is mounted, and after the swid formatting on the new one, it's not the fault of the files. At once it is necessary to launch Recuva and select a disk to search for files on a new one. As a sign of the internal memory of Android, it was broken up correctly, with a deep scan, the files may appear in the list of knowledge.
If the raw file is not suitable for updating, try another way to create an image of the internal memory - through the creation of an ftp server, if the phone is victorious as a usb modem. The process of descriptions of the fortune-telling articles on Habrahabr (sent to the beast of these articles).
I have samsung tablet GT-P7510. Android 4.0.4 All zrobiv, like your post. I have a Samsung folder. I have a vhdtool file - 184KB and a raw file, but a file of 0KB. I can’t try another method with FTP, because No USB-Modem options.
Vidpovid. Try to get netcat 64-bit version. Under the hour of entering commands at the console, change nc to nc64.
Even if it doesn’t help, then it’s also an instruction from the memory of the internal memory.
Disappear files from a flash drive and internal memory of Android. I won’t tell you, because the daddy doesn’t care about the correctness of the information! Show the reason for that program to restore files from the internal memory of Android! on your website information for the computer!
Vidpovid. There are no other programs for updating from the internal memory of the phone. Otrimati access to the system is not so simple. This article has a working method for updating files from the internal memory of Android
The problem is this: the tablet freezes, the photos were inspired service center, but the houses were re-flashed and the internal memory was re-formatted. I tried it with programs, but the tablet connects like an MTP, and not like a flash drive, and it’s impossible to scan. How is it possible to restore data from the internal memory on Android through copying the image of the memory and її razdіlіv?
Vidpovid. So, the process is described in detail above. Using an ftp server, you can create an exact image of the memory card by looking at the raw file and mount yoga on your computer, then be some kind of program to this particular type– Recuva) photo recovery from the image of the internal memory of the phone.
Updates have arrived xiaomi redmi 3 special. Updating, installing - everything works. A video and photo saved on the internal memory of the phone was found. Naytsіkavіshe, sho show zagalnu phone memory 25 Gb, and may - 32. It is possible, there i lie embedded files. I've covered all the folders, but I don't know anything. How to restore deleted files from the internal memory of the phone, de їх shukati?
Vidpovid. Photos and videos are taken from the father DCIM/Camera. You didn’t win the sd card for saving, which means that the multimedia files were in the internal memory itself, so it’s necessary to search there.
Possibly, the process of updating mobile annex the photo folder has been overwritten. Before speech, part of the phone's memory is occupied by system files, so you can't tell about those files that are needed are stored in the attached view.
Try to search the files with the DiskDigger program for Android, as it will not help to image the internal memory of the phone, then scan the connection disk with the Reucva program on the computer.
Virishiv saw a photo not far away, moreover, vipadkovo saw a part of other necessary photographs. The photographs were in the memory of the phone. Connecting to the computer, the phone does not sound like an okremy disk. Because, as I understand, I can’t retrieve files with a simple program, shards of stench were on the phone, at the internal memory. What program can I renew them with? For me, it’s better to be a simple option, because I don’t know in any way. It is possible, with a description of dіy, krokіv.
Vidpovid. simple methods phone internal memory is not updated. As a rule, recovery programs for Android work only from the outer memory, or use root to access the phone's memory, with which they search far from all areas of the internal memory. Vidpovidno, single possible way- create an image of the phone's memory, at the next stage you can beat the program. It is important that you did not work with the phone until this moment, otherwise the files may be overwritten.
To torment me with food: how can you redeem photos from the memory of the phone, and not from the memory card. I also need photos from the Camera folder. If I myself try to inspire distant photos Through these programs, as you have recommended, such uncommon photographs from telegrams, including avatars, but not photographs from the camera, are recommended. What is it possible to inspire them?
Vidpovid. Indeed, although retailers claim that their programs update files in all areas of memory, the fact is that a large part of the data when scanning is ignored, or there are not enough rights, or the program simply cannot work. If you have enough information, I will build a sign of internal memory after our instructions. The process takes a lot of time, but it’s also easy, so in the middle of the day you will know the photos you need. Until then, absolutely cost-free way innovation, so you can experiment at your free time.
1. Bought new phone (ZTE Blade X3), wanted to rearrange the memory card from the old phone, but forgot to unplug the new phone before it. All photographs from the internal memory of the phone have disappeared somewhere, and those that were on the memory card have been lost. There is more than one food: how to remember photos from the internal memory of the phone?
2. Vipadkovo saw a folder with photos at the internal memory of the phone. As a result, the photographs were left in the Android Gallery, but in black and gray colors, with the inscription "a file of visions or errors." Can I please redo the photo?
Vidpovid. To turn the pardon on the cob, so that the photos were not copied to the memory card (stinks can be attached), turn the pardon through the chkdsk utility (Windows).
If there are no photos, for hot tracks you can go through the DiskDigger program or to get a sign of the internal memory of the phone and then, for the help of PhotoRec or Recuva, rotate the photos.
Trying to rotate the photo album from the Gallery, I took advantage of two android-programs for photo editing. Part of the photo turned, but not the most. How to repeat the test with the minimum risk? I want to try to turn the photo I didn’t know, is it real in the situation, what happened? The photographs were taken from the internal memory of Android.
Vidpovid. Richly scan the internal memory of the phone, you do not risk anything. And if you are older than you, then you are using your phone after seeing the photo, then there is a lower chance for your inspiration. Be it a program to win for your robots and internal memory and you can write files to free place. It is better for your mind to use the phone's internal memory and conduct experiments with it in the reading mode.


