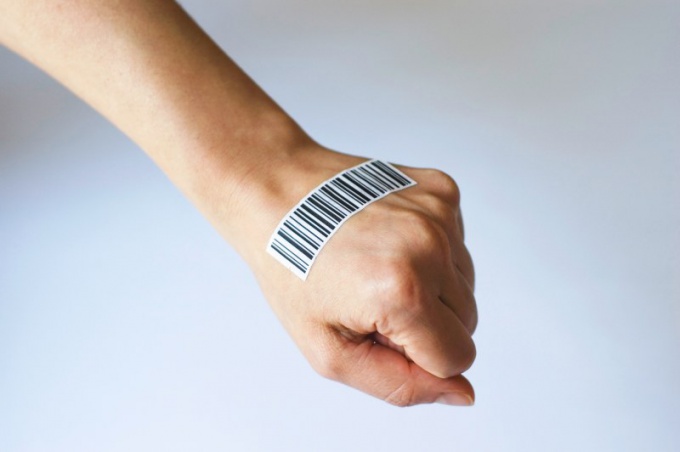
Keyboard scanner. An easy way to connect a barcode scanner without installing a driver
The scanner is connected to the computer or directly to the real COM- either USB port, or use a virtual COM port (VCOM).
It’s elementary to fight for the port’s loss, it’s necessary for the authorities RDP to connect, check the box "Vikoristuvat porti".
Adjustment of the barcode scanner in 1C
There are two ways to connect the scanner to a barcode up to 1C - through robots in the mode of opening the keyboard and through COM-port.
Keyboard layout mode
In the keyboard opening mode, the scanner simply types the keys to match the characters to the barcode. You don’t need any other drivers, so you can install the scanner in 1C.
For all typical configurations behind the button F 7 appears in the barcode entry box. It is enough for the scanner to program the F 7 prefix and that's all, 1C will be added.
Yakshcho configuration was supplemented and in some cases they forgot to prescribe a typical subdivision F 7, it's easier to add tsyu pіdtrimku. In addition, as an alternative, you can change the Atol driver of the old versions, deselect the “Keyboard Exploration” port.
Newer versions of the Atol drivers are paid, but free of charge, they will have a 10-second delay before processing the barcode.
The method is simple for connection, but not handy for robots.
- It is necessary to stitch, so that the correct layout of the keyboard is noted.
- If the prefix is different, the cursor is guilty of standing in the middle of the table, otherwise F 7 does not work.
- Letters when typing in RDP often ruined, and the scanner reads the shortened barcode.
It’s better for that all the same, as it’s possible to hack the keyboard, don’t hack the Atol driver (be sure to spend an hour with that symbol), but simply program the prefix F 7.
I have a glitch in my mind - the letters on some barcodes changed to uppercase. I have been tormented for a long time, but they told me that it is necessary to turn on the character-by-character transmission mode to the barcode, and not the packet one, which is for locking.
COM port mode
Pratsyuє shvidshe i nadіyno. Podiya in 1C should be independent of the layout of the keyboard and the flow active element at the form.
Nalashtovuetsya simply - vkazuetsya COM-port i all.
Ale, nuances.
Driver Atol can be tweaked only for older versions. For a scanner, there is no special sensation, it’s better to use a cost-free driver Scanopos view 1s.
But I'm stuck with the situation, if in some combinations of computers and the ATALIV driver I turned on the scanner only once, and then COM-port will be occupied, and the scanopos driver will start the terminal session. Moreover, such a problem is less likely to be blamed on expensive scanners. Just CipherLab 1000 worked fine.
Vipadkovo knows the topic about this decision. There, one commentator wrote that if he changed wine scanopos zaproponovanoї version tsієї komponenti, without crying a little - everything worked out.
True, I took the component and found everything in my problematic connections. The author states that the problem is to blame, if the connection scanner is not up to the real COM-port, but virtual (VCOM).
Zvichayno, trochs marvelously vikoristovuvati noname-Solution, but it's not practical, and the scanner in COM is more convenient for a koristuvach, lower at the opening of the keyboard, for that reason. It is possible, after 2 years, if this version becomes irrelevant, 1c please your scanopos for normal work with VCOM over RDP.
Ale Vinicla has another problem - the 1C scanner does not reach the first character 0 of the barcode. Maybe, the driver changed the barcode to the number i by inserting zero.
I spent a lot of time looking for a solution, but everything went wrong simply - it’s enough to install any prefix and write this prefix in the connection to the trading account. I am a vikoristav for sleeping F7.
Adjusting the prefix to the barcode
How to fix the prefix F 7 had a chance to suffer.
All scanners have a different key code, so I looked at the table of sixteen codes:
Ale had mercy and replaced the sixteenth 15 (decimal 21) by programming the prefix 51. F7.
The very procedure for programming prefixes is described implicitly, I had a chance to write my own memo, shifting my instructions to a normal human:
In my mind, I missed Validate, and without which prefix was not set.
Dodatkovі respect
I didn't get to the scanners right away. That's why I taught one spivrobitnik on the mission of drukuv need sides z kerіvnitstva and skanuvati need less sequence of commands.
Є special program Scan Master , so you can recognize the prefix and change other settings for different scanner models. Ale won't work only with scanners connected via COM, and not in the keyboard expansion.
For re-verification, working on a scanner, you can still tweak the Atol driver, the program “Introduction Driver”. Click on "Nalashtuvannya authorities" - "Poshuk obladnannya", and then scan any barcode. When the scanner is connected normally, the barcode is displayed.
New clients, how to create independent support for the installed store automation systems!
When updating the programs of the "1C: Business 8" family, it will require the replacement of files-processing services connected to the trading software, moreover, new processing will require new versions of drivers. AT present moment tse software for barcode scanners and magnetic card readers for 1C software of ATOL company for a fee.
If you have connected a barcode scanner or a magnetic card reader, an ATOL driver, then you need to get a driver key, otherwise you need to old driver"ATOL" will speed up the service process corrected by us (div. wine number 1), or connect the barcode scanner through a new standard driver"1C". The need to reinstall the trading software drivers may be due to the need to update any other trading software driver, or if you have changed on one PC ARMK that "1C".
Instructions for connecting a barcode scanner USB interface to software products "1C: Enterprise" through the standard driver "1C".
1.1. For Metrologic scanners:
1.1.1. Connect the scanner to USB.
1.1.2. Read the Configuration Guide for the scanner. On side 2, scan the barcode: "Recall Defaults"
1.1.3. Attachment dispatcher, group "Attachments HID", may have a check box "USB-HID random attachments":
1.1.4. View on the side. 41 (section “Prefixes/Suffixes”) barcode: “Disable LF Suffix”
1.1.5. Let's review the scanner's work. Let it be text editor, for example "Notepad" or "Word" and scan any barcode, or not instructions. The test document may have additional rows of digits to the barcode and the cursor must be placed on the cob of the next row. If you want to open the barcode again, then you must go two rows with the same numbers, for example, back to back
88011929,
sweat
88011929
88011929
1.1.6. View on the side. 68 (part "USB") barcode: "Enable Uni-Direction USB Serial Emulation Mode"
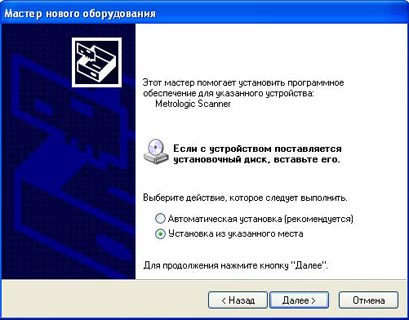
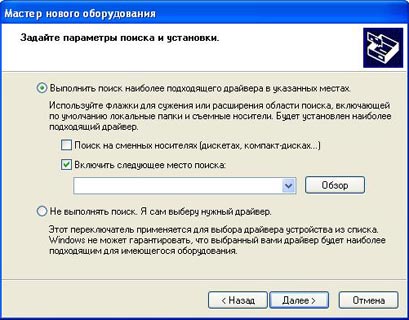
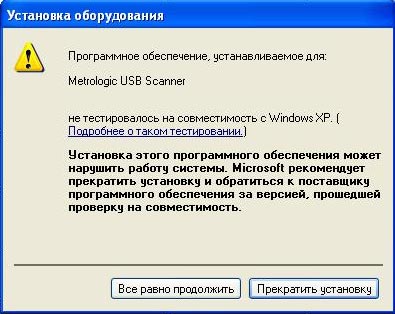
1.1.7. After 2s, “Windows” will close the message “New Metrologic Ownership Found...” and then it will say “Master of New Ownership”, select “Not once”, press “Dali”; select "Installation from a designated place", press "Dal". Select “Vikonaty search for the most suitable driver for designated areas”, set the ensign “Turn on next location search”, use the “Look” button to select the “uni-direction” folder, press the “Next” button. At the vіknі "Restoration of the possession" it is pressing "All the same continue". We complete the maister's work by pressing the Done button at the maister's new owner. At "Windows" that closes the message: "Found a new possession and it's ready to win."

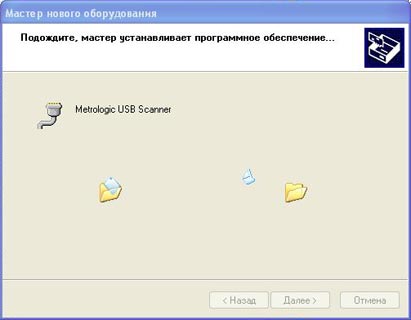
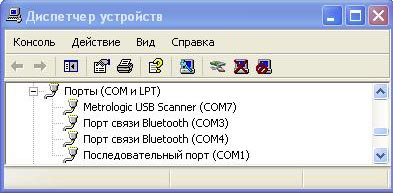
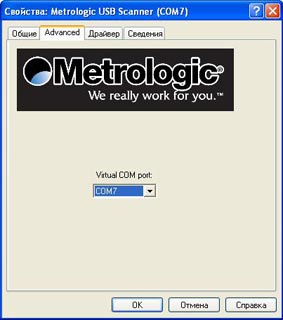
1.1.8. A USB scanner appears, after 2 seconds a new call, the scanner sees a sound signal and in the device manager, in the Ports group (COM and LPT) is responsible for appearing: Metrolog USB Scanner (COM7) (additional port number). Vidkrivshi power I will build this, on the Advanced tab you can remember the number of the COM port. If you changed the port number, disable, connect the scanner to USB.
1.2. For CIPHER 1000 USB scanners (COM emulation).
1.2.1. Install the driver from the supplied CD. Connect the scanner to USB. At the device dispatcher, the Port group (COM and LPT) is responsible for the following: Cipher USB Scanner (COM7) (port number is correct). To check the power of your add-on, on the Advanced tab, you can remember the number of the COM port.
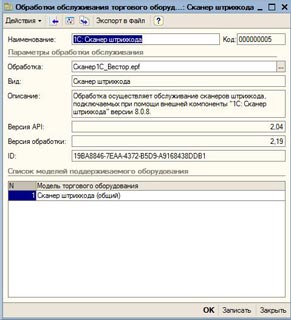
2. The catalog of the working base "1C: 7.7" is to blame for the file "scanopos.dll" version no less than "8.0.8.4.", for 1C8.1 it is the fault of the "\Bin" directory of the program. (The version of the “dll” file can be viewed on the “Version” tab of the file authority), the “ExtForms\Equip” folder has the following files: “Scanner1C_Vestor.ert” and “Scanner1C_Vestor.efd” 1С pripriєmstva "). The installation of that “dll” registration is checked by running the “ScanOPOS.exe” file, then copying the file from the folder, the installation was checked into the yaku.
3. Adjustment of the scanner in the program "1C 7.7."
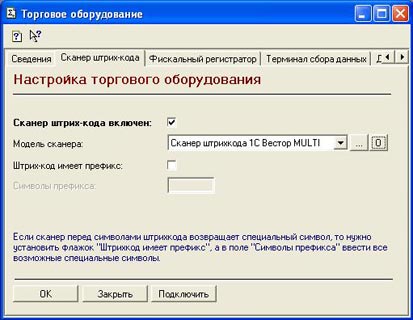
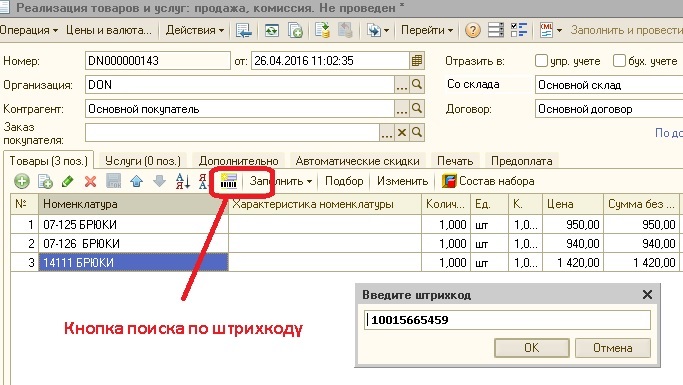
3.1. Through the smut menu of the "1C 7.7" program, select "Service" - "Setting up a trading license". The window “Trade possession” is displayed, go to the “Barcode Scanner” tab, select the “1C Vestor Barcode Scanner” model. Set the flag "Barcode Scanner Enable" (scanner model "Standard Scanner", the flag "Barcode May Prefix" is disabled), press the "OK" button. Close the "Model" window, press the "Connect" button. At the window "Trading Ownership" "1C" you see a message, for example: "Barcode scanner: pardon when connected". Install scanner parameters! The main menu of the program -<Файл> - <Открыть>- (C: Proram Files DemoDB ExtForms Equip Scaner1C_Vestor.ert)".
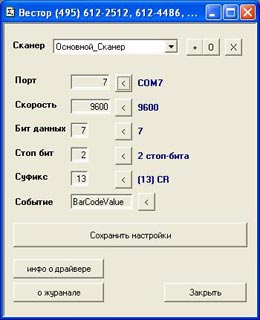
3.2. Following the recommendations, open the file. You can set the following parameters: "Port" - "COM (number from the extension manager)", "Swidth" - "9600", "Data bit" - "7", "Stop bit" - "2", "Suffix" - "13( CR)", "Podiya" - "BarCodeValue", the file is closed. At the window "Trading property", press the "OK" button. As a reminder, "It was not possible to take exclusive access to the annex", turn it over again, it's better for everything, The COM port number is incorrectly entered. correct connection there are no prompts after pressing the "OK" button.
4. Adjustment of the scanner in the program "1C 8".
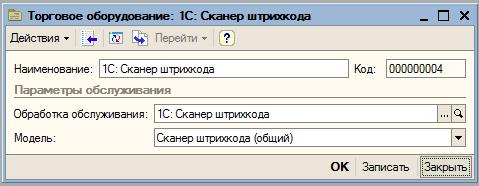
4.1. Through the smut menu of the program "1C 8" select "Service" - "Commercial Ownership" - "Connection and Setup of Commercial Ownership". Clicking on the button “Services processing”, clicking on the item “Click on the button “Maintenance service processing”, open the window “Commercial service procedures”, pressing the “ins” key, open the window “Commercial service procedures: New”. In this case, select the file "Scanner1C_Vestor.epf" from the "Processing:" field, write the name of the model "1C Barcode Scanner Vestor" and press the "OK" button. At the window “Connection and establishment of trading possessions”, having created an active table, by pressing the “ins” key, we add a row of new possessions. With the button “...”, you can open the window “Trading Ownership”, press the “ins” key, open the window “Trading Ownership New”, there you can select: “Processing service:” - “1C Barcode Scanner Vestor”, “model” - “ Barcode Scanner (Zagalniy)”, press the “OK” button.
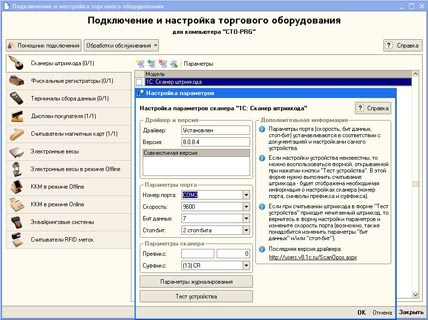
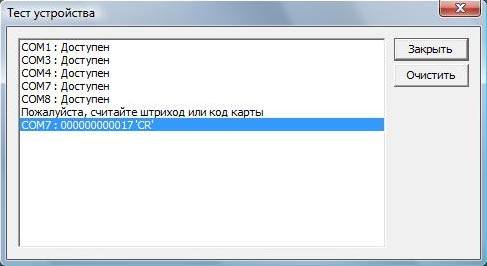
4.2. At the window "Connection and adjustment of the trading account" in the row of the table with the button "\/" select "1C Barcode Scanner Vestor", press the button "Parameters" above the table, the window "Setting parameters" appears, set the parameters: "Port" - "COM (number from the extension manager)", "Shvidkіst" - "9600", "Bit data" - "7", "Stop bit" - "2", "Suffix" - "13(CR)", press the button "Test" , readable by a barcode scanner. We can add, for example: "COM7 88011929 `CR`", it looks like the correct setting of the COM port number and suffix.
5. You can check the scanner’s robot at the opened file - service routines (“1C7.7.” - “Scaner1C_Vestor.ert”, “1C8” - “Scanner1C_Vestor.epf”), scan the barcode, at the top of the window it may be: "dzherelo" - "Scanner", "pod_ya" - "BarCodeValue" or "OtrimaniyBarcode" for "1C 7.7" or "1C8" is valid, "given" - digits for the barcode. At the time of the reaction to the scanner, it is reversed, and it is active opened file, press the button "Information about the driver" If the barcode is not read correctly, please check the driver version on the “1C: Barcode Scanner” tab of the “Adjusting System Parameters” window (main menu “Service”, item “Parameters”), it is to blame but not lower than “8.0.8.4” , reversed, tidied up Chi є suffix "LF" for the hour of scanner programming, chi suffix "CR" was left out. The “About log” button opens a window to configure the parameters of the log and the scanner driver; for locking, the parameter "Rive 0 - enabled" means that no entries are made in the journal; You can assign a directory to a log file, customize log details.
Barcode scanner with interface "into the keyboard" and USB KB sled connect via the "ATOL" driver, with RS232 (COM port) interface can be connected via the standard "1C" driver for this instruction, including the points that describe the connection in Windows installation of a driver driver (COM port at the dispatcher of the annex may already be available).
It is possible to connect a number of scanners or readers of magnetic cards to one PC under one "1C" card reader. The upgrade in "1C 7.7" is carried out at the opening of the opened file "Scanner1C_Vestor_Multi.ert", and in "1C 8" one more scanner is simply added. In "1C 7.7" the connection of the reader of magnetic cards was not transferred, but instead of the standard driver and slightly supplemented by "1C", you can connect the scanner and the reader of magnetic cards in parallel.
Instruction
If you use a scanner with a non-standard interface, turn off the computer and install a special interface board, as it is included in the package of your accessory. Connect to the interface board a scanner for reading barcodes and connect the computer. If something is to be done with the installation of that software, as a part of the complete set of accessories.
After connecting the infrared scanner to the computer, turn it over for clarity of robotics and functionality. Why run a terminal program and install the need to display the speed and parity control. Then close the program and activate the attachment by placing the goods in the area where the sensors are labeled. The IC-scanner will immediately turn on and show the correct digits on the screen.
Barcode for goods, moldings per international standard, giving the possibility of being such an infestation of a person on the planet to take swedish access before new information about the goods of that yoga virobnik via the Internet. Assignment of barcodes in Russia is established by the Association of Automatic Identification, which is included in the international voluntary non-commercial association GS1.
you need
- - friend of the undertaking;
- - 25,000 rubles.
Instruction
Uvai's browsing for the Rosiysky law of the Іndivіdualnі pіdprіmtsі (Іp), p_dprіmtsі without the defender of the legal partner (FBUUL) not є by organizational, this is not to join the asocіiai, osskіlki оно є О І, VІDPOVII, I can not hatch- the code.
Before the 1C program, the process is specific. The peculiarity of this company is that there is no single standard for the organization of connection. Kozhen koristuvach reaches the desired result in his own way. Why so? Firm 1C cannot be sewn into the program universal drivers yaki go to all models of all types of possession. Lines of possession are constantly updated with new models. It is impossible to move everything forward.
On the butt of connecting to 1C the barcode scanner Motorola Simbol LS 2208, we can tell about the universal, in our opinion, way of connecting the barcode scanner to the 1C program. In one of our publications, we already mentioned about connecting a USB scanner through emulation to a COM port. But this method is not necessarily universal, to which the obviousness helps special driver emulation to the COM port. What work, how does a dealer possessing such drivers not release?
Why is the versatility of the described connection method preferred? The fact that the scanner is connected to the 1C program without the participation of the 1C program itself and the other additional firmware. In fact, for the connection, we only need the instructions for the scanner itself, from the system barcodes and the driver.
Everyone who connects the scanner to 1C should know that the barcode scanner that connects to 1C in the “opening the keyboard” works, but a little bit is not as desirable. About scho vlasne go? When you view a document in 1C, insert the cursor at the tabular part of the document, scan the barcode of the product with a scanner, then you will know that the product does not appear at the document. And if you click on the button to search for the barcode, or press the F7 key on the keyboard, and then scan the barcode, then the goods will appear at the document. So it seems to me that 1C can run a USB scanner like a keyboard. USB scanners are connected to the computer as an attachment that mimics the keyboard. There were no buttons on the scanner for numbers 0 to 9 and wi їx to replace the reading of the barcode by the laser exchange of the scanner.
In fact, you will press the F7 key and enter the barcode at the window search barcode from the master keyboard, the effect will be the same - 1C add the goods to the tabular part of the document. Why is it so important to use a barcode scanner? In order to observe the corrosive effect of the scanner, it is necessary to correctly program yoga on the robot with the 1C program.
PROGRAMMABLE SCANNER FOR ROBOT IN 1C WITHOUT PUSH F7 KEYS
For whom do we need:
1. Driver for connecting the scanner to Windows (or other OS). The installation of drivers for USB-scanners starts automatically when the scanner is connected to the computer for the first time. Iz these problems are not to blame.
2. Scanner instructions from system barcodes. For help they need to come correct robot scanner at 1C.
Why have a sense operation?
It is necessary for us to program our scanner in such a way that the operation of reading the barcode and getting the nomenclature into the document was carried out only before pressing the scanner button without pressing the F7 key and other folds from the side of the coristuvach.
SCANNER PROGRAMMING ALGORITHM FOR 1C
1. WE CAN SCAN THE SYSTEM BARCODE, WHAT TO SET THE SCANNER AT THE FACTORY SET
2. SCANNING THE SYSTEM BARCODE, PROGRAMMING SCANNER IN ROBOT AND PREFIX AND SUFIX
3. SCAN THE SYSTEM BARCODE FOR PREFIX PROGRAMMING
4. SCAN THE DIGITS OF THE TYPE F7 KEYBOARDS
5. SCAN THE BARCODE FOR PROGRAMMING THE SUFIX
6. SCAN NUMBER DIALING FROM THE KEYPADS ENTER
7. WE CAN SCAN THE BARCODE AS A PERMISSION, ENTER THE BARCODE "ENTER"
We choose the 1C algorithm, replacing manual operations
1. Button for a quick call to a search for a barcode in 1C. Whenever I search for barcodes in 1C, it clicks on the F7 key, so we need to explain to the scanner that before scanning the barcode, we need to press F7. How tse robiti? The scanner has such an understanding as a prefix, which is the purpose for entering something before the barcode. We won’t delve into the topic of prefixes, we’ll just take note of what we need. Read the instruction from the system barcodes, as it was included in the kit with the scanner (we know the instruction on the Internet) and it is known that the prefix was programmed. Then we know barcodes, which are used for entering letters, numbers. For example, to program F7 for the Motorola Symbol LS 2208 scanner, you need to set the following barcodes: 5,0,0,7. For other models, the ability to dial numbers may be different.
2. If we program the scanner to enter more than a prefix, then scanning in 1C into a document will be scanned for a quick search and conversion of a barcode into a digital look. To complete the operation, do not click on the "Enter" key. Just after pressing on “Enter” 1C send a request to the base of the nomenclature by barcode and add the goods to the document. Also, we need to explain to the scanner that we want to press the “Enter” button after reading the barcode. On the scanner's screen, the introduction of symbols after the barcode means "suffix". Programmable suffix. The principle is the same as for prefix programming. It is known that the suffix was programmed, the system barcode of the suffix was read, and then the digits were read, which means “Enter” on the scanner's screen. For example, for a Motorola scanner, Symbol "Enter" is added up from a sequential reading of digits: 1,0,0,5.
In this way, since the scanner is programmed with system barcodes, we need an absolutely universal scanner that can be connected to any 1C configuration on any computer, and not only on that PC, where in 1C it is possible to add special settings, to connect the processing of services. or Atol. Having programmed the scanner with system barcodes, you will no longer be stale in 1C and you can freely tweak the scanner for good. Below is the instruction with barcodes for programming the Motorola Symbol LS 2208 scanner for working with the 1C program. On the basis of these instructions, you can connect any scanner up to 1C victorious and your personal system barcode.
In this article, I will describe the method of connecting a barcode scanner, which, by itself, especially on rich databases (most importantly trading ones) and hundreds of different hardware configurations. Helping me in advance to prepare a set of files taken from the rest of the Atoll free drivers.
It is transferred, as you know, from the theoretical warehouse relationship of possession, what is connected, and 1C, shards over report description we'll take it.
Father, Croc 1. Preparation.
For folding flooring required folders With a driver, we need to stay (or not even stay) free drivers from the company Atol. If you are regularly engaged in connections, then it’s better for all the stench to lie here at the top of the mist.
My archive is named like this DTO6_2009_02_11_stop.7z
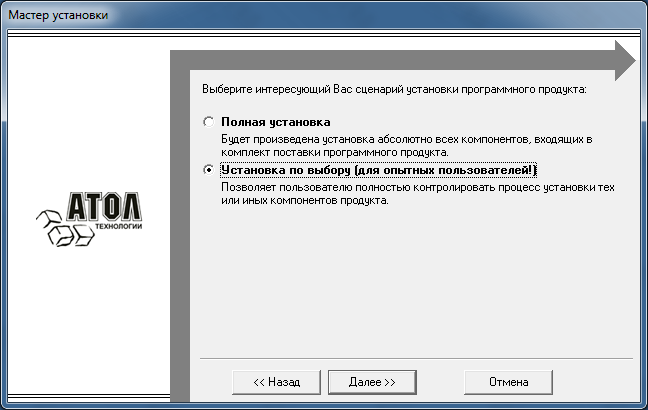
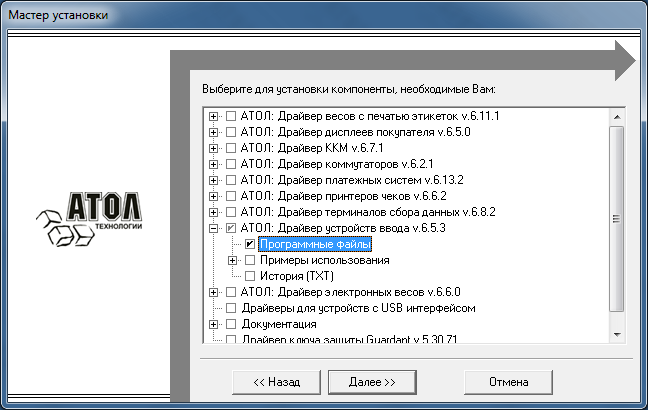
You will need to start installing this package (we'll call you later), so that you can get the new files you need. Run SETUP.EXE and install the program files we need (div. screenshots). Do not forget to remember (copy) the installation paths. Nothing more is changed and we press Dali until the process is completed.
Go to the folder іz installed by the driver (at least "C:\Program Files\ATOL") i reach the folder \Drivers\bin\, in yakіy Bachimo total 3 files.

Copy these files to an okrem folder, as you can name, for example, DriverAttachmentsIntroduction.
Dodatkovo until which time to save the coming files in the next daddy hour %WINDIR%\System32\rtl70.bplі %WINDIR%\System32\vcl70.bpl.
If anything, we see it well insert driver, So that the system did not lose any of its annual traces.
Now try to run the file Scaner_t.exe (File for testing the scanner) from the Driver Attachment folder and may be more advanced.
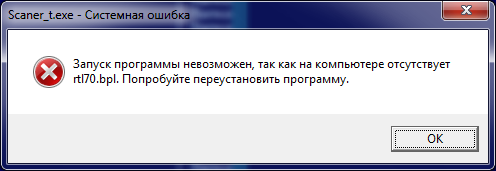
Move the file rtl70.bpl from the time folder to the folder Driver Attachment Introduction. Let's try to restart.
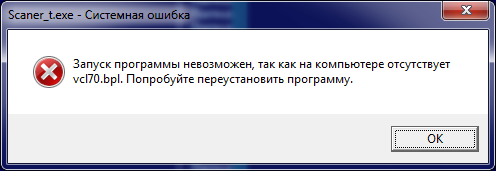
The same is true for the vcl70.bpl file.
Now it's time to launch Scaner_t.exe is taken entirely peacefully in the end from the proposition. Sounds OK.
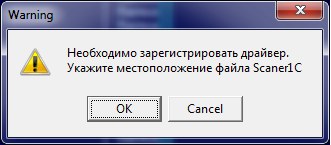
At the end of the day (it will always be checked for locks in the DriverApplicationInput folder), select the Scaner1C.dll file and we will ensure a successful launch of the test driver utility.
Under Windows 7, don't forget to run the first run as administrator.

Krok 2. Connecting a barcode scanner
Also, we may have a barcode scanner, which needs to be connected to the koristuvach's computer. In this case, there is no special value for the robotic scanner mode and the connection port.
I'll copy the folder with the driver to my computer (I'll put it in Program Files). Then we open the folder with the driver, run the test utility (with administrator rights) and we already know in advance about the need to register the driver. Let's wait and take the actual driver on the whole machine.
Now the hour of the scanner has come (you can connect it later or after registering the driver). Checking the Test utility, pressing the button "Establishment of authority ...", gave "Search for possession ..."
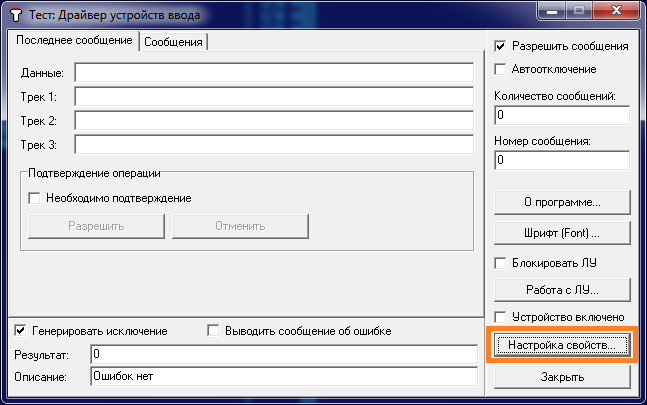
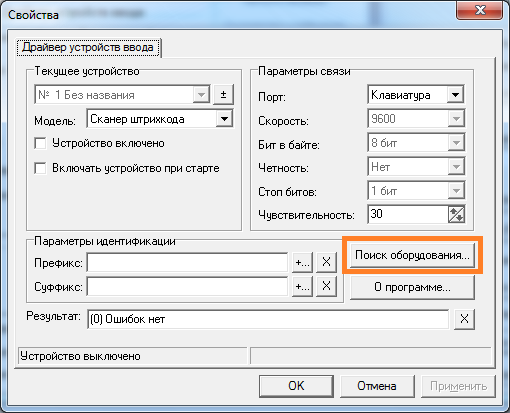
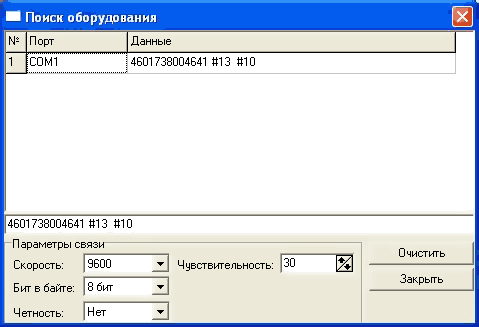
If nothing shows up when scanning a barcode this year, it means that the possession was not set correctly (there may be a lot of reasons) and it is necessary to configure / re-enable / re-enable.
As soon as the record appears, then half of the path is passed - the scanner is successfully interacting with the driver, we did not have a chance to get into it, to find out the necessary parameters. They are the port, port number (for attachments connected to the COM port, let's go to the virtual vin), which suffix symbols can be controlled (for to this particular type#13 #10) that sensitivity (for scanners in keyboard emulation mode).
Moveable to sleeping robot scanner that 1C. The buttstock will have UT 11 on ceramic forms. On the first forms, the process is carried out for the registration of the service for the scanner.
Krok 3. Integration with 1C
Here you are, mabut, already like a ribby by the water. To this, it is necessary to add the property (divided by the Administration) and create a new element.
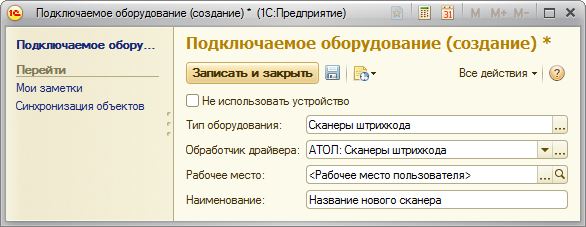
And at the hour of writing down the element, we will be told vikno with adjustments. If it doesn't show up, then the list form has a pop-up button (Customize).
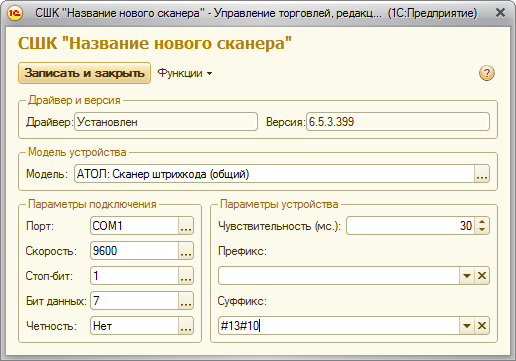
Here you need to specify the correct port (or select the keyboard), specify the COM connection parameters and sensitivity (for the keyboard emulation mode). Also, don't forget about the suffix, which we tried at the test driver. Vin is responsible for confirming exactly what the scanner is transmitting.
On the configuration side, the test of the scanner is daily, so the practicality can be checked by the nomenclature checker.
PIDBAGS
In such a simple way, the axis was made to work without costly drivers without installation, and they deprived themselves of the possibility of diagnostics on the computer of the koristuvach.
Possibly, the description seems to be old, but only at first glance. The whole connection process starts up to copying the folder to the computer of the koristuvach, launching a test utility for rechecking the scanner and adding a copy of the possession with the installation of the necessary parameters in the 1C environment.
PS. Dyakuyu Atol for a miracle product.


