There are no tabs for managing dartless ties in Windows 7. How to find out if you forgot your wi-fi password from your computer. Wi-Fi connection
September 30, 2016
How so? How could you forget the password for your wi-fi? Well, nothing, boo. I will help you recognize forget password in your bezdrotovy merezhі, it's more difficult to find a warehouse. I'm sure you've got the connection, you want to use one Wi-Fi connection before you forget the password. Yakshcho nі - also not a bіda. Let me help you with another method from statistics (recognition of forgetfulness wifi password behind the help of the router. And the third one is to guess the password for the help program WirelessKeyView.
How to find out the wi-fi password from the computer
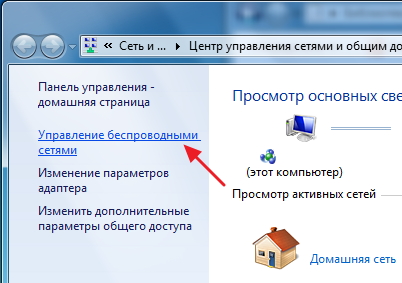
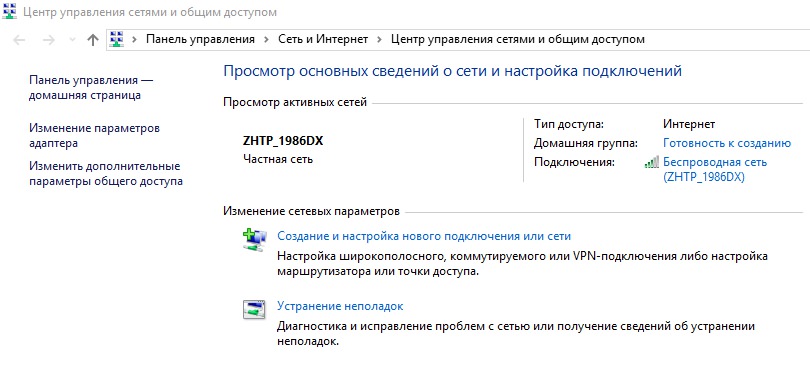
We go on the computer, with which we have already connected to the required wire-free fence, to the Center for the management of fences and open access. For which, press the right mouse button on the icon of the dartless truss in the tray and select "Center for control of treasuries and open access."

At the next vіknі we select the item “Management streakless streaks»
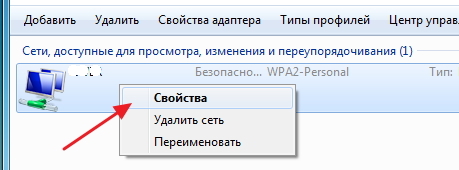
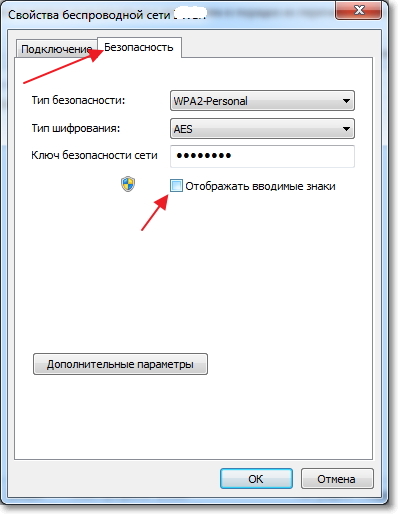
Go to the "Safety" tab and check the box next to "Display signs that are entered." At the “Security key” column, enter the Wi-fi password.
And what about the item “Management of the slingless slings”?
If you don't have the item "Management of dart-free lines" (for example, in Windows 10) - no problem.
In a similar way, go to the "Center for Care with Merezhy and Sleepy Access."
Emboss on your bezdrotove fencing, then "The power of the dart-free fence", gave the "Safety" tab. Check the box "Display signs to be entered". At the “Security key” column, enter the Wi-fi password.

Respect! For robots given method You are guilty, but connected to the required dartless mesh.
If you don’t have much to build, for which you have already connected to the dart-free mesh you need, you will need more guidance from the method below.
Recognize the Wi-fi password from the router setup
Also, connect the computer with a cable to the router. Introduced in address row router address. Most often 192.168.1.1 or 192.168.0.1. You can find out the exact address and the password for entering the web panel of the router on the sticker at the bottom or on the back side of the router (do not bind the computer - you can also go to the interface of the router from the smartphone or tablet)
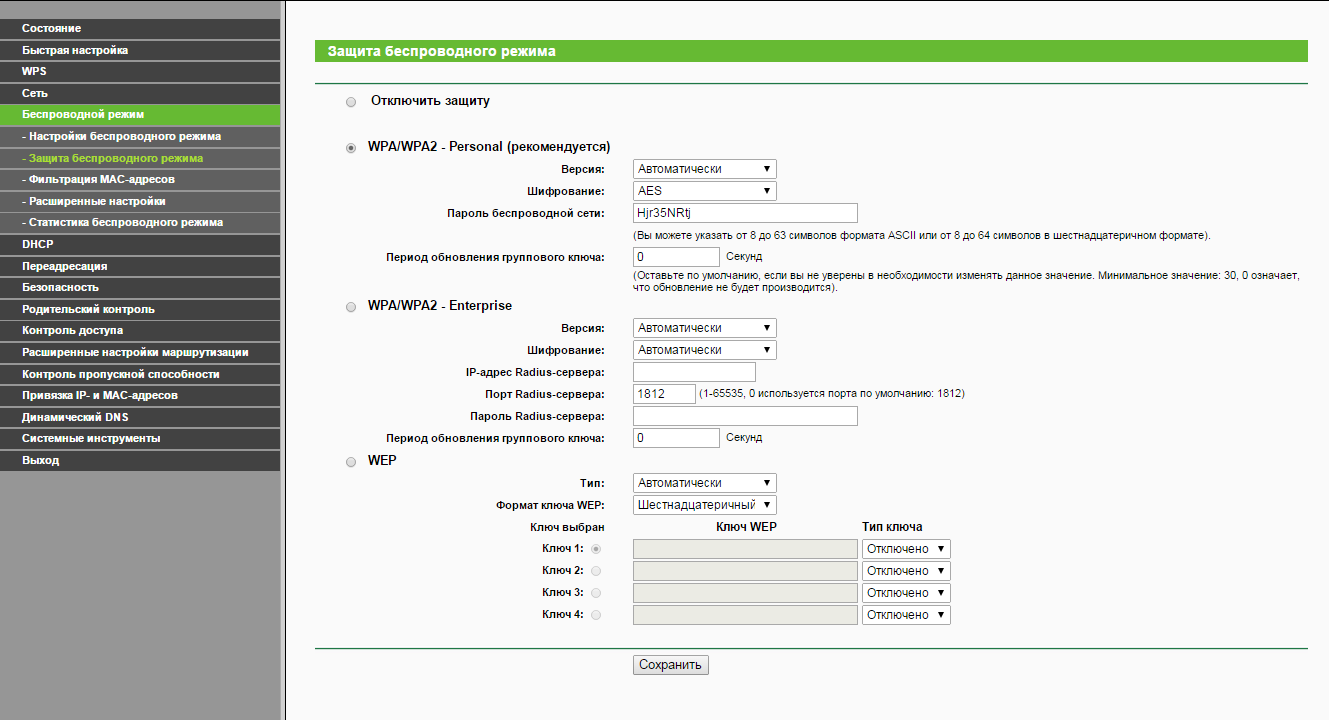
The web panels at the routers are ventilated, but at the same time they are fixed dartless mode similar. For example, on the butt of a router TP-Link TL-WR841N/ND.
Choose "Dartless Mode" - "Protection of the Dartless Mode" - "Password for the Dartless Chain". Please give the password to this column and to the person you see.
If not one of the suggested methods doesn’t suit you, then there is one “enchanting” program that will definitely help you.
Recognize Wi-fi password for help WirelessKeyView
The program, for the help of which you can look over ALL passwords, save on the extension for Windows, is called. The program should be less than 100 kb, it does not require installation and it works practically on any modern Windows. I specifically protest against Windows 10, 8.1, 7 and XP.
- Download WirelessKeyView from the official site
- Let's download files from the archive, run WirelessKeyView.exe
- I bachimo all passwords in the form of the saved merezh, saved on the computer (the password for wi-fi will be in the Key (Ascii) column). You can save passwords in a text file.
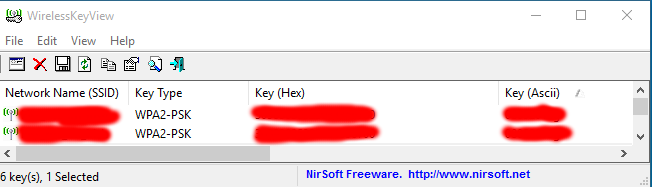
Like bachite, the method is incredibly simple =)
I guess my article helped you find out about your forgotten Wi-fi password. Write down and don't forget more.
Windows 8 (as well as previous Windows versions) upon successful connection to a wireless Wi-Fi network, the system will automatically create for this connection okremium Wi-Fi Profile. This profile has all the information needed to set up a wireless connection: name of the account (SSID), authentication method, password of the account (password key) and other information. At a distance, as given by Wi-Fi, the border is in the visibility zone, and this profile is won for automatic connection to her.
In Windows 7, having created a special element of the keruvannya panel, which allows keruvati profiles to be without dart lines. Manage Wireless Network): delete profiles, change parameters or priority. For Windows 8 Microsoft, for some reason, the functionality has been removed, so in Windows 8 you can manage Wi-Fi profiles with the help of third-party utilities (not our methods!), or for help command line.
Also, with dartless meshes in Windows 8, you can keruvate for the help of the command row, for which we can help the team netsh.
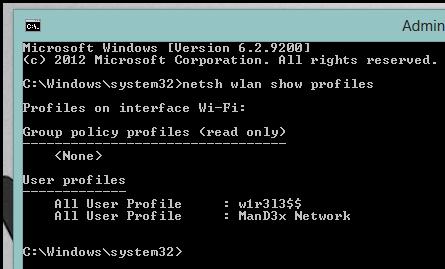
How to enter a list of saved Wi-Fi profiles
The list of profiles of dartless meshes can be entered for the help of the command:
netsh wlan show profiles
The command rotates the list of saving profiles wireless wifi merezh. AT this buttє one Wi-Fi profile for michael.
Revision of saving passwords for Wi-Fi network in Windows 8
It's no secret that the system of transparency of the coristuvacha saves the key of the measure (the password for connecting to the measure).
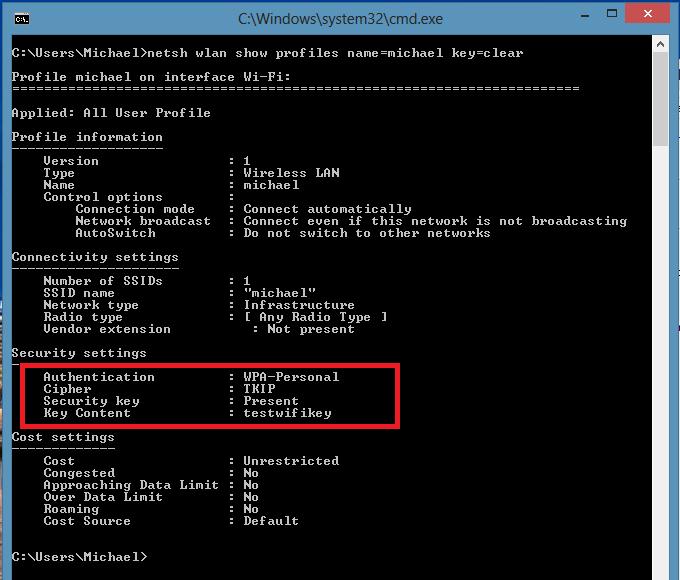
You can look over the saved password for accessing Wi-Fi networks (WPA, WEP, etc.) directly with the row command for the additional netsh command, specifying the required profile:
Netsh wlan show profiles name= michael key=clear
The Wi-Fi password (key) can be found in the Security settings -> Key Content section. AT to this particular type password to connect to Wi-Fi points access: test wifi key.
Wi-Fi profile visible in Windows 8
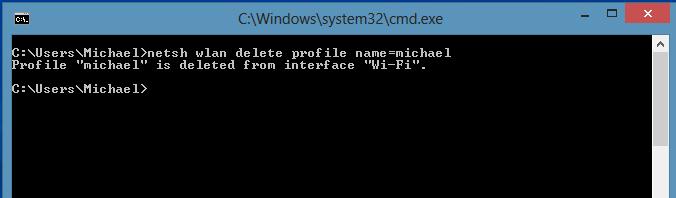
You can view the savings profile of a wireless connection in Windows 8 with the help of the command:
netsh wlan delete profile name=
This command is to protect all saved profiles of all WLAN interfaces.
If you need to delete the wi-fi profile for a specific WLAN interface, hurry up with the offensive command:
Netsh wlan delete profile name=interface=
Note. Profiles of kerfless merging in Windows 8 are saved from viewing XML files in the catalog C:\ProgramData\Microsoft\Wlansvc\Profiles\Interfaces\(GUID_Interface)\(GUID_Profile).xml
The Wi-Fi skin adapter needs a GUID interface (GUID_interface), and all saved profiles for this interface are saved in xml file e s (GUID_Profile) as name. To see information about a specific non-rotor profile, it is enough to see the xml file.
How to connect to a drotoless network in Windows 8 through the command line
It is possible to connect to a wireless network through the command line in Windows 8, even though the system already has a required profile. To connect the victorious, the command is:
Netsh wlan connect name=
In order to do this, it is necessary to connect from the command line to the account saved in the profile (how to select the list of all profiles in the system is described above) with the name wlrЗ1З$$, enter the following command:
Netsh wlan connect name="wlr313$"
You can also specify a specific interface, for help, what you need to install Wi-Fi connection. In this view, the command looks like this:
Netsh wlan connectmso-ansi-language:EN-US" lang="EN-US">13$" interface="Wireless Network Connection 2"
Wi-Fi connection
To get connected to the dartless line, speed up with the command:
netsh wlan disconnect
Or specify a specific interface:
Netsh wlan disconnect interface="Wireless Network Connection 2"
How to change the priority of dartless merging in Windows 8
For presence in the zone of diversification Wi-Fi measure, priority dartless connections It is designated as follows: the remaining connection becomes the highest priority, as the active item “connect automatically”. In case of unavailability of the network, Windows 8 will try to connect to the Wi-Fi network, as it was a priority last time and in the case of a successful connection, the priority of the network will be moved.
Note. In Windows 8, for the presence of a few connections to the lock for locking, the system is trying to connect to the network via Ethernet, which is impossible - it is trying to install Wi-Fi connection, and although the options are unavailable, Windows 8 will connect to the mobile device.
The current priority for non-dart nets can be represented by the help of an already known command:
netsh wlan show profiles
Whichever profile appears on the list is the highest priority for your connection. To change the priority of one Wi-Fi network, hurry up with the command:
Netsh wlan set profileorder name="wlr313$" interface="Wireless Network Connection 2" priority=1
This command moves up to the maximum (1) priority of the wireless network wlr313$$ for the Wireless Network Connection 2 interface.
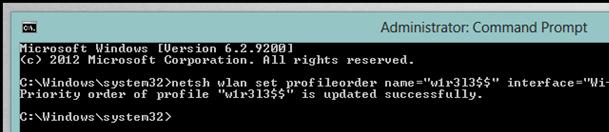
I want to re-enter the list of all profiles of the merger, and you will be sure that the priority of the merger wlrZ13$$ will be promoted (the list should have the most).
Transferring Wi-Fi profiles between computers running Windows 8
To transfer the default Wi-Fi profile from one computer to another, you need to export it to an XML file, and then import it to another computer.
And again, the netsh utility will come to our aid, which allows viconati export and import to set up dart-free merges (profiles) from the XML file:
Vivantajimo Wi-Fi setup profile:
netsh wlan export profile name=”wlr313$” folder=c:\wifi
As a result, an xml file appears in the c:\wifi directory, which must be copied to another computer and imported with the command:
Netsh wlan add profile filename="c:\wifi\WiFi_profile_name.xml"
For the help of assigned teams, among those you can add backup copy all Wi-Fi profiles on the computer.
Shared access to Wi-Fi
Surround access to Wi-Fi to measure can you help me group policies Windows. An example of the implementation of such an exchange is described in the article: .
Deny access to dialog box“Management of streakless fencing” can be requested from the window “Center for the management of fencing and open access” (small 6).
Rice. 6 Dialogue vikno keruvannya without dart nets.
Note: Even in the “Center for slinging with slings and sleeping access” there is no message “Saving with slings without slings”, click on the message “Change adapter settings” and switch to laptop computer or the laptop may have an adapter for a wireless mesh, so that the PIN is displayed in the folder “ Merezhevy connection» (Network Connections) If the adapter of the threadless tether is displayed in the folder of the tether, change what you have installed. the rest version drivers that support Windows 7.
In the dialogue window “Keruvannya with burrless treadmills”, you can add a new burrless tether, remove the kerfless tether, gain access to the authorities of the adapter of the tetherless tether, and also select the type of profile for new tetherless tethers (zastosovuetsya to all koristuvachiv or flow tint).
To manually add a slingless sling, click the “Add” button - a master of manual connection to a slingless sling will open, which will help create a profile of a sizable sling without a sling or a computer-small slab. 7).
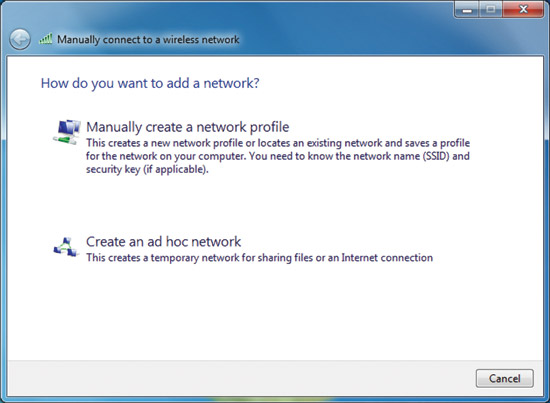
Rice. 7 Storinka to the choice of the option of adding the measure.
To create a profile for a custom network profile, select the option “Manually create a network profile”. To create a profile for the "Computer-to-computer" network, select "Create an ad hoc network".
To look at or change the power of the wireless network in the list, double-click on the name of the “Manage wireless networks” dialog box. Windows 7 displays a dialog window, shown on the small screen. eight.

Rice. 8 Vіkno dominion bezdrotovoї merezhі.
On the "Connection" tab, you can look at the name of the wireless network, SSID, type of the network (access point or "computer-to-computer" network), as well as accessibility. You can also create such authorities:
- Connect automatically when the network is in range;
- Connect to a more preferred network if available - determines whether Windows 7 will automatically connect to a given wireless fence, as if in the reach of a more preferred network if available;
- Connect, navigate as if you don't know your own name (SSID).
Click on the “Copy this network profile to a USB flash drive” message. usb flash drive) to the master of copying the parameters in the cell, which will write down the profile of the wearer. If so, it is possible to vicorate the attachments for automating the adjustment of the profile of the wireless mesh on other computers. Figure 9 shows the Security tab.
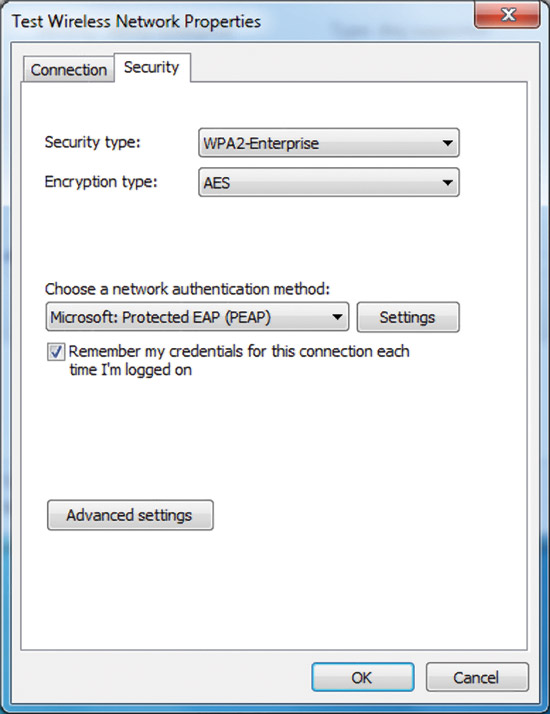
Rice. 9 “Safety” tab of the dialogue window of the powers of the dartless border.
On the “Safety” tab, you can enter the following types of security:
- Without authentication (Open) (No authentication (Open));
- Shared authentication or shared key authentication (Shared or Shared key authentication)
- WPA2-special;
- WPA special;
- WPA2-submission;
- WPA-administration;
- 802.1x standard.
Depending on the selected type of security, you can fix the security key of the security, or you can install and adjust the method of re-verifying the accuracy of the security. To select "WPA-entry", "WPA2-entry" or "802.1x" as a type of defense, it is necessary to step on the step (as shown in the front small):
- Choose a network authentication method ? select Select Extensible Authentication Protocol (EAP) as a method for authenticating a network and press the “Settings” button to set the EAP type;
- Remember my appearance data for this connection during skin entry into the system - indicating that when entering the skin, this form of data is not visible from the registry. If you take the ensign, then when you enter the password into the wine system, you will be asked to enter your personal data (the password will be entered).
Whether you set the security type to "WPA-Private" or "WPA2-Private", or Authentication Security (Open), or Dual Authentication with WEP Encryption, you need to set the security key, as shown in Figure 1. ten.

Rice. 10 Butt of lashing the security key.
If you choose the security type "WPA-Owned", "WPA2-Owned" or "WPA2-Owned", you can also change the Additional parameters. On fig. Figure 11 shows the "Advanced settings" dialog box for the "WPA2 Enterprise" security type.

Rice. 11 802.1X tab.
On the tab "Parameters 802.1X" (802.1X settings) you can specify the authentication mode ("computer or computer", "computer", "coristuvach" or "anonymous coristuvach"), save cloud data for authentication coristuvac and see the appearance of data of all coristuvachs.
One-time registration (Single Sign-On - SSO) allows you to set up 802.1X authentication when you log in to the system and integrate the log in to the system and revalidate the 802.1X server at the login to Windows. For otrimanna additional information about SSO parameters go to the article Wireless Group Policy Settings for Windows Vista, which appeared in the "Cable cable" rubric in April 2007 On fig. Figure 12 shows the 802.11 setup tab.

Rice. 12 802.11 setup tab.
You can configure the cache parameters of the paired master keys (Pairwise Master Key - PMK) and forward authentication at the "Swedish Migration" branch. To check additional information about the parameters of the wireless relocation, go up to the article Parameters of the group policy of the wireless connection in Windows Vista, which appeared in the "Cable" heading in the 2007 year.
Note: when choosing the type of security WPA-enabled, in the dialog box of additional parameters in 802.11, there is no “Setup” tab.
The "Enable Federal Information Processing Standards (FIPS) compliance for this network" flag allows you to specify whether AES encryption should be enabled in FIPS 140-2 authentication mode. The FIPS 140-2 standard is the state standard for computer security in the United States, which determines the extent to which the implementation of cryptographic modules is possible. Windows 7 is FIPS 140-2 certified. When the FIPS 140-2 certificate override mode is enabled, Windows 7 overrides the AES encryption by the software path rather than relying on the wireless network adapter. This ensign appears only when choosing the authentication method "WPA2-authentication" or "WPA2-special" on the "Security" tab.
Non-wide-company, non-dart meshes
Rootless links are not transmitted by their own links or by SSID. You can configure an access point with a non-broadcast, wireless network, to send a beacon frame with an SSID equal to NULL. Rootless treadmills are also called tethered tethers.
In Windows 7, the roamless borders can be adjusted as wide or non-wide. Computer pid keruvannyam Windows 7 you will be connected to a non-dart netting in the order of the list of rows, regardless of how many of these two types of stench can be seen. In addition, non-wide networks appear as the remaining ones in the list of available networks under the name "Other Network". On fig. 13 pointed butt.
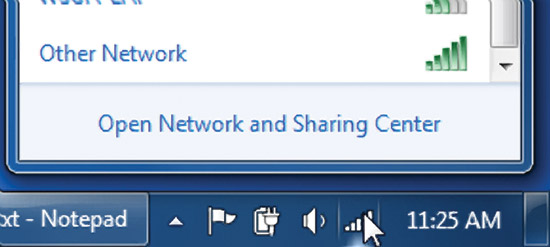
Rice. 13 Neshirokomovna bezdrotova merezha.
When connected to such a network, Windows 7 prompts you to enter the name of the network without wires (SSID). On fig. 14 pointed butt.
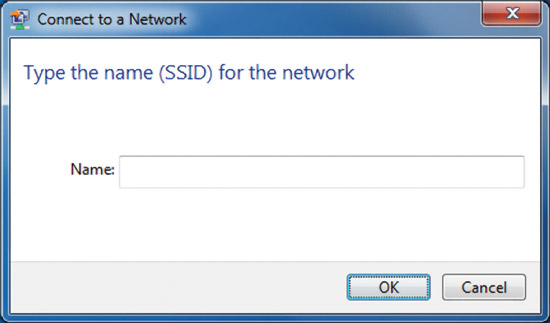
Rice. 14. Introducing the name of the dartless mesh.
Joseph Davies is a Senior Technical Writer for a group of Technical Writers on Windows Mergers at Microsoft. Vin is the author and co-author of a number of books published by Microsoft Press, including Windows Server 2008 Networking and Network Access Protection (NAP), Understanding IPv6, Second Edition and Windows Server 2008 TCP/IP Protocols and Services.
We continue to sort operating system windows 10 You can drink in two ways. The first way, on the start panel, at the bottom right corner of the screen, right-click on the Internet icon or the Wi-Fi indicator. At the vіknі, click on the meaning Center for management of facilities and bedroom access.
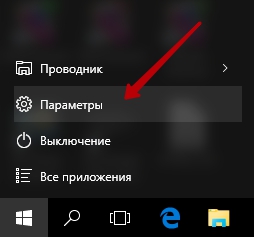
Another way is to press the Start button at the bottom left corner of the screen. At the top, click on the tab - Parameters.
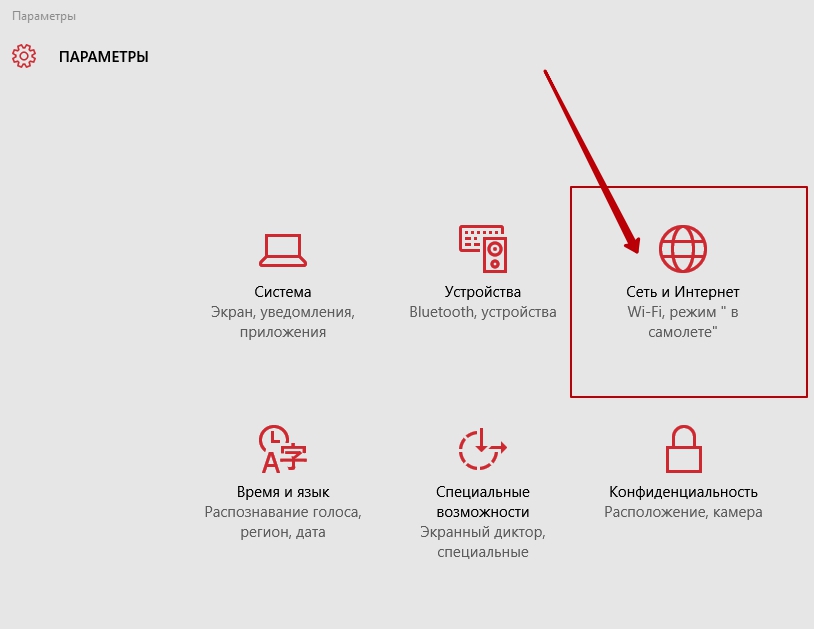
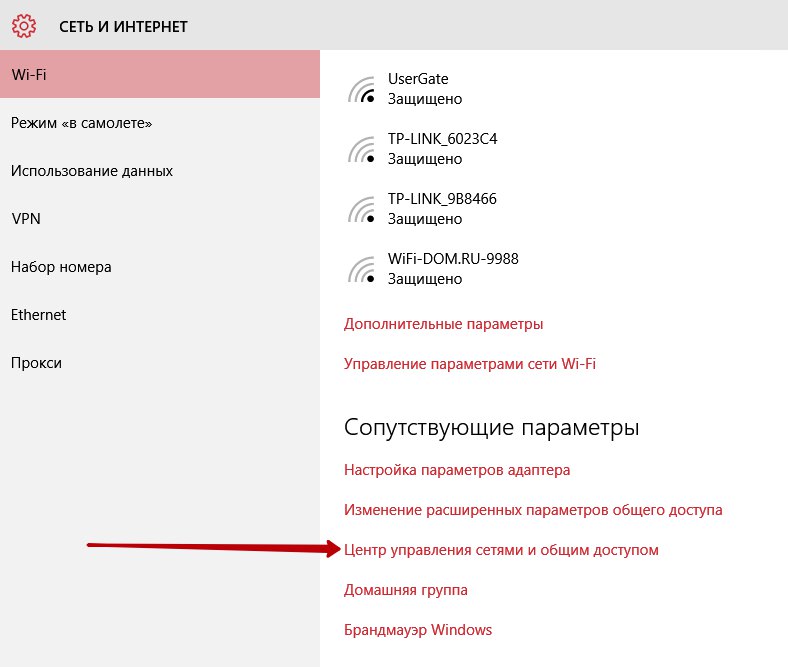
On the side of Merezha and the Internet, on the Wi-Fi tab, at the bottom of the side, click on the tab - Center for management of facilities and bedroom access.
At the center of management of the fences and the overhead access, you can:
— Create that mood for a new connection or a measure. Set up a wide-switched, switched, or VPN connection. Setting up a router or an access point.
— Usunennya inaccuracies. Diagnosis and correction of problems from the measure or removal of reports about the elimination of faults.
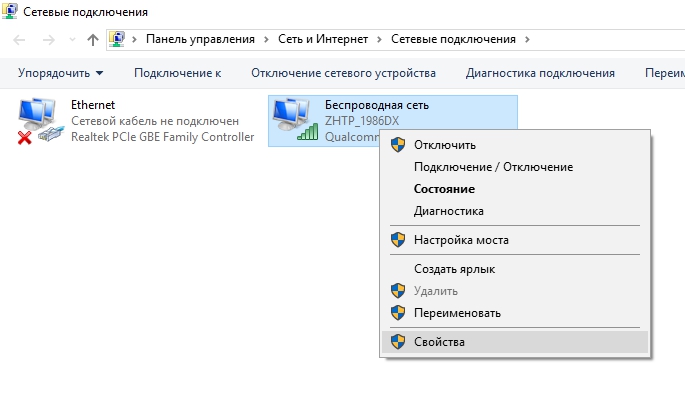
You can also change the adapter parameters from the center of the thread. Evil on the white panel, click on the tab - Change adapter settings. On the side, right-click the mouse on the connection you need. At the end, you can enter the following commands:
— Wimknuti connection.
— Learn about the camp connection.
— Nalashtuvati local
— Create yarlik.
— visuality connection.
— Rename connection.
— Look over the authorities connection.
At the center of management of the fences, you can Change additional parameters of sleeping access, press the double tab in the white panel. Here you can set the parameters for a private measure, a guest one, and a shared one. For example, as if you were victorious, you can easily access the merezh, more Vimknuti merezhne manifestationі Wimknuti hot access to files and printers. That is why, increasing these parameters in the globally accessible media, you can threaten the security of your computer and all files that are on the new one.
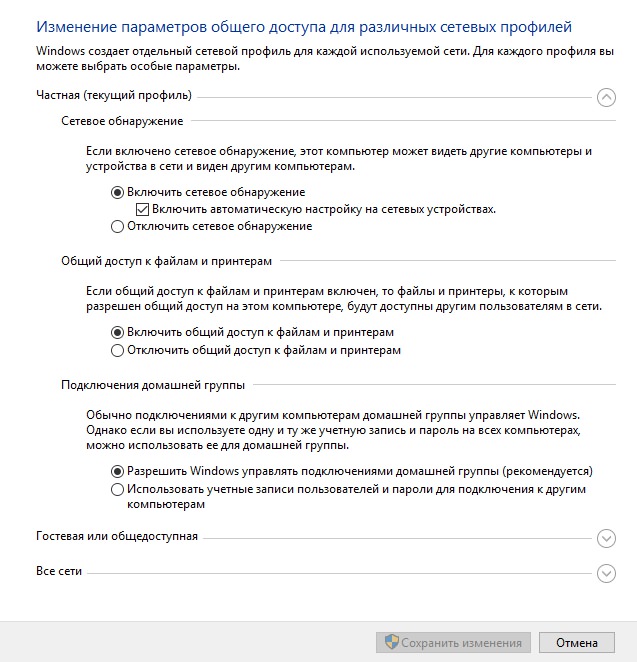
After adjusting the parameters Save change.
Merezha management center Wi-Fi Internet on Windows 10 updated: May 4, 2016 by: Illya Zhuravlov
For Windows 8 (as in earlier versions Windows) upon successful connection to a wireless Wi-Fi network, the system automatically creates an ad hoc Wi-Fi network profile for that connection. This profile has all the information needed to set up a wireless connection: name of the account (SSID), authentication method, password of the account (password key) and other information. Nadal, as if the Wi-Fi of the network is being transferred to the visibility zone, this profile is selected for automatic connection to it.
In Windows 7, having created a special element of the care panel, which allows you to handle profiles of wireless networks (Manage Wireless Network): see profiles, change parameters or priority. In Windows 8 Microsoft, for some reason, the functionality has been removed, so in Windows 8 you can use Wi-Fi profiles with the help of third-party utilities (but not our methods!) or for the help of the command line.
Also, with dartless meshes in Windows 8, you can use the help of the command line, for which the Netsh command will help us.
The list of profiles of dartless meshes can be entered for the help of the command:
netsh wlan show profiles
The command rotates the list of saving profiles of wireless Wi-Fi networks. I have a Wi-Fi profile for my application michael.
Revision of saving passwords for Wi-Fi network in Windows 8
It's no secret that the system of transparency of the coristuvacha saves the key of the measure (the password for connecting to the measure).
You can look over the saved password for accessing Wi-Fi networks (WPA, WEP, etc.) directly with the row command for the additional netsh command, specifying the required profile:
netsh wlan show profiles name= michael key=clear
The Wi-Fi password (key) can be found in the Security settings -> Key Content section. I have a password for connecting to a Wi-Fi access point: testwifikey.
Wi-Fi profile visible in Windows 8
You can view the savings profile of a wireless connection in Windows 8 with the help of the command:
netsh wlan delete profile name=
This command is to protect all saved profiles of all WLAN interfaces.
If you need to delete the wi-fi profile for a specific WLAN interface, hurry up with the offensive command:
netsh wlan delete profile name=interface=
Note. Profiles of droto-free merging in Windows 8 are saved from looking at XML files in the directory C:\ProgramData\Microsoft\Wlansvc\Profiles\Interfaces\(GUID_interface)\(GUID_Profile).xml
The Wi-Fi skin adapter is given a GUID interface (GUID_interface), and all saved profiles for this interface are saved in xml files (GUID_Profile) as a name. To see information about a specific non-rotor profile, it is enough to see the xml file.
How to connect to a drotoless network in Windows 8 through the command line
It is possible to connect to a wireless network through the command line in Windows 8, even though the system already has a required profile. To connect the victorious, the command is:
netsh wlan connect name=
In order to do this, it is necessary to connect from the command line to the account saved in the profile (how to select the list of all profiles in the system is described above) with the name wlrЗ1З$$, enter the following command:
netsh wlan connect name="wlr313$"
You can also specify a specific interface, for the help of which you need to install a Wi-Fi connection. In this view, the command looks like this:
netsh wlan connectmso-ansi-language:EN-US" lang="EN-US">13$" interface="Wireless Network Connection 2"
Inclusion WiFi network
To get connected to the dartless line, speed up with the command:
netsh wlan disconnect
Or specify a specific interface:
netsh wlan disconnect interface="Wireless Network Connection 2"
How to change the priority of dartless merging in Windows 8
When present in a zone with a small Wi-Fi network, the priority of a wireless connection is set as follows: the remaining connection becomes the highest priority, as the active item “connect automatically”. In case of unavailability of the network, Windows 8 will try to connect to the Wi-Fi network, as it was a priority last time and in the case of a successful connection, the priority of the network will be moved.
Note. In Windows 8, for the availability of a few connections to the lock for locking, the system is trying to connect to the network via Ethernet, which is impossible - it is trying to install a Wi-Fi connection, and even if the options are not available, Windows 8 connects to the mobile network.
The current priority for non-dart nets can be represented by the help of an already known command:
netsh wlan show profiles
Whichever profile appears on the list is the highest priority for your connection. To change the priority of one Wi-Fi network, hurry up with the command:
netsh wlan set profileorder name="wlr313$" interface="Wireless Network Connection 2" priority=1
This command moves up to the maximum (1) priority of the wireless network wlr313$$ for the Wireless Network Connection 2 interface.
I want to re-enter the list of all profiles of the merger, and you will be sure that the priority of the merger wlrZ13$$ will be promoted (the list should have the most).
Transferring Wi-Fi profiles between computers running Windows 8
To transfer the default Wi-Fi profile from one computer to another, you need to export it to an XML file, and then import it to another computer.
And again, the netsh utility will come to our aid, which allows viconati export and import to set up dart-free merges (profiles) from the XML file:
Vivantazhimo improved Wi-Fi profile:
netsh wlan export profile name=” wlr313$” folder=c:\wifi
As a result, an xml file appears in the c:\wifi directory, which must be copied to another computer and imported with the command:
netsh wlan add profile filename="c:\wifi\WiFi_profile_name.xml"
For the help of assigned commands, zocrema, you can backup all Wi-Fi profiles on your computer.
Shared access to Wi-Fi
You can get access to Wi-Fi with the help of a group Windows policy. An example of the implementation of such an exchange is described in the article: Blocking a dart-free barrier in Windows 7.
Access point based on Windows 8
From a computer based on Windows 8 wifi adapter For help with the help of the netsh commands, you can organize an access point. The report procedure is described here: How to create a point WiFi access Windows 8.


