Three ways to quickly change the color of an image in Photoshop. Change the color of the image on the color instructions online How to change the color of the image in Photoshop
At this Photoshop level, I will tell you everything about the Color Replacement Tool. This tool is a building tool to change the color of the object of the image without clutter and trouble.
You can be inspired by the fact that between the tools "Background sheet" and "Change of color" is richly sleepy, if you want, it would be better if you use the tools for your recognition. Offending tools and vicorists use the same technique for displaying pixels on images, as if they were due to change. The only difference is that the “Background Gumka” sees these pixels, and the “Change Color” tool changes their colors to a different one.
The tool "Change the color" of the victorist is not the most professional option for changing the color and not always, it can give you those results, which are necessary. Ale wine is good for simple tasks, for example, change the size and appearance of objects. Let's marvel at how wine works in practice.
(Change of color) above the introductions of Photoshop CS, and if you use Photoshop CS or CS2, you can know yoga in a group with the "Flying brush" tool (Healing Brush). Press and tap the brush icon in the toolbar (Healing Brush), to select from the list the tool "Change color" (Color Replacement Tool).
Like you have Photoshop CS3 or CS4, like me, click on the icon of the Penzel tool (brush) and increase it until the list of other instruments of the group appears, select "Change the color".
After the choice, the cursor will change its appearance on the column with a cross near the center. The background gum can have the same cursor shape.

Regulate the expansion of the penzle manually for the help of the buttons of the square arms [abo]. The left bow changes the size, the rights - the bigger one. To regulate hardness (hardness) brushes, press the Shift key (Shift + left square bow to make the edges soft, Shift + right square bow to make the brush hard).
If you drag the Color Replacement Tool on the image, Photoshop will continuously scan the color under the crosshair cursor. This color, which will be replaced by the current color of the foreground (Foreground). Other pixels, which enter the area of the round cursor, also need to change the color for an hour on the object.
For example, if you set the cursor to the blue color of the object, and the foreground color is red, then in the cursor area the color under it will be changed to red. At the top menu, you can set up the robot tool in a different way, but we can look at the details later.
The front and back color icons are located at the bottom of the toolbar. Behind the locking program, the color is black foreground.

To change the color of the foreground, press on the upper square (Zrazok color) and choose whether there is a new color from the palette of colors. I choose green colors. Press OK after completion, closing the palette.

If you marvel again at the icon of colors for the foreground and background, then sing that the upper square has become that color, which you have chosen (I have greens). Now, as I am painting on the image with the “Change Color” tool (Color Replacement Tool), then the outer color will be changed to the foreground color (greens).

I choose for the butt a photo of a girl with a checked bag.

Vaughn is happy, but if you want, sob її the bag has become green. What can we do for whom? Select the “Change Color” tool and, after clicking on the cult with the cursor, it is almost the middle one. Shards of the foreground color are the same greens, the blue color of the bag is replaced by green when dragging the cursor in the middle of the object.

We continue to change the color of the bag, pressing the button of the mouse pressed with the Russian cursor, until the whole bag is filled.

Like a raptom we wiyshli for the boundary of the object that is being processed (bag) and bumped adjacent areas, the tool "Change color" (Color Replacement Tool) qі pіkselі also minyati on green colors.

As if inadvertently getting out of the way of the object, just swipe the front edge by pressing Ctrl + Z on the keyboard, or swipe the front edge by pressing Ctrl + Alt + Z.
Tolerance/Tolerance (tolerance).
Zdaєtsya, everything is fine, until the right does not reach the processing of the edges of the object. If you are surprised, then you remember that the edges of the bag are not completely closed, remember the blue coat.

At the beginning of the lesson, I figured out that the “Change Color” tool can have different parameters, so you can adjust it in the exact settings panel. One of these parameters is Tolerance or Tolerance (tolerance). Tolerance is known, as a sensitive tool for changing to the color that changes. For the locking program, the tolerance of the “Change Color” tool is 30%, but for our mind, it’s not enough. We move up to 50%, which allows you to pour in a wide range of colors, and again we will carry out along the edges of the bag. Now the area is also changed to green color foreground.

I will complete the work on other areas of the bag, still slightly increasing the value of Tolerance (tolerance). The axis has become so charmingly transformed.

Choose a color from the images.
At the front butt, I selected the color of the foreground for the bag, the vicorist color palette. Ale, you can choose a color scheme with elements of the image, for example, a girl's blouse. For anyone with the active tool "Change color" (Color Replacement Tool), press the Alt key and your cursor looks like an eyedropper (Eyedropper Tool).
Now, press with a pipette into the field of photography, whatever color you want to take for a moment for a future change. Look at the icon of colors for the foreground and background, and remember that the upper square added the color you chose.
I have been honored with the erysipelas color of the blouse, I will choose yoga.


Now, I will run the instrument over the culture one more time, so that I become erysipelas.

Return respect for the value of the priority to the tool "Change color" (Color Replacement Tool) in front of the great Penzl (brush). Adzhe, changing the color, the bag saves its svіy, the texture and the spіvvіdshennya svіtla and tinі, scho would be impossible with vikoristanny penzl. (brush). The object became bi-simple flat with a great farbuvanni.
Mixing modes (Blend Modes).
The reason the tool can change the color of an object without wasting any texture is due to different mixing modes. The color that is superimposed is combined with the front color and such an effect comes out. You can choose these modes in your upper settings menu, their choices: tone, richness, color and brightness (Hue, Saturation, Color, and Luminosity). For locking the program, the Color mode is set (Color)
If you ever read about the theory of color, then you know that color is a combination of three warehouses: tone, richness and brightness. You can choose whether or not the mode of mixing is fallow, depending on which of these three aspects of the outer color will stick.
Mode "Tone" (hue): the main color itself is less likely to change, and the richness of that color is left without change. This mode is suitable for the image, the decolour is not even more intense, the shards of change are thin.
Mode "Accessibility" (Saturation): the nascentity changes less, but the vernacular does not change. Such a regimen is suitable for lowering the intensity or for making the color more visible.
Color mode (Color): for zamovchuvannyam that zminyuє vіdtinok z nasichenіstyu. Yaskravіst zalishaetsya postіynoy. Sound victorious more often for other modes.
Brightness mode (Luminosity): change the brightness of the cob color that is superimposed. The tone and intensity do not change.
For an offensive butt with zoom modes (Blend Modes) I selected a new photo from the bags. On the sign of an orange sack, it seems that it’s better to fly more for all the others, we’ll fix it.

One of the ways to see the bag from the existing group, to change the number of other bags. In the contributors of the modes of change, I will get the mode of abundance (Saturation).
Yakby, I wanted to ignite the znebarviti bags, then I chose bi in the basic color white, gray or black. Ale, I want a thinner effect. For whom I will take a piece of color with a smaller bright bag, primuyu Alt and pressing with a pipette (Eyedropper Tool) on new. Why am I taking a sample from a yellow bag, even if I'm going to practice with an orange one? On the right, in what I need is the very essence of the object, and not the yoga image. With the mode of mixing "Nasichenist" (Saturation) only the density will change, and not the tone of cool that is being processed.

Now, having turned the tool “Change of Color”, we begin to paint on quiet bags, on which we want to reduce the amount of the population, the roblyachs of them look like a great one. Adjustable penzl size (square arms) yakshcho nebhіdno i rіven tolerance. On the buttocks below you see a bachite, on the tips of the buds there are buds of a bag in the form of a changed one.

We continue to fill all the bags so that we can see the top one.
Problems with yaskravistyu (brightness).
Іsnuyut dyakі difficulties z vikoristannym іnstrument "Change color" (Color Replacement Tool) in quiet moods, if there is a great difference between the color of the primary color and change it. Let's say I want to change the color of the top orange bag to Violet colorіnshої coolі іz zvyazki. All, nachebto, easy to finish? Ale...
Turn the back of the head all the colors of the cull at the cob camp. For which, go to the File-Rotate menu (File Revert). Now, take a color from the purple bag, clicking on the new Alt key to switch to the eyedropper.

At the top menu, set the mode to change to "Colour" (Color) for the lockdown. Come on, I'll make an orange ball to change its color to purple. Axis result:

Hmm… That, obviously, violet, ale yogo color is not similar to the color of other violet bundles from the bundle. The problem is that our orange sack is richly red, lower purple sacks. Our setting of the mode of zmіshuvannya vplyvaє yaskravіst, dіyuchi only kolіr.
Try to make our sack brighter by changing the mode of changing the tool "Change color" to "Yakravist" (Luminosity).
I cut the front edges to turn the spool at the cob orange color. Now, with the "Yakravist" zoom mode (Luminosity) zafarbovuemo ball dark purple color.

Well axis! Everything went wrong, as it wanted. The "Yakravist" mode, obviously, having grown a bag of bright colors, but still has an orange color and the texture of the object disappeared before that. The problem here lies in the great difference in the brightness between objects. The tool "Change the color" miraculously copes with simple tasks, it is necessary to change the color or the intensity of the color, but if there is too much richness between the beauty of the two elements of the image, then it is necessary to choose other methods.
At the top menu you can add three icons from the pipette images. Leather from three options in a simple way to choose a color for a work (Sampling). Pererahuemo їх levoruch-right: test: without interruption (continuous), the won is set for the mind of the program; sample: one time (Once); test: eye to the background (Background Swatch). To switch between three options, simply activate the vibration icon.
Let's take a look at the report and options.
Sample: non-stop (continuous). With this option, select the color to be displayed by the tool without interruption, while you press the mouse button and move the cursor over the image. This parameter is good, if you need numerical folding to change the color in the object.
With a one-time breakdown (Once) Photoshop vrakhovuє color, vibranium once by clicking the mouse, regardless of how long you are moving the cursor over the image. This parameter is best suited for replacing large areas of a uniform color.
Zrazok background (Background Swatch). This parameter is not to stop the flooring often. Here the background color replaces the days. Only a few pixels will be replaced on the image, as they will match the color of the background, so you need to choose color palette the color, the largest one after the color to the image, clicking on the lower square of the color icon of the front and back plans. Try to regulate the value of tolerance, as your appearance is not close to the end.

The next parameter of the settings of the “Change Color” tool controls the shading of pixels, which are replaced, and is called “Replacement”. (Limits). This option has three options for showing color: sum pixels (Contiguous), non-summary (discontinuous) that vision of the edge (Find Edges).
From the three main ones you will often beat the first two.
Typical exchange amount for promotional programs (Contiguous). With this type of exchange, the tool "Change color" (Color Replacement Tool) perefarbovuє pikseli, scho at the borders of the cursor, the same under the cross. If the tool is not in line with this pixel, it will match the selected color, but it will match the cursor with the area of the other color. Obviously, you can't physically move the cursor to the zones.
Exchange type (discontinuous) replaces all pixels that are in the borders of the cursor.
Remaining type of edge viewing (Find Edges) replace the color in areas with a selected color, preserving the contours of the edges of the object.
І remaining option at the top settings menu for the “Smoothing” tool (anti-aliasing). Activate it at the edge, which is necessary to smooth the edges of the image, behind the edges of the exact contours of the object, in the meantime, raise the ensign.
Axis maybe and everything I want to tell you about it necessary tool. I am sure, you will need more than once to learn how to work in a robot from a change in color.
Often it’s like this: I need a picture, but the color is not the same; or just wanted to ur_znoman_tniti zvichne. How to change the color of photoshop to something else? Food is true, even in Photoshop, you can change the color in dekilcom ways. It is rich to lie in the middle of a rose-colored song according to the whole image. The easier it is to change the color of the image on other plots of the image, it is easier to change the color of photoshop.
And now let's take a look at a few ways and take a look, like in Photoshop, replace one color with another.
The first way is the simplest and best seen. Ale and the object of farbuvannya is not guilty of buti nadto foldable. For example, take a photo of limes on the table. The background mayzhe is uniform, green colors and only on limes. The fruit is round, it will be easy to refarb.

Open the image in Photoshop and notice that the lock image is pinned to the ball by clicking the right mouse button.

Above the ball from the photo we create a new prozorium ball ( Shift+Ctrl+N). Viklikayemo tool "Penzel" / Brush(key B). Take a brush more firmly. On the control panel, we call out the power of the brush and choose a thick line, with clear edges of the stroke.

The color of the penzle is chosen by the one you want to turn lime into. Take, for example, blue. The palette is located on the toolbar at the bottom. Called to the bottom clicks on the icon. Moving the bands with the spectrum, you can choose the range of colors. The tone of the color is chosen, shifting the white ring at the square window, de tone to move from white to black.

Stand on a prozory ball, pick up the penzle with keys Kommersant- zbіshiti, or X- change that zafarbovuemo our lime.

Now we can change the overlay mode for the ball "Spooky"/Normal on the "Colorful tone" / Hue. You can work on the palette of balls. In this rank, lime change color.


Just hold down the key ctrl And, moving the cursor to the ball icon, click once, the barred zone will be visible. Now, without knowing the vision, you can change the color of the brush and choose other colors. It is not necessary to re-farb. After choosing a color, you can press a combination of keys Alt+Delete. So the zone is seen to fill with a new color.

At the offensive butt, it’s clear, like replacing the color in photoshop, it’s more. Such a method can take more than an hour, or the result of that wart.
How to replace one color with a different one in Photoshop
It is permissible, it is necessary to change the color of the lips of the model. Chervoniy, erysipelas and colors of these colors are present in the colors of the shkir. Changing the color of the lips, it is necessary to change the color of the shkiri with the permanent color.
Curve the image in Photoshop. Let's create a shaky ball. The list of balls that can be corrected can be found on the ball palette below.

At the end of the day, fix the ball, which is correct, select the channel for the “Chervoniy” color, click on the instrument Eyedropper/Eyedropper Tool Let's just one click on the model's lips. So we are significant color, which is changeable.

Below, on the gradient, there are arches that move. With this help, you can expand wider or narrower the range of the given color. When moving a checker "Color tone" / Hue vibranium lip colors change over the entire spectrum, depending on where you enter the checker. At every sight of the red one, change on the whole image.

Ctrl+I

Select the color you need to change, close the editing of the corrigative ball, turn on the mask to the coriguval ball (white square) and press the keys Ctrl+I. The mask turns into black, and all our changes visually disappear.

If all the plots, de color need to be changed, you can try, you can save the image (press keys Shift+Ctrl+S). Like in the yakіys dilyantsі you missed, you can say dіyu Alt+Ctrl+Z otherwise, paint over all the misses with a black pencil on the mask of the correcting ball. This way is more accurate to help you choose a new color, and the robot looks more accurate.
You can learn more about Photoshop in the course at Fotoshkola.net.
How to replace one color with a different one in Photoshop, like a different color black or white
Celebrate the change of black and white color otherwise.
To change the black color, you can zastosuvat koriguyuchy ball "Colourful tone / Richness" / Hue / Saturation Ale pratsyuvati with whom not with the channel of colors, but with the tone. For whom it is necessary to put a tick in the custom ball "Tonuvannya"/Colorize.

Let's take a look at the report. It is permissible, it is necessary to refurbish the black sofa. We see a sofa behind an auxiliary tool (the key ring W).

For additional combinations ctrl+cі ctrl+v tolerably see the area on a transparent ball "Colourful tone / Richness" / Hue / Saturation. For which one between the ball with the ball and the ball with the sight of the object, it is necessary to click the left key of the mouse, pressing the key alt.

Now let's keep clapping on the short ball, crying out yogo nalashtuvannya, put a tick "Tonuvannya"/Colorize and, shifting checkers of color tone, abundance and brilliance, choosing the required color.

Walking out is simple, beautiful, without tricks.
For refarbing a white color, you can speed it up with a short ball "Colour"/Color in overlay mode Multiply.
We create an image, we create a shaky ball "Colour"/Color. The color of the ball is immediately set by the one with which it is planned to make white.

Change the overlay mode to Multiply, staєmo on the mask of the coryguval ball and tisnemo Ctrl+I.

Let's move on to the ball from the images and we can see the bajans of the village with a white tool "Shvidke Vision"/Quick selection(click on the key W). Without knowing the vision, we stand on the mask of the ball, which is curving, and beat the mask with a penzle of great diameter. The color change is less likely there, de vie set the vision with a tool "Shvidke Vision"/Quick selection, Yake can be seen behind the dotted line.

For the bazhannya you can change the color of the coryguval ball. For the first click on the new lower clicks of the mouse, it is selected from the spectrum whether there is a new color.
Axis is so easy. Try, experiment. You have obov'yazkovo viide. Now you can see a few ways to change the color in Photoshop to something else.

You can learn more about Photoshop in the course at Fotoshkola.net.
Hello again, my dear readers. Today, I want to tell you how to change the color of photoshop for another one on the other side and put it on all the pictures. Adzhe, singsongly, you often blamed the bazhannya, overfarbing, to marvel at how you will look. Alas, if you don’t have mercy, more often than not, it’s better to grow on any mock-up or on a photograph. You already know how and what you look at. Let's wonder how to change the color of the object to the song on the butt of the car's furnishing to the little one.
First method. Color change
Let's take a look at the simplest view, if we absolutely look at the object itself, that is. machines.
- Then, take a photo, a picture or a picture of a little one to our editor and now go to the “Image” menu we know. Let's change the "Correction" item, and then "Change the color".

- In front of us, it was time to change the color. What are we doing here? First, let's change, that in this century the active tool is a great pipette (without signs). Now just click the left mouse button here on the hood of the car.

- Like a bachite, we had a small slogan at the window. Those who shove the light show us how the area can change the color. Now start pulling the "Colorful tone" brace. Bachite? Part of the color begins to change, if you ruin the whole tone. Chi doesn’t get confused that not the whole car was zafarbuvalsya. We'll fix it.

- For the cob, press the left button of the mouse on the "Rozkid" pozunts and pull the yog at the bik. Just try to do it so that the car gets as far as possible, and the background is unborrowed. AT to this particular type on aphids, there are no signs, which allow me to set the maximum rozkid 200.
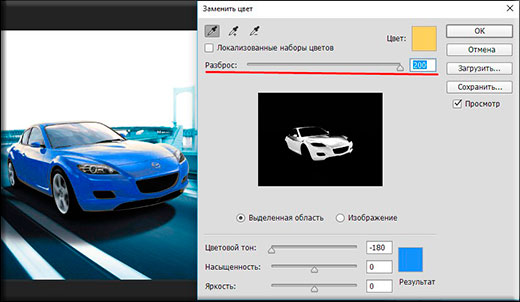
- Needed object, having changed the entire color scheme, why don’t I repeat it? I know it's not bad. Activate the internal tool "Piper +" and press the left button of the mouse on the quiet areas of the car, where the unfinished area was left for the little one.

- Voila!) Like bachite, everything has gone and navit our ashes without suffering. And before the speech, you can also sing the words “Colourful tone”, “Nasichenist”, “Yakravist” to reach the required vision.

Marvel. Looking like this is required. The first function can be achieved in different areas, for example, to change the color of clothes, or to give an inconspicuous, scarlet color to vegetables or fruits. O! Try robiti blue kavun. I will sing you. Tse is easy, even a cicavo is corisno for fastening.

Correction incomprehensible
Let's marvel at the fluctuations of threefold more. Admittedly, I still want to change the color of the car, but even more. Like a bachite, the color of the car is the same as it is in the background. Well, what? Let's try everything as if on top and marvel at what we see in us.

And it’s nasty to go out with us, the ashes of the flooring are similar to the color of the car, so neither “Pipetka-”, nor a change in the rose does not help. If we want to, if we have a violet bula, then the lights will be similar. What work?

In such folded situations, you may have to touch the handles a little. Really, there is nothing terrible here. It's just that you happen to be quick to know you. Well well. With pens, we can erase the faraway stuffed objects with a background, and the object itself is overlaid with a songful color, tobto. have a different car.

Even better before him, how to take care of the serpentine color, duplicate the ball and work all the work on the creation of a copy. And non-essential details can be erased by the superficial. So it will be more beautiful, as if you would like to change the color of the year.
Another way. Overlay mode
Well, since we are talking here about refarming a car from photoshop, then I can’t help but think of one more dishonorable way to make a big difference. True, here you also happen to get your hands on it, so that you happen to minify and zafarbovuvati all the missions. Then, with ease, we can change the color of photoshop to whatever it is.
Let me zavantazhu the same car, which is more.
- Beremo i, yakim bi mi wanted to fill up this machine. Well, let's say, I want to її bachiti green, I choose the same specific color.
- Now create a new ball by pressing a combination of keys SHIFT+CTRL+N. And then take a look at the panel of balls. Chi bachite there є overlay modes? Behind the abbreviations is a great one, but you can open the list that you can see, and select the item “Colourfulness” (Before speech, the “Colorful tone” mode is also pidide, so you can choose it). Chudovo. Well done.

- And now you choose the axis of the world, the shape of that thick brush, and forward! Farbuyemo machine. Tilki neatly, so that you don’t get a bunny. Well, if they hooked it up, then correct it with a gumko, nothing terrible.

- And now, if you want to change that color scheme, which you have inspired, you need to go to our new menu “Image” and select “Correction” there. "Colourful tone / richness". Ale, I'm happy to speed up the clumsy combination of keys CTRL+U

- Well, at the vіknі, scho vіdkrylos, you can also ruin the colors of the color tone, richness and brightness, to change the vіdtinok. Everything is simple.

What's your lesson? All Bulo ozumіlo that cіkavo? I agree that it is. Especially me, if I knew about the change in the color of the subject Adobe Photoshop, bov just at the capture. Well, obviously, if you don’t understand, you can always specify what to ask. Radium help in the world of possibilities.
I would be glad to marvel at you cool video course with photoshop. The video lessons are just crazy, the course went from easy to folding, everything was told by the human mind, nothing wasted and at the same time you just “drive”. All on the fly. Tozh obov'yazkovo marvel.
Well, I say goodbye to you today. Radium bachiti you in my other articles. And so as not to be ruined, obov'yazkovo subscribe to the update of my blog. I will not spam - everyone is right, word of honor. Well, you practice. Let's take care of other lessons. Boo!
With respect, Dmitro Kostin.
Replacing the color with Photoshop is a clumsy process, ale cicavia. For each student learn to change the color of different objects in the pictures.
Minify the colors of the objects we will try different ways. The first two have a victorious special functions programs, and for the third one, I’ll need the handicrafts.
Method 1: Simple replacement
The first way to change the color and victoria of the finished function in Photoshop "Replace color" or "Replace Color" English. Best result won vkazuє on plain objects. For example, take the icon and see it in Photoshop. They gave us a replacement color for any other cicavia for us.


So we changed one color to another.
Method 2: Color range
Another method behind the robot scheme, one might say, is identical to the first one. Ale mi yogo can be seen in a folded image. For example, we chose a photo with a car.

Like in the first moment, we need to tell us what color we can replace. For whom you can create a vision, vicarious function of the color range. In other words, see the image behind the color.

The result has been achieved. If in the image the plots of the outer color are lost, you can repeat the procedure.


