How to get a flash drive capture on a laptop How to put a flash drive capture in BIOS. The creation of an exciting DOS flash drive for the help of the RUFUS program
If you tried to install Windows 10 from a flash drive, then one of the short ones, which you will need to vikonate - that is, in the past, you need to indicate that the computer is guilty of taking over from the flash drive itself. Otzhe, food stand like this: how to install BIOS from a USB flash drive?
Actually, there is nothing coherent here, for a little more than that, your BIOS can look a little different and you happen to have similar buttons.
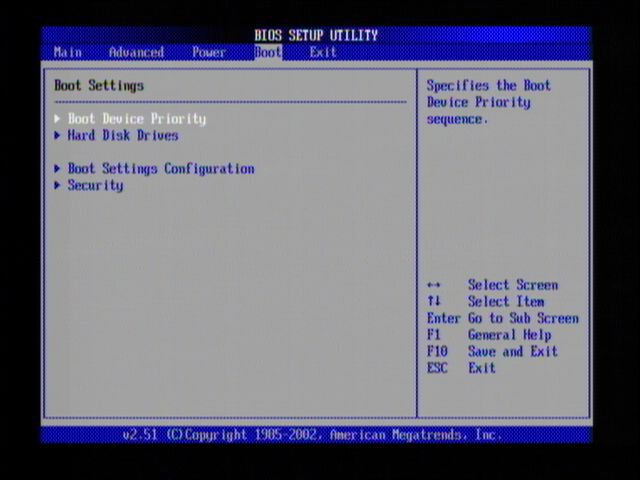
Otzhe, before us, we need to eat up to the BIOS. For this purpose, the computer can be restarted, as if it were already turned on, and immediately after the start, it is necessary to press the DELETE key. Tisnemo sprat times, docks do not support the BIOS program. You can view the vin like this:


On the other computers and laptops, the button to enter the BIOS can be changed. For example, on my laptop I need to press the F2 key. The buttons F1, F8, ESC and others can also be used. Obviously, in most cases, we need to win DELETE or F2 . Rashta - tse even less rare falls.
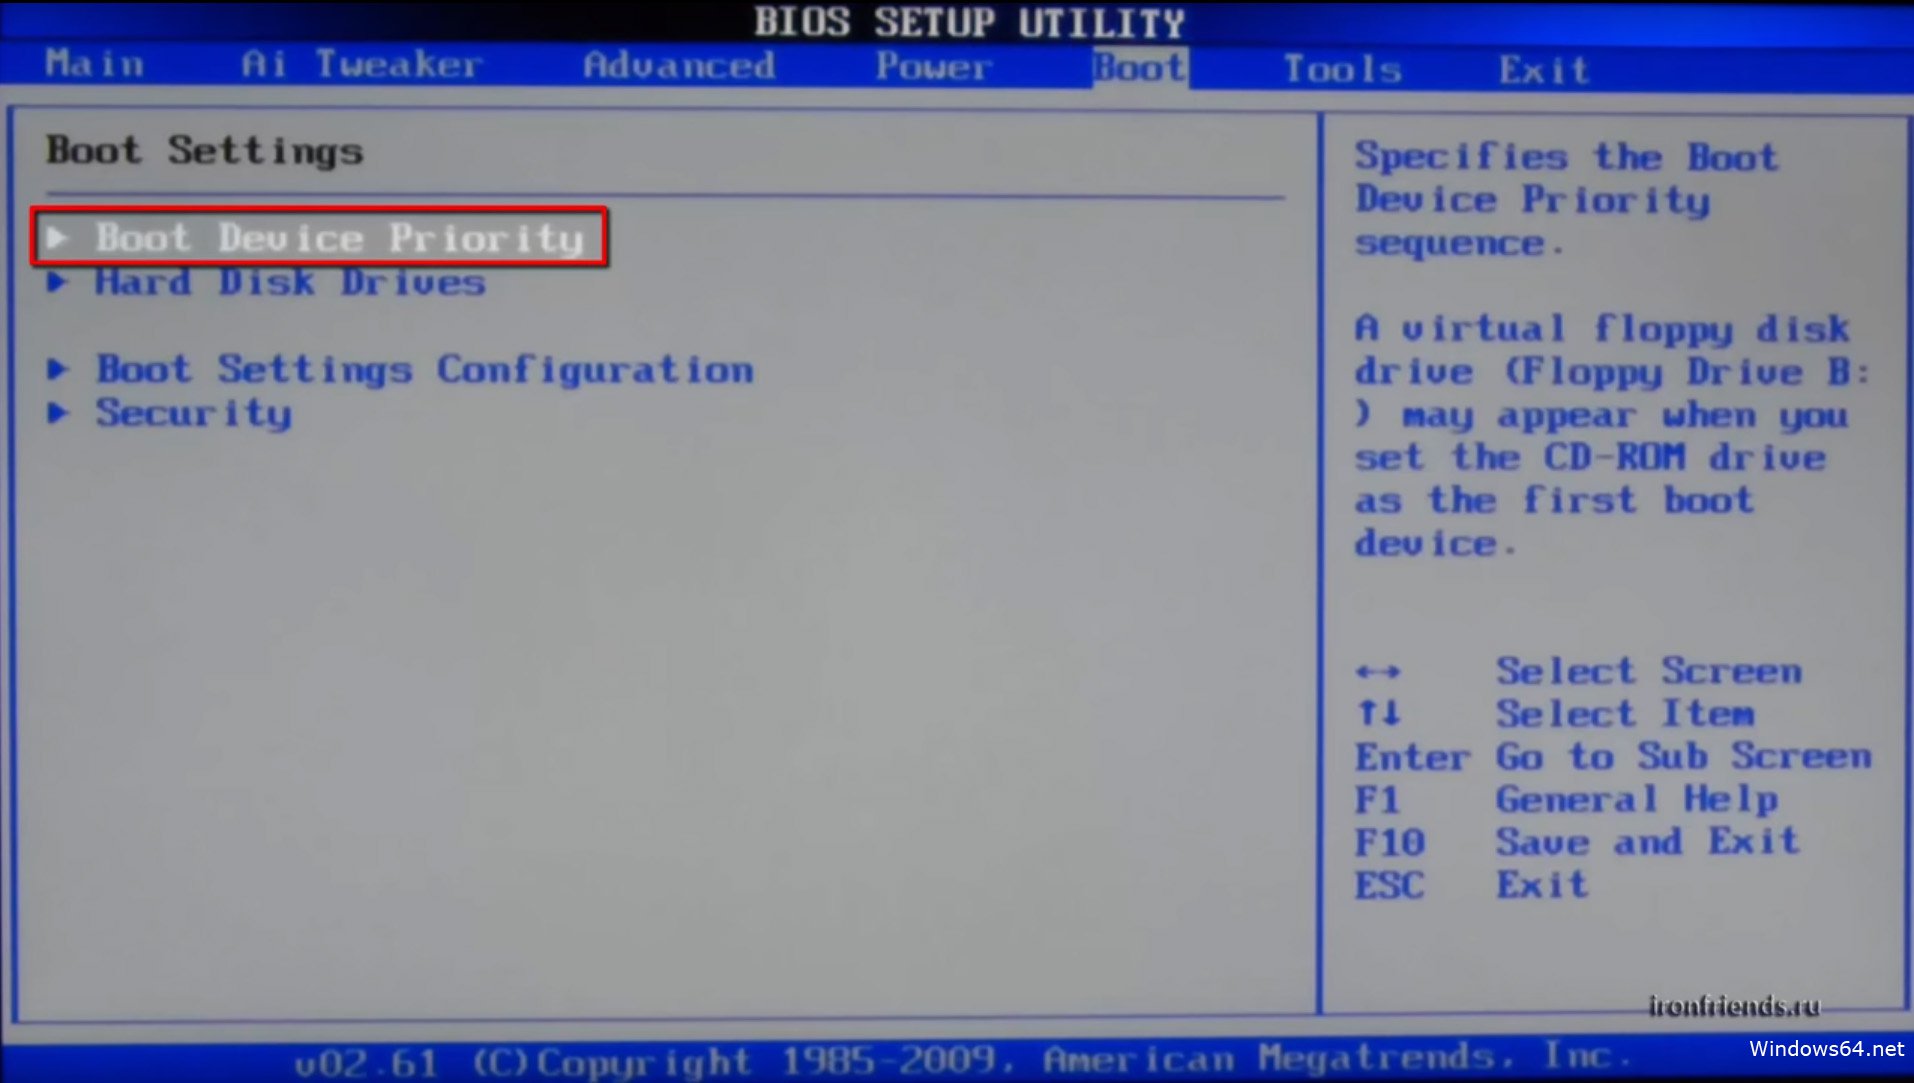
If the BIOS is running, you can fix it. Vicorist arrows on the keyboard, go to the Boot tab and press Enter. There we will need to select another item Hard Disk Drives. Vidkrivaemo yogo pressing keys Enter.

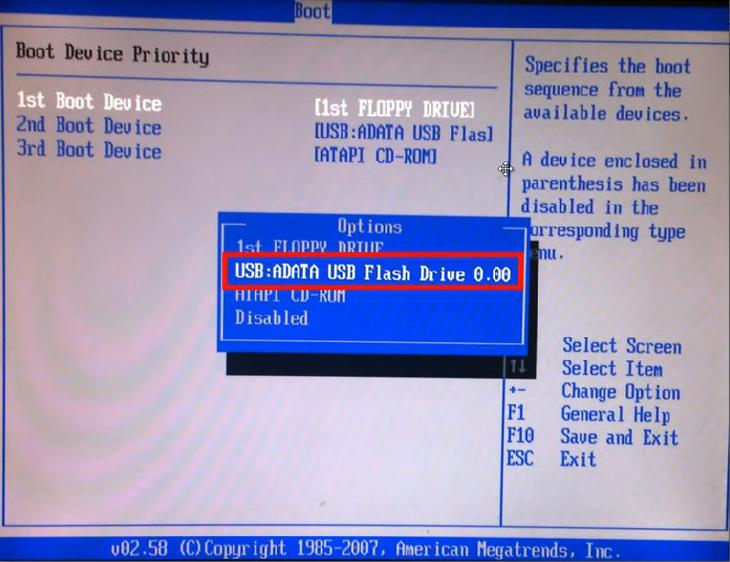
Yak bachite is ordered at once at the first place hard drive(HDD)

We go there and in the menu we indicate our flash drive. My USB port is Corsair Voyager.

Vibravshi її, she will lean on the first place, deputy hard drive. Now turn back one row more, pressing the ESC key.
We know we know. Let's move on to the Boot Device Priority Sustainability Point and that's it.

We go to the first point and tisnemo Enter.

I choose my USB flash drive again, and the priority will be on the first job. Chudovo


In others BIOS install flash drives maybe a little more. For example, on my laptop on the BOOT tab, I once need to enter the Boot Device Priority and give the keyboard shortcuts F5/F6 pick up the flash drive first.


Everything is easier on my new computer! There everything is Russian, and you can win a bear. In my opinion, it is necessary to open SETTINGS and go to the tab.


We select a flash drive from the new window.


Since we have installed a flash drive, we are left to save ourselves already in the way we know ( F10 key).

On which I have everything, I tell you to put the flash drives away and install Windows 10 or your system on your computer or laptop.
It is often necessary to dosit to Vlasniks or to short-term laptops to take advantage of the BIOS from a flash drive. Particularly, it is not possible to install a CD / DVD drive, but it is necessary to install a new operating system (OS) or install fresh drivers and anti-virus software. Therefore, in this article, we report on how to install flash drives in the BIOS on laptops of various manufacturers (HP, msi, sony, dell, acer, etc.).
Also, in order to put the flash drives into bios on the laptop, it is necessary:

Do not forget that in bios you can move by partitions, tabs and rows only for the rows of buttons on the keyboard. Misha will not help you.
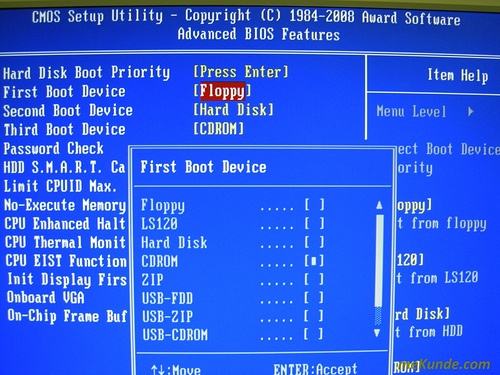
However, the BIOS versions for all the known laptops and laptop models are different. Therefore, the algorithm for refurbishment is not suitable for all outbuildings. For example, if you go to the BIOS and get such an interface, then you have Award Bios.

Then launch an exciting flash drive in the best way like this:
- Let's move on to the "Integrated Peripherals" section.
- Approximately in the middle of the screen, we know the item "USB Controller" with the arrows on the keyboard.
- Tisnemo Enter. The window has the value Enable.
- Best regards, for the USB Controller 2.0 in the row to be enabled.
- Pressing Esc. Looks like it's from the same division. Why "demo" in "Advanced BIOS Features". The name is transferred as an addendum or as an extension of the extension. Here we need the item Hard Disk Boot Priority.
- We go in and wonder what to stand in the first place. May be a flash drive, not a hard drive. Therefore, we select the USB-card and use the “+” button to lift it up.
- Pressing Esc. We select the First Boot Device row and set the USB-HDD value (or USB-FDD, so with the first option, you can’t get into the bios on the laptop from the flash drive).
- I'm calling Esc again. Select "Save & Exit Setup", then press the Y key.

Also other BIOS versions. Ce and Phoenix-Award BIOS and AMI Bios. True, all stinks are less likely to be heard on old laptops with not the best motherboards. How to configure the capture from flash drives of such attachments? All the same. Only the names of the divisions and points of the BIOS menu are considered. The algorithm for dіy and nalashtuvannya is as similar as possible.
For proof! As we have already planned, to install a flash drive in BIOS, it is necessary to activate the Secure Boot protocol. When tsiomu on bagatioh lenovo laptops which is not enough. You may also need to turn on the mode of mindfulness. Wines are called differently. So look for CSM / CSM Boot, UEFI and Legacy OS, Legacy BIOS, Legacy Support and other.
How to capture a laptop from a flash drive via UEFI?
A lot of modern computer attachments (especially, with the rest Windows versions) equipped with a new interface for cob entanglement. It is called UEFI VIN. Pratsyuvat z tsim "option" Bios trohi simpler. Until then, you can squirm with a bear here. However, regardless of those who understand the new interface, not everyone can work with it. Therefore, we will briefly describe the whole order diy.
For example, to get started from flash drives on hp laptops in UEFI, you need:
- In the next hour of interest, I will add a kilka once to press the ESC key. Let's run F10 to get to Bios Setup.
- Now, at the very bottom of the window, you need to know the Boot Priority distribution.
- Just drag the icon from the looking flash drive on the first place.
- Another option is to click on “Exit/Advanced Mode”, then confirm that the extensions have switched mode by clicking on the Advanced Mode item. Dali vikonati nalashtuvannya.
However, UEFI versions can also be downloaded a lot. Є th Russified variant. As a rule, here it’s easier to install a flash drive from a flash drive:
- It is necessary to immediately go to the "Enterprise" section. Sometimes yogo was crushed at the sight of a child. Todi yogo slid shukati at the dodatkovyh lashings.
- Just select the item "Damn discs".
- Put a flash drive first in the priority space.
- Press F10. Save change, .
So rozpovimo about those, like zavantazhitsya from flash drives on outbuildings with mothers. Gigabyte boards(You can see the popularity of a lot of popular brands - acer, lenovo, samsung etc.), on which UEFI BIOS is often used.
- We go to BIOS. How to fight, you know. The simplest way is to simply Delete, F2 or Esc at the start stage.
- Dali "visible" tab "BIOS Features".
- At the very bottom of the window, click on the Hard Drive BBS Priorities.
- In the Boot Option 1 row, you need to put our flash drive instead of the hard drive. Also, Boot Option 2 is to blame for the hard drive - HDD.
- Take care and apparently.

How else can you take advantage of flash drives on laptops?
Through the BIOS of the computer is not the only option. For example, you can take advantage of flash drives on Asus laptop, toshiba, samsung and in. and through special exciting menu. It is called the Boot Menu (before speech, it is also part of the BIOS). You can go to the new one at the beginning of the phase of interest. Just need to hit Esc, F8, F11 or F12 often. Yaka same button - deposit in the retailer maternity pay and the BIOS version that is hacked into it.
After drinking in the Boot Menu, it is necessary to select and install the flash drive from the flash drive for additional arrows on the keyboard. Let's get rid of it and press Enter. Wait a minute, it's easy to do it manually. However, you can't wait to go to the enchantment menu. On the right, on some laptop models, the BIOS has the Boot Menu option disabled. Therefore, you will need additional supplements to increase it.
Warto turn back respect for one more mile. There is no single design for the Boot Menu. It can also be called differently: MultiBoot Menu, BBS Popup, Boot Agent and so on.
Possible problems
At first glance, getting a laptop out of a flash drive is awkward. However, some problems can be fixed. Therefore, we were able to describe the most of them. In addition, the world rozpovіmo like that suck їх.

Rejoice that even older laptops can be a lot more fun with a USB flash drive. It is necessary either to modernize the attachments by installing a new motherboard and software, or to think about the new computer's gadgets.
Past stats were talking about those. And now I'll tell you how to fix the computer's BIOS to install Windows from a disk or a flash drive.
1. What is BIOS and UEFI
Leather motherboard special program for setting up a computer and adjusting parameters other outbuildings. This program is flashed (programmed) on a special microcircuit on the motherboard and is therefore called firmware.
Previously, all motherboards had a firmware, as it was called BIOS, as a small simple graphical interface with white letters on a blue background and a bula was surrounded by functionality. For example, in the BIOS it is not possible to select a teddy bear, to select a language and to have daily graphic elements (pictures) in front of a connected BIOS memory chip. Also, motherboards with BIOS did not support disks larger than 2 TB through the exchange. old system disk layouts (MBR).
At the same time, a lot of motherboards can create a new type of firmware, UEFI titles, graphical interface with different backgrounds, painted buttons, the possibility of choosing a movie (including Russian) and some other improvements. For example, support for a new type of disk distribution (GPT), which allows you to win hard disks larger than 2 TB.
What type of firmware your motherboard can have can be found out from the helper before it, on the site of the motherboard builder of a laptop, and also visually at the entrance to the Setup program. The Setup program is also programmed into the motherboard and can be used to change BIOS or UEFI settings.
2. How to go to BIOS Setup
To enter the Setup program, you need to press the Delete button on the keyboard once you have upgraded your computer. On some motherboards and laptops, the keys "F2", "F10" or "Esc" are used. You can read the click button in the notifications that appear as soon as the computer is turned on.
At the text view

Have a graphic look

If you can't read it, press the "Pause" button on the keyboard to start engrossing. You can continue to take advantage of the onslaught of any keys. As soon as you press the key assigned to enter Setup, you will immediately go into the motherboard setup program.
Classic BIOS

UEFI interface

3. The Basics of the Setup
3.1. Keys keruvannya
The Setup program is a set of different parameters, grouped on four tabs, and fallow in recognition. On the right, or at the bottom, there will be a description of the keys, for the help of which all the dii will win.

To move between tabs, sound the arrows "right", "left" on the keyboard. To move between rows in the middle of one tab, the arrows "down", "uphill" are used.

To change the value, you need to go to the additional arrows on the required field, press the “Enter” key, and then, after the additional arrows, select a new value from the menu that appears. For whom, the keys “+”, “-” or “Page Up”, “Page Down” can also be played.
To turn to the level uphill or to the front side, press the Esc key. The Esc key on one of the main tabs means to exit from the BIOS without saving the settings, which you will need to confirm or be prompted to exit.
AT Setup programs With the UEFI interface, you can win all the games for the help bear.
3.2. Save money
Tse duzhe important moment. After all necessary adjustments go to the "Exit" tab, wrap the "Exit and Save Changes" item with arrows "Enter".
You can save the hacking more simply and more quickly by pressing the F10 key on the keyboard and confirming your decision. This key works in rich versions of BIOS, UEFI and is often indicated in prompts (below or right-handed).
3.3. Skasuvannya nalashtuvan
If you have already changed it, or if you didn’t make sure that the changes were corrected, then go to the Exit tab and select Exit and Discard Changes (Exit and Discard Changes) or press the Esc key until the prompt appears "Yes").
3.4. Reinvention nalashtuvan
To restore all the settings for the optimal values for the promotion, go to the “Exit” tab and select “Load Setup Default” (“Set Up the Settings for the Promotion”). If so, you can immediately change the settings, or simply exit the BIOS with the saved parameters (Exit and Save Changes or F10).
4. Variants of interest
Insert an advanced disk or USB flash drive on the computer on which you plan to install Windows. Now, in order to install Windows, it is necessary to configure the BIOS (or UEFI) for the help of the Setup program to download from a disk or a flash drive. Also, for whom you can create a special zavantazhuvalne menu of the motherboard (Boot Menu). The remaining option is simpler and more convenient, but we can look at the offensive ways.
5. Customized BIOS
5.1. Change of priority
Go to the Boot or Boot tab.

Install a DVD-drive or a flash drive first in the order of exciting attachments.

If you install Windows from a disk, then the first item is to select an attachment of the "ATAPI CD-ROM" type, naming the name of the drive or drive model. For example, CDROM:PM-HL-DT-STDVD-RAM GH22NP (not LG DVD drive).
If you are planning to install Windows from a flash drive, then select the "Removable Dev." type first. or name the flash drives from the designations of the virobnik. For example, "USB: Patriot Memory" (flash drive "PATRIOT").
Transcend JetFlash 790 8Gb
Others are to blame for a hard disk, which is designated as a Hard Drive, HDD or an interface to a certain connection, type, and disk model. For example, "SATA:3M-SAMSUNG HD502HJ" (this is a 500 GB "Samsung" hard drive with a SATA interface).
Please note that there may be other items in the Boot distribution that are considered to be priority, such as Hard Disk Drives or Removable Device Priority.

It's also necessary to stink, so the DVD-drive or the flash drive was in the first place.

If you have two hard disks, then you are more to blame for the one on which you install the system. But at this time, I recommend one of the disks to turn it on, so that the swindle possible pardons in the system installation. Yogo can be connected after installation.
In the Setup program with the UEFI interface, everything works in the same way. Shukait split "Boot" or "Advantage", know there your DVD-drive or flash drive and take it to the top priority of the acquisition. Plus, for whom you can win a bear, which is simpler and more convenient.

5.2. Robotic SATA controller mode
Tse, in principle, is not so important, but if someone cries out food, then I’ll clear it up. SATA disks can be used in a mixed mode with older IDE disks and more frequently AHCI mode. AHCI gives a small increase in the productivity of a hard drive with a multiplier one-hour recovery to a new one. This robotic disk mode is mainly found on servers and for home computer practical marium.
At custom BIOSє Possibility to choose the robotic mode of the SATA controller.

Tsі nalashtuvannya can be found in different places and deschko vіdіznyatis in names, but skіz one principle. You are encouraged to use the IDE mode or the new AHCI mode.

In general, it's recommended to use the IDE's summation mode for Windows XP, but you can't use SATA drivers and just don't turn on the hard drive, which won't allow you to install Windows. Drivers can be introduced into the Windows installation distribution, but I don’t feel like it, the shards of the robot are not in the line, but you can add problems.
Є simplest i manual way booting from a DVD-disk or a flash drive for both BIOS and UEFI - booting for help Boot Menu (Menu Boot).
You can use the keys F8, F10, F11, F12 or Esc for the wiki menu. Їx you can often ask for tips on cob screen zavantazhennya computer You can find out this information from the instructions on the website of the motherboard manufacturer or a laptop, by searching the Internet or using the tick method.

As soon as you click on the computer, press it, press the Boot Menu button, the docks will not appear in the menu for choosing an exciting add-on.

For help, the arrows "down" and "up" go to the DVD-drive or flash drive and press "Enter".
Sandisk Cruzer
The advantages of this method are obvious - you don’t need to dig into the BIOS, you don’t need to then turn the BIOS settings back (if you don’t want to reset the language) and click on the menu only once, since it’s not necessary after the installation of Windows. In addition, changing the Boot Menu does not change BIOS or UEFI settings.
7. Problems from the entanglements
Friends, I'm in touch with you, who blamed the bagats for problems due to entanglements during Windows installations And the deacons wrote about it in the comments;
- As the computer’s attention is right on the cob itself and ask to press F1, after which you enter to the BIOS, then you have a better battery on the motherboard (it may take an hour), problems with the processor cooler (it’s off the hook, it wasn’t connected) or hard disk (pardon in SMART).
- As soon as the PC is notified, it will say “Reboot and Select proper Boot device or Insert Boot Tse means that the area on the disk is occupied, or the flash is not found, or it is hidden. Try to get interested installation disk or flash drives for the help Boot Menu (divided 6 articles), so it’s not possible to build an exciting new one again for the help of the Windows USB / DVD Download Tool.
- As soon as you reboot your computer, the Windows installation will start from the start, change the upgrade disk or flash drive and restart the computer, the installation will continue from the hard drive.
- Turn on all USB devices connected to the computer (flash drive, 3G modem, smartphone, printer). Get rid of the mouse, keyboard, DVD-ROM or USB flash drive, for which you can install Windows.
- How do you have a sprat hard drives, then enable all disks on the motherboard, in addition, on which Windows will be installed.
- Throw off the standard BIOS settings (described in this article).
- If the installer does not download the disk, otherwise the pardon 0x0000007B will appear in the BIOS, change the SATA controller mode from AHCI to IDE in the BIOS, or back.
- If the computer is skin-locked, or the laptop itself enters the BIOS, or it opens the capture menu, then install BIOS option Boot Pop Menu at the Disable / Vimkneno camp (yakscho є).
- Disable Fast Boot in the Advanced branch of the BIOS, and in the Boot branch set the option Launch CSM at the camp Enable
- For the BIOS Boot, change the EFI (UEFI) capture mode to Legacy (yes, yes).
- Set the BIOS to have the Secure Boot option set to Disable / Disabled (likely є).
- Choose from BIOS version install Windows (likely).
- Like you have a laptop, one Windows version to be installed, but otherwise they didn’t help you for the sake of updating the BIOS, go back to support or to the forum of the virobnik. It is also possible to update the BIOS, if any may appear in the new additional options(P.8-12).
- With the possibility of a DVD-disk, as with flash drives, there are a lot of problems.
- Work from .
- Insert the flash drive into the USB 2.0 socket on the back panel of the computer (motherboard) or the USB 2.0 sockets of the laptop. The USB 3.0 plug is not required.
- Try speeding up the Boot Menu, as described in paragraph 6 of the article. This way is simpler, better, lower, setting the priority of advancement in the BIOS and you can determine whether your USB flash drive should be downloaded by the computer.
- The lower confirmation on the black screen is to talk about those that the computer freezes at the moment of downloading to the flash drive or to hard drive. Yakscho without a flash drive zavantazhenya ide far away, then right exactly in it.
- If your computer does not download a flash drive, or if you do not want to get involved with it, download a DVD-ROM or another flash drive to install it.
- Since there is no such possibility, then change the type of flash drive znіmny nose» to the hard drive with the help of the BootIt Next Generation utility, format it with the HP USB Disk Storage Format Tool and rebuild the hack with the help of the Windows USB/DVD Download Tool. All these utilities you can order below in the "Essential" section.
- If the problem is already cleared up after you choose to install Windows, hurry up to fix the BIOS (item 7-12). To see the old ones from the disk, or to save for help zavantazhuvalny disk Acronis Disk Director.
- If the installer tells you that you can't install Windows to disk, try vikonati or go back.
I'm guessing that the F10 key is set to exit the BIOS from the savings.
8. Posilannya
At the next article, we can look at how to install it, that one.
Sandisk Cruzer
Transcend JetFlash 790 8Gb
Sandisk Cruzer
Use a rich BIOS view: Ami, Award, Phoenix Award, UEFI. Rozberemo, like push buttons for the hour of zavantazhennya computer chi laptop, schob go to bios that put the flash drive from the flash drive to install windows. I want to respect that the traditional key delete, F2 to enter bios. Lower the combination of buttons, how to enter the BIOS, to install the flash drive.
Buttons for entering bios for browsing laptops and computers.

BIOS selection buttons

How to install BIOS from a flash drive to install Windows
I’ll start from the fact that you don’t need to go into the BIOS, so you remember the places to install Windows. For whom is it so called start menu. To go there, it is necessary, if the computer is recognized, a key is written differently. AT to this particular type F12. Press the key, as it is written in the word boot menu.


Why start the computer: USB flash drive or other annexes. Dali pіde installation of the windows system.


Yak at Ami Bios put the flash drives
- Onslaught device priority.

in a row 1st Devise set the priority from the flash drive. On whom, sound and that's it, ale richly hto sticking to why I zrobiv everything correctly, but the computer does not start from a flash drive. It’s just necessary to say something else, krіm priority, primus vanity in a row Hard Disk Drives.

- AT Hard Disk Drives set primus launch from a flash drive.
- AT 1st drive choose wearable.
- Tisnemo F10 for savings.
Viyshlo, scho in nalashtuvannya 1st Devise and Hard Disk Drives cost zavantazhuvach USB Flash tobto. we put a priority option, tried it and didn’t work. Then we set the primus launch and everything went well. And so in all bios versions, it didn’t seem to be a priority.


Yak at Award Bios put the flash drives
- Let's go to advanced features.


- Tisnemo First Device, in context menu we put some kind of start-up starter for the computer. We chose the first attachment for launch.

- Hard Disk Priority put the flash drive on the first place. (Yakscho in First Device if you chose to start from the storage device, then you need to install a USB flash drive from Hard Disk Priority).
- Award is ready, press F10 to save it.

Yak at Phoenix Award Bios put flash drives
- Nalashtuvannya Advanced, in a row First boot device we put a flash drive with a different attachment.
- Onslaught F10 for saving.


New UEFI BIOS, in which you can use a bear.
- Row Boot Priority, minyaєmo missions for help pulling the bear. You can robite through the extension settings > Exit/Advanced mode ta vibrati advanced mode.

- Onslaught Boot and selectable in Boot Option #1 zavantazhuvach.

Entering the BIOS and installing the flash drive for installing Windows turned out to be even easier, you just need to change the type of the drive. And remember about the priority and primus zavantazhuvach.
Yakscho download iso image h Windows distribution and navіt correctly write її on DVD disc or create a flash drive for help, tієї Well UltraISO is practically not important to anyone. Then with other stages, without intermediary installation operating system from the disk of a flash drive on a PC, the bagatioh blames problems.
Here are three ways to start installing Windows.
1) the simplest and the most undesirable - if you are already running Windows, open the image through a virtual drive and start the installation, but there are a lot of factors, so you can make and see a pardon for how you are doing such an installation.
2) Insert the flash drive we created into USB sockets or a DVD disc with Windows for your drive is not important what version, chi windows 7, chi windows 10, want win95. Tse pratsyuє all. Potim when the PC is turned on BOOT menu, tse list with noses, for which it is necessary to get interested, we choose the one we need and press ENTER. A report on how to install Windows through the BOOT menu can be read here.
3) Vіdrіznyаєєєєєєєєєєєє 2 way tіlki tim, scho mi vyazuєmo those why we want to get involved not through the boot menu, but in the BIOS of our attachment.
In these articles, we will talk about how to install windows from flash drives through bios or Windows takeover 7 from the BIOS flash drive.
Capturing Windows 7 from a BIOS flash drive
Installing Windows from a USB flash drive via BIOS starts with a BIOS menu click, otherwise it’s called Setup, it’s usually better to use the Delete button as soon as the laptop is turned on or the computer, don’t push the docks blue screen For example, the text, but also if you need to press another button, either F2 or F10 or Esc. You can try all the options until you get the desired result, or you can read the text like "Press DEL to run Setup We should not talk about those things that you need to use in the BIOS and click on DEL.
And so after that, as we spent in the BIOS SETUP UTILITY, we look at the Boot tab and for the additional arrows, go there. We need a row of Boot device Priority
Here the logic is simple; To be the first to take advantage of the top of the list, and so far through the docks the system will not be taken.

And so we choose the first drive in the list for the help of the arrow and press ENTER, we want a list of all possible attachments, from which a computer can be taken.

If we want to select the BIOS via a USB flash drive, then we select USB interface, tse Removable Dev or if the text "USB" is included, or if a USB flash drive is already inserted, then the name of the USB flash drive will be written. If you need to select a DVD drive, then start playing this row with the following lines CDROM: or DVDROM: otherwise it may also be written to the DVD drive.
As soon as you select the choice, then just ENTER and in the same way select another one according to the device, the other behind the list is your hard drive, on which Windows will be installed. If the bios does not download the USB flash drive, then try inserting the USB flash drive into another USB socket and start all the work.
So that all changes are saved from BIOS Setup, it is necessary to go to the Exit tab before the exit and select the Exit & Save Changes row and press ENTER.

If we can Windows bios install via flash drive dvd drive. bios from the blue screen is no longer possible for everyone. In 2017, you can often use the BIOS of the new generation, there is more graphically thought out, there are pictures and icons for an intelligent association, which is not strong in English, so do not have mercy. Ale, it’s true, all the similarities have been fixed.
Respect!- after our changes in the BIOS, now the computer will start booting from a USB flash drive, then from a hard disk, it is important when installing Windows after the first stage of installation, if the laptop or PC is rebooted, IT IS NECESSARY Vityagnut disk from DVD-roma. Otherwise, the first stage of the installation can be repeated indefinitely.
Now we know how to update the bios and install windows from a flash drive. І mayuchi with your own zavantazhuvalnu flash drive with WINDOWS rank 7 or 10 we can install it without any problems or reinstall the OS on any add-on.


