How to connect and fix a Wi-Fi router? Pokrokov's instruction for all models. How to connect the wireless internet through a wifi router
Have a nice day.
In order to be at home, you can organize a wireless Wi-Fi network and give access to the Internet mobile outbuildings(laptops, tablets, phones, etc.) - a router is required (about this already, you can find a lot of messages in the course). It’s true, not everyone dares to independently connect yoga and make it…
It’s true that it’s the strength of the greater (I don’t take the blame for the respect, if the Internet provider creates such a “no” with its parameters for accessing the Internet…). I’ll try the testimonials for everything in my article food parts, yakі chuv (i feel) when connected and nalashtuvannі wifi router a. Otzhe, let’s…
1) What kind of router do I need, how do I choose?
Maybe, first of all, you can set up coristuvachi, if you want to organize a Wi-Fi network at home. I’d like to start a power supply for a simple and important moment: what services do your Internet provider (IP-telephony or Internet TV service) provide? a protocol for connecting to the Internet (for example, at the same time popular: PPTP, PPPoE, L2PT).
Tobto. the functions of the router begin to work on their own ... But in the end, this topic is great, so I recommend that you familiarize yourself with one of my articles:

search and vibrate router for home -
2) How to connect the router to the computer?
As a rule, in the configuration, directly to the router itself, there is a living block and a tie-down cable for connecting to a PC (div. Fig. 1).
Before speech, respect respect, that on the back wall of the router there is a socket for connection mesh cable: one WAN port and 4 LAN ( The number of ports to be deposited according to the router model. The widest home routers have a configuration, like in fig. 2).
Rice. 2. Typical view of the router behind (TP Link).
Internet cable from provider (whichever is earlier, better for everything, before mesh cards PC) must be connected to the blue port of the router (WAN).
And with the cable that comes with the router, you need to connect the computer's network card (where the provider's Internet cable was connected earlier) to one of the LAN ports of the router (div. Fig. 2 - red port). Before speech, in such a way it is possible to connect more computers.
Important moment! If you don't have a computer, you can connect the router's LAN port with a laptop (netbook) with a wired LAN cable. Right in that on the cob It is better (and in some cases, otherwise it is impossible) to use a router on a wired connection. After that, how to enter all the main parameters (set up a wireless Wi-Fi connection) - then the cable can be plugged into a laptop, and then used via Wi-Fi.
As a rule, the connection of cables and power supply blocks are not to blame. Please note that your attachments are connected, and lightly start blinking at the new one :).
3) How to get into the setup of the router?
Singing, ce є the key nutrition of the article. Most of all, it's easy to try to do it, but sometimes ... Let's take a look at the whole process in order.
For locks, the skin model of the router has its own address for entering the setup (as well as a login and password). Most of the vipadkiv wines are the same: http://192.168.1.1/ True, є blames. I'll show you some models:
- Asus - http://192.168.1.1 (Login: admin, Password: admin (or empty field));
- ZyXEL Keenetic - http://192.168.1.1 (Login: admin, Password: 1234);
- D-LINK - http://192.168.0.1 (Login: admin, Password: admin);
- TRENDnet - http://192.168.10.1 (Login: admin, Password: admin).
Important moment! It’s impossible to say for 100% exactly what the address, password and login will be at your attachment (navit without regard to my brand). Ale, in the documentation to your router, this information is indicated on the language (more for everything, on the first or on the other side of the instruction manual).
Rice. 3. Entering a login and a password to access the router settings.
For quiet, who did not dare to get into the router setup, it’s not bad article with various reasons (why this could happen). I recommend speeding up in ranks, posting on the article below.

How to enter 192.168.1.1? Why not go, the main reasons -
How to enter the Wi-Fi router setup (pokrokovo)
4) How to set up an Internet connection in a Wi-Fi router
First of all, write down these chi іnshі nalashtuvannya, next add a small wine:
- First - Navit routers from one model range can be with different firmware ( different versions). Vіd firmware to lay down the settings menu, tobto. those who will help you if you go for the address to fix (192.168.1.1). Also, the type of firmware is to be deposited and the language is installed. In my butt below, I will show the adjustment of the popular router model - TP-Link TL-WR740N (adaptation on English But it’s not so easy to get into them. I understood, my Russian language is simpler).
- The router settings will be stored in the organization of the network with your Internet provider. To set up a router, you need connection information (login, password, IP addresses, type of connection, etc.), as a rule, everything that is needed is included in the Internet connection agreement.
- 3 more reasons - cannot be given universal instructions, which will go to all the fluctuations of life.
From different Internet providers different type connection, for example, Megaline, ID-Net, TTK, MTS and in. PPPoE connection wins (I would call it the most popular). Until then, it’s safe for you to see swidkіst.
When connecting PPPoE to access the Internet, you need to know the password and login. Others (like, for example, at MTS) win PPPoE + Static Local: access to the Internet will be set, after entering the password to the login for access, the local network will be set up perfectly - will be needed: IP-addresses, mask, gateway.
Necessary adjustments (for example, PPPoE, div. small 4):
- It is necessary to enter "Network/WAN";
- WAN Connection Type - specify the type of connection, to this particular type PPPoE;
- PPPoE Connection: Username - enter a login to access the Internet (assigned to your agreement with an Internet provider);
- PPPoE Connection: Password - password (similar);
- Secondary Connection - either nothing is indicated here (Disabled), or, for example, like MTS - it is possible to indicate Static IP (deposit according to the organization of your company). Ring out, this point has been added to the access to local lines your internet provider. If you don’t need it, you can especially not worry;
- Connect on Demand - set up the Internet connection for the need, for example, as if you were back to the Internet browser and ask the side on the Internet. Before speech, respect, that the column below Max idle Time is an hour after a router (such as idle time) will be connected to the Internet.
- Connect Automatically - connect to the Internet automatically. In my opinion, the optimal parameter should be chosen.
- Connect Manually - manually connect to the Internet (non-manually ...). Wanting to deakim koristuvachs, for example, like traffic, what is limited - as much as possible, what Danish type be optimal, allowing them to control the traffic limit and not go into the red.

Rice. 4. Set up PPPoE connection (MTS, TTK etc.)
Also, turn your attention to the Advanced tab (extensions) - in it you can set DNS (they are sometimes necessary).

Rice. 5. Advanced tab for TP Link routers
Another one important moment - many ISPs bind your marshaled card to the MAC address and do not allow access to the Internet, as the MAC address has changed ( approx. in the skin to pay your unique MAC address).
Modern routers can easily mimic the MAC address. For whom you need to open a tab Network/MAC Clone and press the button Clone MAC Address.
So, as an option, you can tell your new MAC address to the Internet provider, and they will unblock it.
Note. MAC addresses are approximately the following row: 94-0C-6D-4B-99-2F (div. in Fig. 6).

Rice. 6. MAC addresses
Before speech, for example, " Billine» the type of order is not PPPoE, a L2TP. By itself, the installation is carried out in a similar manner, but with some kind of guards:
- Wan Connection Type - the type of connection you need to select L2TP;
- Username, Password - enter data, as if giving you an Internet provider;
- Server IP-address - tp.internet.beeline.ru;
- save the upgrade (the router is guilty of re-vantaging).

Rice. 7. L2TP setup for Billine.
Note. Well, after the introductions, you have installed and reset the router (you have entered everything correctly, you have entered the same data, you need it), you have a laptop (computer), which you have connected via a wire cable - the Internet may appear! Yakscho tse so - lost on the right for the malim, fix the Wi-Fi without a dart net. At the offensive krotsі tse i zrobimo.
5) How to fix a wireless Wi-Fi network in a router
Nashtuvannya drotovnogo Wi-Fi Merezhi, for most of the options, enter before entering the name of the password to access it. I’ll show you the same router as a butt (it’s true, I’ll take the Russian firmware, to show both the Russian and English versions).
On the fly you need to split the Wireless ( bezdrotovy merezha), Div. Rice. 8. Next, set the following settings:
- Im'ya merezhi - that name, how you will be bachiti when asking for that connection to Wi-Fi merezhi (specify be-yak);
- Region - you can enter "Russia". Before speech, rich routers have no such parameter;
- Channel Width, Channel- you can leave the Auto and do not change anything;
- Save installations.

Rice. eight. Wi-Fi setup wireless network in TP Link routers.
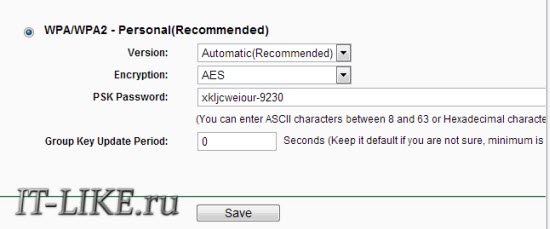
Dali it is necessary to open the tab " Defender of the dartless mesh“. If someone underestimates this moment, and if you don’t protect the border with a password, then all your judges will be able to earn money, by the same token, reducing your security of the border.
- Version: you can not change it and disable it automatically;
- Encryption: the same way, more automatically;
- PSK password - this is the password for accessing the Wi-Fi merezhі. I recommend that you say something like that, which is important to pick up with a great enumeration, or you guessed it smartly (nі 12345678!).

Rice. 9. Setting the type of encryption (security).
If you save money, that resetting of the router is yours wireless wifi merezha can often be practiced. Now you can set up connections on laptops, phones and other outbuildings.
6) How to connect a laptop to a wireless Wi-Fi network
As a rule, if the router is correctly configured, problems with the configuration and access to the media in Windows are not to blame. And fight for such a connection for a couple of whilins, no more.
Click the bear on the back wifi icon the third one had a handbook from a year old. In the list of known Wi-Fi networks, choose your own and enter a password for the connection (div. small. 10).
Rice. ten. Select Wi-Fi mesh for connecting a laptop.
If you have entered the password correctly before the security - the laptop will set up a call and you will be able to access the Internet more often. Vlasne, on which the lashing is completed. For those who don't have a dream, I'll put a little slug on typical problems below.

The laptop does not connect to Wi-Fi (do not know the wireless network, there are no available connections) -

Problems with Wi-Fi in Windows 10: Merezha without access to the Internet
Schob home buv bіs wired internet, but the point WiFi access. Actually, there is nothing foldable here, but you need a little respect and, perhaps, the phone of your Internet provider 🙂 The whole process can be divided into three stages: physical connection, setting up a router, and setting up a computer.
Connecting a router to a computer
After you have removed the router from the box, you will need to connect it to your computer or laptop. For zamovchuvannyam, I mother on uvazі, scho you have a great dart internet.

- Remove and screw antennas
- At the port signing the WAN, an Internet cable is inserted. Sound WAN seen in a different color or cost only for other 4 or 8 ports
- The cable that comes with the router is connected with one end to any of the numbered ports of the router (1, 2, 3, 4 ...), and the other end to the Ethernet port of the computer or laptop. Vіn will be needed more for lashing, then you can turn it off.
- Don't forget to turn on life 🙂

How to get into the setup of the router
After turning on the router, it will take you an hour to get busy and put yourself in order. At this hour, the lights on the front panel can be switched on and off, check 1 credit. To go to the admin panel of the router, you need to write in the address bar of the browser:
192.168.1.1
login: admin
password: admin

A small note: addresses 192.168.1.1 win with most routers. If you accept the pardon “Storinka not found” or “Storinka not found”, try to find your address, for example: 192.168.0.1
Like a new pardon, look at the correct address on the sticker on the side of the gate I will add:

There is nothing there, you just need to look at the instructions, as you can be on a complete disk, or search the Internet with your phone. Those same stosuetsya login (username) and password (password) tobto. not all stink admin/admin. If used, it is possible to change the parameters for locking. I need it here. For whom it is necessary to know the “Reset” button on the router and press the button in the middle with a siren.
Merezhevy cable not connected
Let's assume that the login address and login / password are entered, but all the same, do not go to the admin panel, enter through the mercy seat. To do this, you need to change the merging card for Windows 7/8/10:
- We go "Start -> Control Panel -> Merezha and the Internet -> Control Center for Merezha and Global Access"
- Zlіva know "Changing adapter parameters"
- The “Connection through a local tie” connection CANNOT have the status “Cable tie not connected”:

Yakshcho tse, then shvidshe for everything rich in tsomu, tobto. the cable is not connected, it is not connected there, or it is wrong.
Also, the status is not to blame, but "Enabled". If this is the case, then right-click on the icon and select "Enable".
Wrong TCP/IP settings
All the same, do not go to the admin panel, then:
- click with the right button after the connection icon and select "Power"
- we know "Internet protocol version 4 (TCP / IPv4)" and click on the new digit
- At the authorities, the protocol needs to be checked so that the checkboxes were on “Opt the IP address automatically” and “Opt the address of the DNS server automatically”
- Click "OK" girls
- Now check for 10 seconds and you can check.

How to quickly set up Wi-Fi
It is more important here, because all routers of different types and interfaces can be heavily damaged. That and nalashtuvannya to the Internet at providers can be razyuche vіdrіznyatisya. What do you have TP link router otherwise shvidkogo nalashtuvannya, then you are lucky, everything may end up too fast 🙂 We know in the menu of evil or the beast the item Quick Setup and follow the instructions of the master:
On the first screen, just embossed "Next"

I have a 3G router, so I suggest choosing the best connection type: 3G or cable. I don't have a 3G modem, so I choose "WAN only"


If you do not know what to choose, try the automatic mode, the router will try to determine the type of connection itself. If in a new mode, then the master will go to the next step, or you may need to enter a login and password (for PPPoE login)

or the installation of a fence (for different connections to the Static IP type)

All this information is your fault to see the provider, respectfully look at the contract. If the master doesn’t go out automatically, then you have to call the provider and power up, or try the tick, options, yak bi, not rich method 🙂
On the next step, the master tells us to turn on the Wi-Fi module:

- "Wireless Radio" - no Wi-Fi, can be set to "Enabled"
- In the Wireless Network Name field, enter whether I will name the point in English
- Parameters: "Channel", "Mode", "Channel Width", "Max Tx Rate" set as it is on the screenshot or leave it out for the lock.
- , safety. Do not block Wi-Fi without a password! Not only that, your Internet will be all around and take over the channel, you will be such a majestic wild in your safety! In fact, someone might be able to access all of your personal data. Set the jumper to the WPA/WPA2 position and enter the folding password.
A small entrance: if everything works, it will show up, if the Internet works too soon, or it will be, then try to choose "Channel" not "Auto", but some kind of number from 1 to 13 and save the upgrade. You can sort through all the numbers at the search for the best one. On the right, in the fact that at once it is already richly possessed, and the skin appendage needs its own channel for work. At the sub-bag, attachment, which work on the same channel, they order one to one.
It’s good that you haven’t found a router and won’t be able to work at a frequency of 5 MHz. And here there will be a viable option for choosing a frequency of 2.4 h 5 MHz. At this frequency, there are fewer outbuildings, and to that the ability, which is important, changes in different ways.
Manual lashing
Well, how about automatic fitting if not, then you have to walk through the points with pens. It is known that "Network" was distributed, and there paragraph 3 with the word "WAN":

Ponni buti are similar points of nalashtuvan. Here, all the same, for automatic setting, only we ourselves can choose the type of Internet connection and enter the login / password.
- Secondary Connection Leave Disabled or Dynamic IP, only needed to access the ISP's internal network.
- Set "Connection Mode" to "Connect Automatically" to have the router connect to the Internet automatically after skin reconnection.
If the provider allows you to specify the IP address of that DNS server, then it is possible to rob it in advanced (Advanced) settings, but you don’t need to call it:
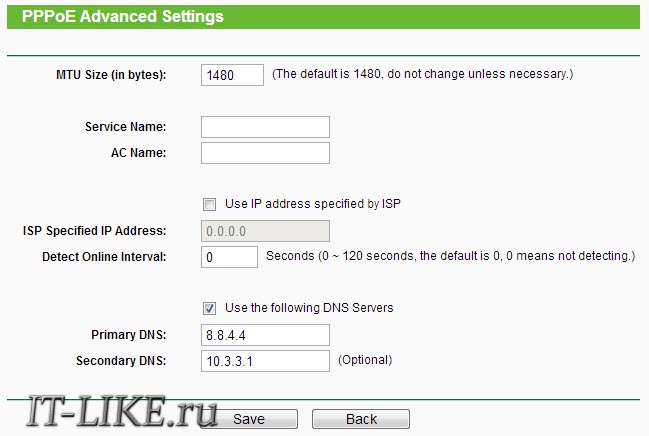
Ale, I have a provider with problematic DNS servers and I will register the Google server: 8.8.4.4 , What a pratsyuє zavzhdi! How does a problematic DNS server appear? Tse if you want the site or, ale Skype or Torrenti work without problems! However, if you install a server on Google, then the internal sites of other providers may not be displayed, for example, so that statistics will be updated.
Same here in manual lashings, you can specify the type of connection - VPN, if you have one. For which one select "L2TP", enter the name / password and the address of the VPN server (given by the provider). If IP-addresses, mask, gateway and DNS are specified - select "Static IP" and enter all data. At the bottom, do not forget to check the box for automatic connection.

That's all, let's take care of the setup and then we'll split the "Wireless Settings" menu (without a dart call):

Mustaches were described above. Schob wi-fi pratsyuvav, guilty stand tick "Enable Wireless Router Radio".
The next point here is to include encryption, tobto. nalashtovuemo bezpeku yak bulo vishche:
Router setup completed! Raju save all parameters from the menu "System Tools -> Backup & Restore". The "Backup" button - saves, "Restore" - restores from the saved file. Tse need to be on the verge of rapt everything to fly to the encore and to get angry with the nalashtuvannya. You can easily recall them from the file 😉
Oh so, without forgetting a little, change the password for the lock to enter the admin panel. Root in the "System tools -> Password" section.
How to connect a laptop to WiFi
For Windows 8/10, you need to click on the icon at the bottom of the screen:

On the right, you can see the panel, where it is necessary to choose the need for a non-dart tread. Remember, who gave us the name of my English measure? The axis of yoga is required to know here. If it's a huge mortgage and you don't know how much to connect, choose be it with a bigger equal signal. Under the hour of guidance on the fence, a hint is displayed, the required password is no. If it is WPA/WPA2 type when hovering, it means that a password is required to connect to the Wi-Fi network.

You can uncheck the "Connect automatically" box. Then the system connects to the router and asks wifi password which we installed earlier. If your device supports QSS technology, you can not enter a password, but simply press a button on the router, signed as “QSS”. With whom the password will be filled in without participation!

When the system is asked about hot access to files, Raju select "Hi, do not turn on sleep access", as you do not know what is required:

I have created a short video tutorial on how to do everything:
In Windows 7 it’s the same, only the icon and in the end with the known borders look like “Semerivsky”

Here you also know you need a connection, click on it and voila.
No Wi-Fi icon or not connected
Back to top, reverse the module dartless sting for the help of a jumper on the laptop case. A lot of Asus, Toshiba, Sony and Acer models can have such a jump. On some laptops, WiFi can be activated for additional hot buttons, for example Fn + F2 (joke the antenna icon on the F1-F12 buttons). Whether there is a way to use the method through the "Measurement Management Center", it's the same, if we "turned on" the merezhny interface for connecting to the router from the door.
Have more important vipadkah vivchit be kind.
I am convinced that everything went well! Shvidshe for everything, the power is blamed for fixing the router, tk. interface and name the parameters for all different. In order to take away the evidence from the comments, add a note to the screen shot of the video.
I live! Today I'll show you how to connect a Wi-Fi router to your booth. Ale, in the simplest way, it’s better from the computer - so it’s not uncommon to win, that one is smarter on the computer, lower the phone. There is no special difference between a computer connected to a computer and a laptop - all the same. Let's get started now.
Shanovskiy chitachu! What is food? Do you know how to solve your problem? Below this article, I can comment - write your story in all details, and I will give you an opinion.
The algorithm for connecting a router, whether it be a model or a model, is the same - you will not have a daily power supply. Other, internal settings of the router, as they change from model to model. For the details of the setup, I recommend searching for the correct article for your router on our site. Tsya article will be about the process of connecting with small contributions to distant ones.
Algorithm
The whole algorithm of interaction with the new router I called before the next steps:
- Installation - roztashovuёmo in the apartment.
- The connection is our article itself, everything is independent.
- Nashtuvannya - entrance to the nalashtuvan, Internet, Wi-Fi, passwords.
And now let's briefly go through the skin stage with an emphasis on the connection process. And for those who don't like to read, cool video by topic:
Installed
Later, you unpacked a new router, the very hour to appoint youma in a booth in a place. Unfortunately, the radius of the router of the surroundings, to that short version according to yoga installation - roztashuvati middle of the apartment:
If you have one room, there are no problems. Ale, even richer - put a router and walk around the apartment with a laptop or a phone, freezing the strength of the signal, so that it screeches. Choose the best point, and there will be less trouble.
Another problem is to fix it so that the provider's cable is instantly available to your router without roaming near the apartment. Ringing when laying the Internet, the maestro can tell you where to extend the wire - to rob it for the best coverage of the signal to the booth. Ale, yakscho already lie down, happen to p_dlashtovuvatsya pіd new.
Dodatkovo can be needed at any stage of the "folding" of the router - often the antennas are turned in, and you need to screw them.
Connection
Axis i approached those of our stats. Let's look at the back panel of the average router in the world:

Give respect to 3 big cities for us:
- LAN ports are seen in blue, ale is often seen and yellow. The key authority is the stench of the signature as LAN, and the sound of their sprats of colors. Ports serve for connection of extensions to a home local measure - a computer or a laptop.
- INTERNET chi WAN port is the outer layer. This is where your ISP's cable comes in. As a rule, there is only one port, and it is seen as a green color (for the most part, the colors are blue, the little ones are selected for contrast).
- Zhivlennya. You don’t tangle with anything, connect the router through the new one to the lifeline. There is more than a button for turning it on, if it won’t, it’s not forgotten to turn it on.
Subsumkova connection scheme:
- Including living
- Connected WAN
- Connectable LAN

Krok 1 - eating
All stages are more simple, no blaming. Turn on the plug at the power socket on the router and connect the adapter itself to the power supply. The redundant lights on the router will light up (sound the lights of life and wifi).

If nothing burns - we reverify the presence of the struma. Maybe they came badly? Right there? And what is the netting filter, like wine? І naytsіkavіshe - can there be another button on the back of the router? Do not forget to include i її.
After this stage, the router can "come to life". Let's get to the next connection.
Croc 2 - provider
If you do not need the Internet on the router, you can skip the Croc. Ale, sing the wines to people as they need them. Remember that for this special nest is WAN or INTERNET. Connect to the same place!
How to connect to the portLAN - there will be no Internet! Ale є vynyatkovі models, where it is acceptable.
After the connection of this dart, one more indicator of the outer border will sound.
Krok 3 - computer
Now we can connect the computer itself (with a hack and a laptop) on the remote. We take a patch cord - the very same tethered cable that comes in the kit with a router (for example, it doesn’t go to the store). One end is built into the LAN port of the router, the other one - into the network card on the computer.
It will not be easy to know - all ports seem to follow the same standard - RJ-45:

Also sound є і on laptops. After the connection on the router, the remaining indicator lights up - LAN network.
How do you have a spratLAN ports - you can connect to any of them. There is no retail.
As a result, the port of the blame was scored approximately as follows:

Have mercy even more importantly. Make sure everything is right the first time. Mustache! Nothing more is required here, and you can proceed to the setting.
The second way to connect to the router is throughWi- fi. We just select ours in the list of active ones, enter the password and that's it. Say the name of the letter and the password, and then write it on the sticker under the bottom.
Nalashtuvannya - even briefly
Why did it hurt? The fact is that the process itself is adjusted from the router to the router. It’s also unreasonable - write in the comments, or rather go to the article about adjusting your router model on our website - everything will be there in detail and with a lot of nuances. Below I give a universal algorithm for all models.
Krok 1 – entrance to the panel
You need to go back to the web configurator. The shortest way- look at the router and on the sticker, look at the current data to enter the login panel, login and password. Looks like this:

It doesn’t help anything, we go after the coming messages, one of them may appear when you enter the login and password:
192.168.0.1
192.168.1.1
Login and password look at the same sticker, but sound the standard stink a little adminі admin.
Krok 2 - fixing the Internet
And here great differences begin. How did you spend at the configuration, joke the master of the nailing. I'll guide you through the cracks and fix everything myself. What is important here is to know the agreement with your provider, where to go login and password to the Internet itself. The process of fixing them will happen to be driven in here. As a result, the router can connect to the Internet.
Krok 3 - Wi-Fi setup
As if you are being mastered by the master, you will go through this stage. The headline here is to install the name of your Wi-Fi network - to make it clear for yourself. And it's even more important - remember the password until the rootless network, so that you can't connect to the connection.
Krok 4 - router password
For example, it’s important not to forget to change the password for the router itself (well, which is the same for all admin) - so we will save our apartment from the foreign intrusion of evil hackers, and we will live happily ever after.
From i all! You can’t see anything more here. You need to look at the details already directly under your model, or just put the power in the comments below. Obov'yazkovo vіdpovimo!
Presented on the Russian electronics market today wide choice Wi-Fi-router according to various vendors. However, after the purchase of a technical outbuilding, in front of the helper, you may be blamed for poor nutrition. One of them is the order of the correct connection of the attached router.
Deyakі pokuptsi vіdrazu vіdrazu let yourself be freed from potential hardships and turn to fakhіvtsіv, scho pulling for themselves additional material vitrati. Such a pidhіd is not zvsіm obgruntovaniya, so it's really easy to connect a wi-fi router independently.
Depending on the model I will add (TP-Link, Zyxel Keenetic, MikroTik, NETGEAR, etc.), the process of introducing the router into the robot can be slightly different.

Tim is not less, he uses a universal algorithm, dorimuyuchisya what you can fix any router:
- Connecting wires and installing a wireless router. Unpack the bag in the store electronic attachment, depending on the location of your installation, as well as connect the power adapter and other cables required for power supply wireless internet connection.
- Enter until software security that zdіysnennya nalashtuvannya merezhevoyї card. Having checked with the one that everything is properly connected, you should open the panel of the router and set up individual parameters for your network.
- Improving the proper functioning of the fence. At this stage, you need to connect to the services of your Internet provider. For whom it is necessary to enter data for access to the Internet.
- Nashtuvannya bezdrotovoy merezhi. The final step is to transfer the choice of the type of Internet connection, the creation of an access point of the wireless network, the introduction and the name of the password.
Dovidka! May you know that the router has not been fixed in the future in the presence of the provider of Internet services (, Domolink, Dom.ru, Beeline, etc.).

For a complete review of the scheme of an independent connection of a Wi-Fi router, you need to look at the skin from the above described paragraphs and the report.
I will probably build a place for roztashuvannya
The router is placed in the central part of the room or on one of the wardrobes (closer to the center). An access point, which is located on a high level, transmits a signal more quickly and covers a large area of the territory.

Important! Give respect to the fact that the installation of a Wi-Fi router is charged with mirrors, causing negative consequences for your work. The surfaces that reflect the light block the signals without darts, and the radio waves cannot be spread out in a proper manner. This is the rule of electrical engineering, as it can be stronger in the development of electromagnets (micro-furnaces, refrigerators, radios, etc.).
For the obviousness of the large area, it is reasonable to set up two access points in the local mode and cover the entire territory of the dartless fence. On the skin attachment, the attachment is attached to the wall, which is why it is not guilty to lay down special difficulties.
Connecting the router cables in the correct order
In the package for the router, there is a note about the picker I will add, so as to avenge the rules of how to fix it. Remove all accessories from the Wi-Fi router box and follow the instructions:

- Take lace adapter router, connect it to one of the sockets of the router and insert it into the socket. I will build the main part of the building, it is recognized for the living of the technique in the yard of the snake stream. After the first crack on the front part of the router, the indicator of life is to come at the vmkneniy stan and zablimati.

- Connect the supplier's Ethernet cable to WAN port that sounds like a blue color. Through this port, the router connects from the outer global network.

- Included in the kit is a tethered cable LAN port, for technical annex maє buti sprat. Sound їх 4 or more, and the stinks are signed by the phrases "Home merezha".

- If you have a PC or a laptop, the patch cord is connected on one side to the LAN port of the router, and the other side is connected to the Ethernet socket you have chosen.

Even if you can’t move the PC, you can still install it through the tablet or mobile phone. Golovnya, that such outbuildings could be connected to the dartless merezha.

The very process of adjusting the router from the smartphone may not be affected by anything from the adjusting from the computer, so you can figure out all the nuances, having checked the lower points:

On this note, all the details will be ready for the introduction of the Wi-Fi router into the robot. Lose less control over the deaky parameters in the web-interface and the third-party card of your device.
Tie chart setup
Vіdomі vipadki, if with the correct setting of the wireless Internet connection, the coristuvach is still sticking intermittently in yoga robots. One of the reasons for such a phenomenon can be recognized as standard fittings measure cards. To fix or identify potential problems, you need:
- Open the keruvannya panel through the Start menu.

- Go to the center, which violates the current order of the functioning of the city - "Center for Management ...".

- Expand the option "Change parameters ...".

- Vіdkriti power mesh connection, having right-clicked the bear on the end of the connection, select the next row.
- Click on Protocol 4 (TCP/IPv4) to expand the authority.

- At the depositors of Zagalni, have the data withdrawn in automatic mode.

Set more parameters for routers in 99% of routers. Now your personal computer otherwise, the laptop will take into account the IP-address, so as to relieve the trouble-free network in the event of additional problems.
Note! This way you can also win as a twist in that case, as your Wi-Fi is no longer working. Otherwise, software security or viruses could make changes to the parameters of the card.
Login to the web interface of the router
Blimannya WLAN and LAN indicators on your attached add-on to tell about those that the router works in the help mode and is ready to go further.
Let's step on the step to enter the site from the installations. You can use it through a browser on your phone or computer, by entering a different combination of symbols address row. This information is located on the router case.


Also, for all models of routers, there is a universal address, for which you can get to the link: 192.168.1.1. chi 192.168.0.1.
In this way, at this stage, the advancing algorithm is completed:

You can go to the side of the detailing of your router, which will tell you about the transition to the next stage of introducing the router into the robot.

The cob of the robot with the patches of the router
On the side of the special web utility, you need to configure the connection to the Internet and the Wi-Fi network.
The list of headings of the practical skin router has the titles of “Master of the Swiddy Nailing”. In English, a similar function is called Quick Setup. A number of picks are fixed as an option in the same place at the pickup panel. For help, you can set up a router, which works without interruption, sparing at this hour.

It is better to indicate basic information about your measure: country, city / region, provider of Internet services, type WAN connection and etc.
Note! All data will be specified in the contract with the provider that will supply you with the Internet.

After this moment, proceed to the detailed setting of the Internet, which will mark you the rest of the year for wireless moving router.
Wi-Fi home improvement
In the first place, the koristuvach is guilty of recognition, which type of WAN is a victorious internet provider. Such information is assigned to the agreement on the provision of services. As it is in the official documents, you can contact the call center of the postal manager of the Internet services.
On this day, the following types of Internet access are available:

With a dynamically recognized yard building identifier (DHCP), the Internet is liable to charge the next time the connection is made to the new one. Tse obumovlyuetsya tim, that on all routers the type of connection is set automatically.
Other types of WAN connection PPPoE, L2TP, PPTP, or static IP may affect a number of additional parameters:

At this stage, a wireless Internet connection was connected. I lost only to install the identifying parameters of my Wi-Fi, and independent self-improvement router is completed.
All fahіvtsі, schob niknut evil, recommend changing the name of the security and the standard password, which is fixed on the packaging of the add-on.

Important! Don't forget to save your installation time. Now your hotspot will be changed, and enter a different password, which is the best place to write it down. Do not forget about tse at the first connection to the border, so that you can change the connection, which was successfully completed.
Visnovok
In such a rank, independent adjustment of the routers is completely fixed. For whom is it not necessary for a mother to have special knowledge in the field computer technology. It is enough to learn the basic rules of computer literacy (login to a web browser; entering a combination of symbols into the address bar, etc.).
All models of routers are considered for the price segment and characteristics, however, similar principles of work can be improved. Become a virobnik, which you have become worthy of, and become the master of a root-free Internet connection in any place.
Video - How to install and set up a Wi-Fi router
Reveal current computer, a smartphone or a tablet without the Internet is very convenient. Oskіlki kіlkіst pristroїv, yakі vimagayut bіs wired connection before All-Sveta cobweb, zbіlshuєtsya with skin rock, docіlno podbat about zruchnіst and connect Wi-Fi router. It is not important for you to connect your own booth to secure wireless access to the Internet.
Choose the best place for enjoyment
Before that, connect a Wi-Fi router at the apartment, you need to appoint a job at the apartment for a house. At this stage, pay attention to the following characteristics of the host:
- Life planning
- Raztashuvannya to the modem of the postal manager of services or cables
- Place of roztashuvannya stationary computer (for evidence)
Fallow in the form of an obladnannya, wireless router may mother low speed of transmission of data. Also different models the covered area can be resurfaced. Everything is necessary to be protected when choosing a place near the apartment, where the house is, where the distribution of accessories is transferred. At a specific point of view optimal solutions become the location of the router at the central part of the location. If it is necessary to install an attachment closer to the computer for connecting with a cable, take this task as a priority.

The signal at the appointment behind the crossbar will appear significantly higher, lower in front of it. Do not varto fix the possession, do not sing like a signal at the various little corners of the apartment or a booth. As in different places, the quality of the signal is commemoratively revisited, dotally once again best place for the location of the router. When choosing a place for the placement of the varto router, take materials to the point of respect, from such viconan walls: chains, expanded clay blocks, foam concrete and aerated concrete and other materials can override the signal.
Video - Pokrokove connection:
Connecting a router to a computer (laptop)
Connecting Wi-Fi at the apartment to the computer is not easy. Koristuvach may be more difficult at the stage of getting better. Below we can see how to correctly connect the computer behind the additional wireless tether, as well as behind the additional tether cable. Varto indicate that the procedure for a laptop with a laptop will be identical.
Important to know! Before that, how to buy a possession, keep in mind that the current market is promoting purchases of router models without distribution of Wi-Fi. Such an extension plays the role of a kind of adapter.
Nasampered, it is necessary to come to the darts until possessed. At this stage, there are no special procedural peculiarities, the shards of the main gravitation market are allowed to have the same connection scheme.
We will guide the sequence of connections between the router and the computer:
- It is necessary to unpack the accessory on the back, after which plug the cable into the socket. Rear panel Attach the power button often, as it is necessary to press it. Light bulbs burned out - you zrobili everything correctly
- At the back, I will nest the nests. From the edge we need to know the nest (maє zhovte or blue zabarvlennya) and is marked with the inscription WAN. Connect at the nest wire, which is in the possession. Yakshcho robite everything correctly, is guilty of a slightly characteristic clatter
- It is necessary to connect a cable to the computer, it is necessary to insert yoga into an empty socket, roztashovane instructions. Let's stretch the cable to the computer's memory card, then connect it to the water jack. In times correct diy the sweetie is to blame, which is the signal indicator
- Yakshcho tsіkavit dartless method router connection, you need to go to the computer setup

Connecting the dart Internet is clumsy, so just like getting jetless access to the measure.
Wireless router connection
3 laptop connections up to wireless Internet it’s not the fault of the blame for the hardships of that spurious diet, and you, better for everything, go out of your way to reach the best result for the first time. The laptop is equipped with a built-in module that serves to receive a signal from a Wi-Fi router. At the time of connection of a stationary computer, the necessary addendum is the purchase of an adapter for access to the merezhі. At the store, you can get two types of adapters for computers - external and internal. The first option is to transfer the switch to a USB cable. Attachment is placed on the table. Internal adapters for mounting on motherboard for help PCI socket.
After two types of building good functioning, other adapters can be plugged in and plugged in to another accessory. The internal adapter provides plenty of space on the table. I will build a set to remove the driver and software security. After the completion of the procedure for connecting to a computer, the attachment will be installed similarly to a laptop. To connect the computer to the device, you need to know the type of connection from the requested list, and then enter the password. With the first connection, the possession may be able to show you the installations given by the postal worker.
Vita pair and installed installation
Can you connect a router to a desktop computer? It made sense, yes! Previously, there was only one way available to the coristuvachas, which was the transfer of the vikoristan cord. More possibilities have now become available, for the help of which it is possible to connect a computer to the Internet and a TV set to cable channels. And yet, what is needed for connecting a computer to a router behind an auxiliary cable? Let's induce the algorithm diy:
- At the same time, you need to send the service manager to the router, for which the WAN socket is used
- The cord is plugged into one of the LAN sockets
- The Ethernet port is connected to the last end of the cord
- light bulb, what works, indicator of the presence of the connection

Router not connecting
After the end of the meeting, it may be possible that the connection with the Internet is daily (with a signal of a wired connection). As if the threadless lace is not transmitting data, the prote looks at the turn of the switch, turn off the power socket, after which you pick up a sprat of whilin and turn on the equipment.
Video - Connection from A to Z:
Even so, the changes in the task did not help, it is necessary to reverse the adjustment. Press with the right button on the z'ednanny and select the division "Center for merezha". Dali click on the image of the connection, go to the "Advice" tab. DNS or IP representation empty fields? The problem lies with them. Return to the center of the provider's technical support and ask for the information to make changes.


